I recently updated to NDepend 4. I got an
early preview of the sweetness that is CQLinq (code query using LINQ
syntax) so I couldn’t wait to
dive into the full deal.
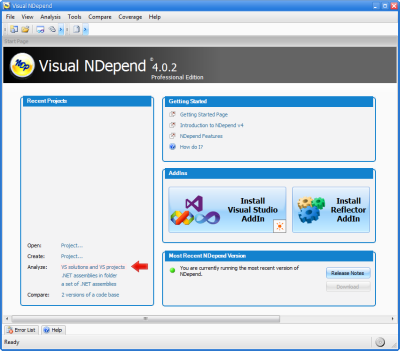
For new users of NDepend, the “getting started” part of things isn’t
too different from NDepend 3 - same download/unzip/run xcopy-style
installer, same UI, same super-robust reporting. I wrote a good entry
on getting started with NDepend 3 and most of that still applies here so
I won’t rehash
it.
For existing users of NDepend, CQLinq is really the big deal in this
latest release. That alone is really worth the price of admission. But
there are also some other cool things in there. Let’s take a look.
First, CQLinq. If you’ve written code queries in the old SQL style of
syntax, you’ll love the new LINQ style.
Let’s say you want to find all the methods that start with “To” in your
project (like “ToString()” or “ToDecimal()”). The old SQL style query
looks like this:
SELECT METHODS WHERE NameLike "^To.*"
The new CQLinq looks like this:
from m in Methods where m.NameLike("^To.*") select m
Or you can use the extension method style of LINQ syntax if you like
that better (which I do):
Methods.Where(m => m.NameLike("^To.*"))
In this simple example it may not be too clear what the power is. But if
you look at the result set, you see both your methods and methods from
the framework assemblies you referenced. Let’s work in another of the
features of NDepend - analyzing “JustMyCode”:
JustMyCode.Methods.Where(m => m.NameLike("^To.*"))
Now the result set is just the methods from your code. Oh, but that
includes some crazy ToString methods that the compiler generated. Let’s
remove those, too, and maybe even order the result set for easier
reading.
JustMyCode.Methods.Where(m => m.NameLike("^To.*") && !m.IsGeneratedByCompiler).OrderBy(m => m.Name).Select(m => m)
The results of the query look like this:
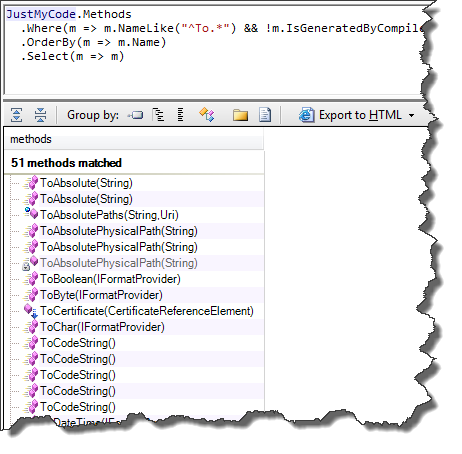
Now, that’s pretty sweet.
All of the base queries have been rewritten in CQLinq so you can really
see some great uses. Here’s the built-in query that checks to see if
your constructor is calling any virtual methods:
warnif count > 0
from t in Application.Types where
   t.IsClass &&
  !t.IsGeneratedByCompiler &&
  !t.IsSealed

from ctor in t.Constructors
let virtualMethodsCalled = from mCalled in ctor.MethodsCalled
                           where mCalled.IsVirtual &&
                                (mCalled.ParentType == t ||
                                 t.DeriveFrom(mCalled.ParentType))
                           select mCalled
where virtualMethodsCalled.Count() > 0

select new { ctor ,
             virtualMethodsCalled,
             t.DerivedTypes }
You can really dig into your code like this. I find this way easier
to use than the previous SQL-style syntax.
Now here’s the bit that sort of blows me away:
You can use this API to write your own custom analysis tools.
This is also a new thing with the 4.0 version of NDepend. NDepend comes
with a bunch of sample applications that show you how to use the NDepend
API. There’s also plenty of online
documentation. I will warn
you, this isn’t for the faint of heart. If you’ve ever written a custom
FxCop rule, it looks to be roughly that level of complexity. The trouble
isn’t in running the CQLinq to get your analysis results - that’s the
easy part. The complexity is in getting the analysis results in the
first place. You’ll most likely want to make heavy use of the sample
code and “borrow” from it when making your own tools.
Once you build the sample app, you get a console app with some
old-school console menus that show you different options.

I thought I’d try the duplicate code detector. Here’s the output running
it on one of my projects (I had to blur a few things out, but you get
the idea):
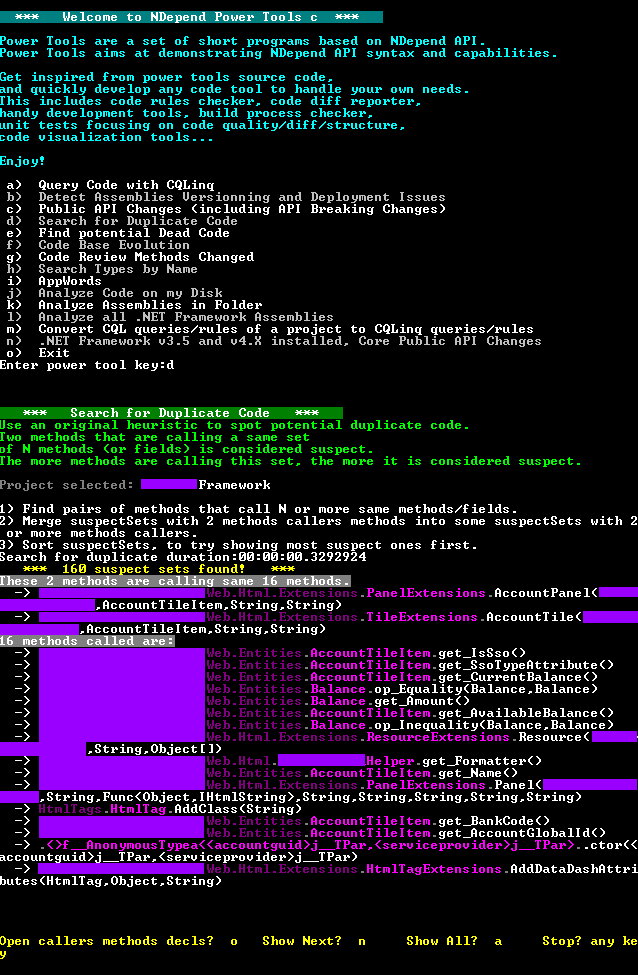
Not pretty, but you can see the power there. You could do all sorts of
things with that - Visual Studio add-ins, PowerShell scripts for
analyzing across solutions… all sorts of ideas. (Keep in mind that
with CQL and CQLinq you can basically replace FxCop rules with queries.
Using the API is primarily for more in-depth analysis tools. My point in
saying the relative difficulty is around the difficulty of writing for
FxCop is that with FxCop there’s a lot of interesting custom stuff you
have to learn to wire things up - the object hierarchy, the way you get
analysis results, the way you insert yourself into the process, etc. It
appears there is roughly that level of learning to be done to write a
power tool using NDepend.API. That said, if you’re just interested in
doing analysis and querying… you can just write CQLinq pretty easily
inside NDepend and skip the API part.)
With the power of CQL and CQLinq comes a little bit of a learning
curve in the form of some hard-to-diagnose gotchas when things aren’t
finding what you expect. I found a couple while crafting the above
example query:
- You have to add a Select after an OrderBy or you get an error.
Notice in that last example query I order the list of methods by
name. In standard LINQ, you order it and you’re done. In CQLinq, you
get an error telling you that you need a Select after that. So…
add a Select and you get the ordered list as you expect.
- IsGeneratedByCompiler doesn’t mean “has the
CompilerGeneratedAttribute.” If your application has, say, some
generated web proxy classes or some things that have the
[CompilerGenerated]
attribute
on them, you won’t find them by using the IsGeneratedByCompiler
predicate. IsGeneratedByCompiler only finds things that really were
generated by the
compiler
- iterators, anonymous methods, that sort of thing.
Learning about NDepend takes effort. It’s not something you’ll just
“figure out” without watching the videos or reading the docs. And
there’s a lot of documentation. And a lot of videos. It’s thick, it’s
technical, and it’s hard to get through. In some cases, the
language/phrasing of the documentation belies that the author isn’t a
native English speaker, which makes it sometimes a bit harder to parse
for a native speaker like myself. Stick with it, though. It’s worth the
effort, especially if you’re working on a larger enterprise project.
Not only is it a great way to learn about NDepend, it also helps you
learn about good code quality and metrics used to analyze code.
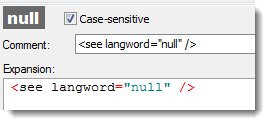
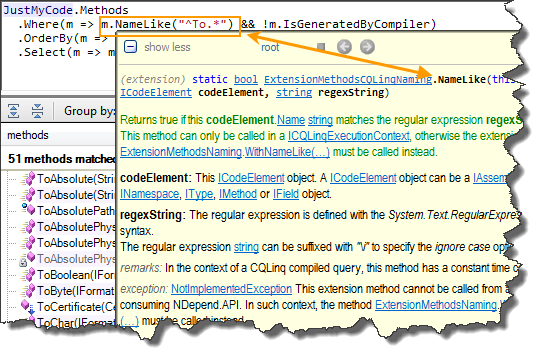
Speaking of doc, you can find it everywhere. Even in tooltips. Hover
over a part of a CQLinq query and you get doc for that element:
NDepend support is really good. I think
Patrick does it all by
himself, so when you ask a question, you get an answer straight from the
source. We worked through a recent weird
issue
and resolved it almost in real-time.
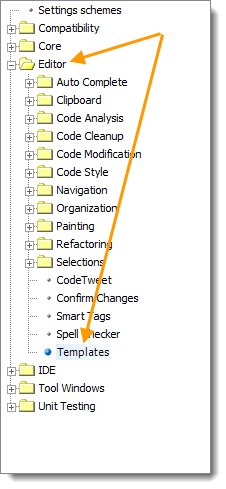
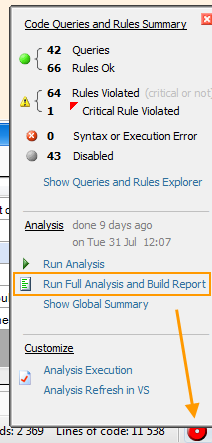
The UI continues to be a little confusing. Each version gets better,
guiding you to steps like “what to do next,” and given the robustness
and complexity of what NDepend is doing I don’t know how I’d do it
better… but there are still little things that get me. For example, I
updated the location of analysis report output and wanted to re-run the
report, but couldn’t find the option to do that. It turns out the
ability to re-run the analysis isn’t in the Analysis menu - it’s behind
this little button in the bottom right corner of the window.
IntelliSense in the query window can sometimes be frustrating. Maybe
I type too fast, but I find that sometimes it autocompletes when I
didn’t want it to, or the cursor “jumps around” as I backspace. This
isn’t new in 4.0 and I can’t consistently reproduce it.
The mouse scroll wheel doesn’t do what you think it does. Normally
in a window with a scroll bar, scrolling the mouse wheel will scroll the
window up and down. Zoom is usually done by holding Ctrl and scrolling.
In the Dependency Matrix view the mouse wheel zooms without holding Ctrl
(even though there’s a scroll bar and I generally want to scroll more
than I want to zoom in that window). In other views, the mouse wheel
does nothing - even if there is both zoom and scroll available.
Definitely takes some getting used to.
My NUMBER ONE problem with NDepend, though, persists to this day: You
STILL can’t use environment variables in framework folder paths. For
example, I may have Windows installed on my C:\ drive but moved Program
Files to D:\. If I set up an NDepend project on that machine, I won’t
be able to use it as part of my build because the build server doesn’t
have the same setup. I’ve reported this to NDepend support, so they’re
aware, but it’s still never been fixed. It’s a small thing, but in an
environment where you truly need NDepend - a large, enterprise shop with
build server farms and lots of developers and architects - this is a
huge oversight.
Despite all that,NDepend is a totally valuable
tool. If you think your code is good now,
run it through NDepend and dig in. You can make your good code
great.
Full disclosure: I got a free personal license from
Patrick at NDepend. However,
we have also purchased several licenses at work and make use of it to
great benefit.
UPDATE: After the initial posting of this article, I got some
answers on how to do some of the things I was stuck on, so I added that
info.