
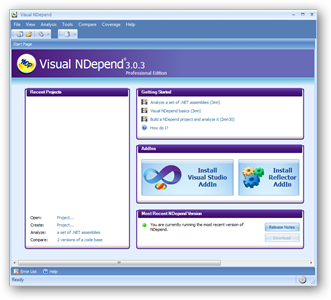
Getting Started with NDepend 3
I was fortunate enough to get my hands on a license for NDepend 3 so I decided to take it for a spin. I’d had some experience with NDepend 2 and thought it would be interesting to see the new, cool stuff.
Install is still reasonably easy. It’s still just a zip file - unzip, drop your license XML file in the folder along with the application, and you’re up and running. That said, one of the things that’s changed since I last wrote about NDepend is that my development environment is as a non-admin user on Windows Server 2008 R2 with the User Account Control turned on. In that scenario, it’s not quite as simple as unzip and go if you want to put the application in the Program Files folder as is recommended. The steps I had to go through:
- Unzip the program to a folder on my desktop.
- Copy my license XML file into that folder.
- Use the streams tool from Sysinternals to unblock all the files.
- Copy the folder from my desktop to the Program Files folder. (This will ask for admin credentials.)
- Create a folder at C:\ProgramData\Microsoft\Windows\Start Menu\Programs\NDepend so I can have a shortcut to the program in the Start Menu. (This will ask for admin credentials.)
- Create a shortcut to VisualNDepend.exe on my desktop (because you can’t create a shortcut directly in the Start Menu).
- Move the shortcut from the desktop to the folder I created in the Start Menu. (This will ask for admin credentials.)
So, not insurmountable, but more than a single step. It would be nice if there was an actual installer that did all this for me in a future version of NDepend.
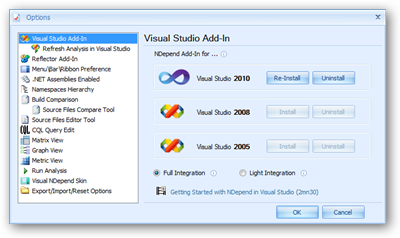
The first thing I noticed was a slight update in the welcome screen that made installing the Visual Studio and Reflector add-ins a little more prominent.
Clicking on one of the install buttons will bring you to the respective place in the options dialog for Visual NDepend. Click “Install” and things “just work,” which is awesome:
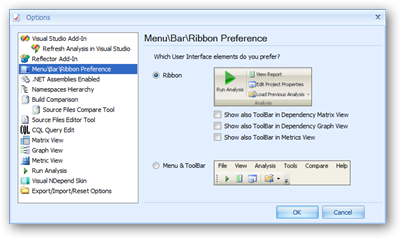
I noticed that the Ribbon is still not the default interface used by NDepend, so you’ll want to go into the options and specify to use Ribbon rather than regular menu/tool bars. The Ribbon is still easier to figure out.
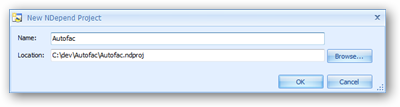
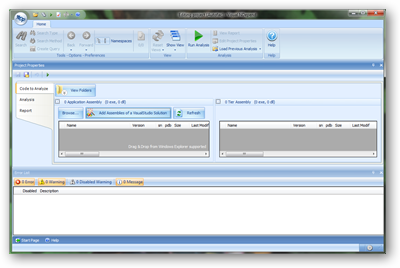
The project I chose to analyze this time was Autofac, the open source dependency injection framework.
From the Visual NDepend welcome screen, I clicked the “Create Project…” link and I got a small dialog to fill out:
That gets you to the project properties window.
Something I noticed when taking screen shots is that the smallest I could make the window and still have all the buttons visible was about 1200 pixels wide. If you’re running in a lower resolution monitor, you may be out of luck. Something to consider.
The first thing I noticed (sort of by accident) was this little icon in the corner of the window…
I’m not sure if it was there in the last version of NDepend or not, but it’s cool. Hovering over it tells you what’s going on:
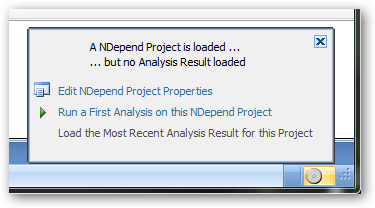
It’s sort of like a little “what do I do next?” cue. Very nifty.
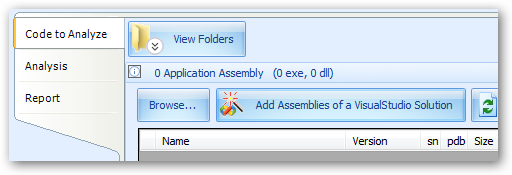
I clicked the “Add Assemblies of a Visual Studio Solution” button and selected the Autofac core solution.
After removing all of the unit test assemblies and demo project assemblies, I was left with some errors. As it turns out, NDepend wasn’t getting the assemblies from their target folders - it was trying to get them from the bin folders of some of the demo projects.
To fix this, I had to do two things.
First, I rebuilt the solution to make sure the assemblies to analyze were in the associated build output locations (bin\Debug for each).
Second, I had to click the “View Folders” button, switch to “relative path mode,” and delete the folders from the test and demo assemblies.
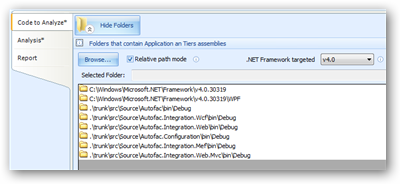
Side note:I still think things should default to “relative path mode” because if you’re going to share the NDepend project with other team members and check it into your source tree, you don’t want to be using absolute paths. I also found itpretty unintuitive that the target .NET framework version was only revealed as an option when you opened up the folder view. I don’t feel like it has anything to do with folders. But I digress.
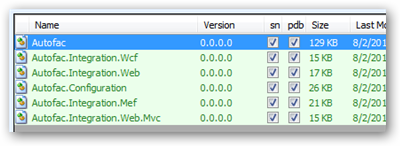
Once I did that, all of the target assemblies were properly located.
The next thing I noticed was that the MVC 2 assembly, referenced by one of my targets (Autofac.Integration.Web.Mvc) wasn’t found.
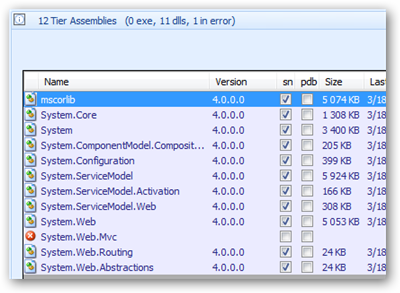
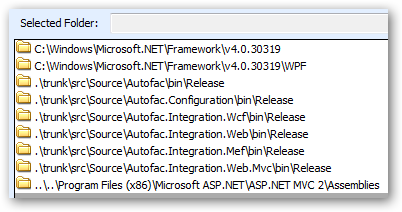
To fix that, I had to open up the folder view again and add a new search folder to C:\Program Files (x86)\Microsoft ASP.NET\ASP.NET MVC 2\Assemblies - where System.Web.Mvc.dll is located. That’s when I ran into a problem:
NDepend keeps the .NET Framework search folders as absolute paths regardless of whether your project is in “relative path mode,” but in “relative path mode” you can’t add a new absolute path folder yourself. You also can’t add a new “framework location” so it knows to search for it next time. That means, for the MVC 2 assembly, unless I keep a local copy in my project’s source, there’s still no way I can share this project with my team. Why? Because in relative path mode, I may check my project out in a different location on my drive than other team members and the relative path to the MVC 2 assembly will break. Problem. I even tried manually hacking the project file. It sticks as long as you don’t open the project up in Visual NDepend again, at which point it switches everything back to absolute paths.
For the sake of this article, we’ll move past that. Hopefully this will be fixed in a future version because it’s sort of a showstopper for adding NDepend to continuous integration on MVC projects.
The thing about this is, it looks like it was a painful process but it wasn’t that bad. There were a couple of hiccups, but all of this took just a couple of minutes. It just wasn’t quite as easy as I think it should be. That said, once you have it all set up, you don’t have to do it again - just reuse the project file next time you want to run analysis.
Once I had the MVC 2 assembly located, everything was found, so I hit the big green ‘Run Analysis’ arrow and let it roll!
When it was done running (it only took a few seconds), I got a report that popped up in my browser.
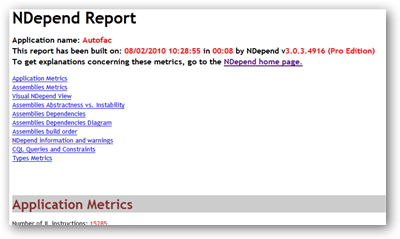
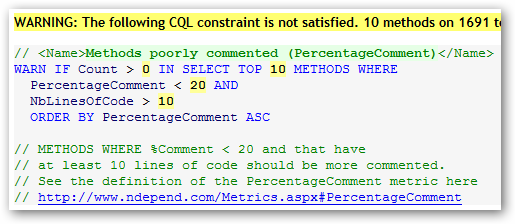
There is a ton of information in this report including notes on methods you should look at refactoring (e.g., things that take too many parameters) and so on. In many cases, the warnings that come up are very similar to things you’d see coming out of FxCop, but with a more in-depth analysis. For example, NDepend can tell you about methods that are poorly commented:
It also includes some really cool diagrams, like “abstractness vs. instability”:
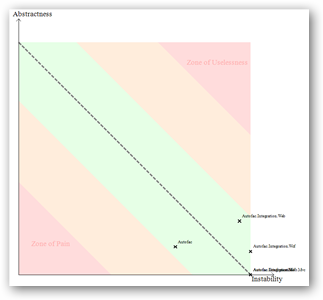
In this case, Autofac looks pretty good! You can also see a diagram showing the dependency graph between assemblies:
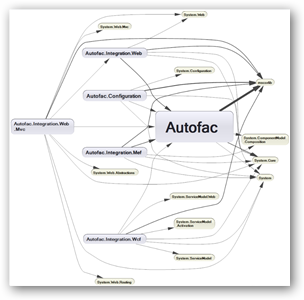
Again, reasonably clean for Autofac.
Flipping back to the Visual NDepend UI, you can see the same information but can navigate around in an interactive fashion.
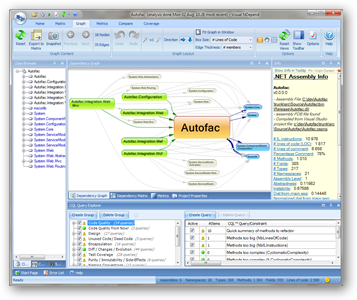
For example, I looked at the Code Quality section of queries and looked at the list of methods that are considered too big from a “number of lines of code” standpoint. In Autofac’s case, there is just one: Autofac.Configuration.ConfigurationSettingsReader.Load. Clicking that, I can see a lot of information about the method:

Double-clicking on the method will open up the source file in Visual Studio so I can see it for myself. Or I can right-click on the method and open it up in Reflector (which is faster than viewing source in VS). (You can use the NDepend options to switch your source editor tool to something like Notepad, which is a good idea. Do that. It makes opening source files much faster.)
There is a lot to look at. Very interesting stuff that’s well worth checking out.
One good way to get this going for your team is to integrate it with your continuous integration build. After you run your FxCop analysis and unit tests, run NDepend and integrate the report into the dashboard. It’ll help get people familiar with some of the things to look for and keep them mindful of their development. It sort of sucks to see code you wrote show up as failing some of the “code quality” queries, believe me.
One shortfall of the build integration with NDepend is that there are only two levels of query: WARN and SELECT. WARN queries will output a build warning; SELECT queries just introduce information into the report. Neither one necessarily fails the build. It would be nice to have ERROR query types, too, to allow you to fail the build. I’ve mentioned this to the folks at NDepend before and it was going to be “considered” but it’s not there yet.
Especially for larger teams where you probably have a technical lead or architect looking at statistics and making decisions about how to design things, this is a fantastic tool. For the average team member, you’ll probably look at the report occasionally, but you probably won’t run the reports all the time or anything. On the other hand, integrated into the build and with someone sort of looking at the overall direction of the project, this becomes exceptionally powerful.
Head over to NDepend and check it out. It’s well worth your time and better than ever.