
How to Consume MSDeploy Staged Web Site Output in a Wix Installer
MSDeploy is a pretty cool installer technology, but it’s not what everyone uses, and my personal experience so far is it’s not flexible enough for me. I’m not the biggest fan of Windows Installer, either, but you can’t say it isn’t flexible.
As part of a recent project, I was working on a web site installer. I wanted Wix to take my web site - including the transformed web.config files and such - and package it into an installer. I’m no Wix expert, but this didn’t appear to be as straightforward as you might think.
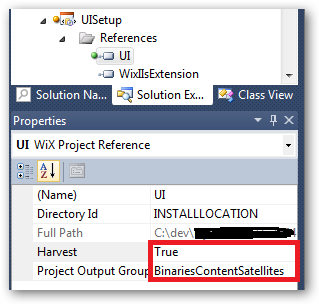
The usual way you consume project output (when using the Visual Studio integration and .wixproj files) is to add a project reference to the application project, set up the output you’re interested in grabbing, and telling Wix to “Harvest”:
If you do that for a web project, though, the installer ends up dropping the web project assemblies right in the root of the app instead of keeping them in the bin folder like they’re supposed to be. I understand why it’s doing that (because other app types would actually need it that way) but for web projects it’s wrong.
Not only that, but you know that whole fancy web.config transformation thing you can do when you use MSDeploy? Wix doesn’t do that transformation. I want that, so I figured out how to do it:
You can get Wix to automatically consume MSDeploy-staged output from a web project. It just takes a little manual hacking to get it to work. Not much, but it is manual.
First, add a project reference from your Wix .wixproj to your web project. In Visual Studio, set the properties on that project reference - set “Harvest” to False and “Project Output Group” to “None.” If you look at the .wixproj source, that reference will look something like this:
    <ItemGroup>
      <ProjectReference Include="..\..\UI\UI.csproj">
        <Name>UI</Name>
        <Project>{YOURGUID-HERE-abcd-abcd-abcdabcdabcd}</Project>
        <Private>True</Private>
        <DoNotHarvest>True</DoNotHarvest>
        <RefProjectOutputGroups>
        </RefProjectOutputGroups>
        <RefTargetDir>INSTALLLOCATION</RefTargetDir>
      </ProjectReference>
    </ItemGroup>
Once you have that, it’s time to do a little manual hacking.
Open up the .wixproj in a text editor. Find the ProjectReference you just added. Just before the end of the ProjectReference, add a metadata property called “WebProject” and set it to “True” like this:
    <ItemGroup>
      <ProjectReference Include="..\..\UI\UI.csproj">
        <Name>UI</Name>
        <Project>{e3362c3d-45c4-47d3-ad61-9f6fbcad9b02}</Project>
        <Private>True</Private>
        <DoNotHarvest>True</DoNotHarvest>
        <RefProjectOutputGroups>
        </RefProjectOutputGroups>
        <RefTargetDir>INSTALLLOCATION</RefTargetDir>
        <WebProject>True</WebProject>
      </ProjectReference>
    </ItemGroup>
This will set web projects apart from other projects - in case you have multiple project references going. This is how you can identify which ones are web projects that needs to be staged.
Now look in the .wixproj file and find a Target node with the Name “BeforeBuild” - there may or may not be one, depending on your project, so if there isn’t one, create one just above the closing </Project> node at the bottom of the file. You may even see a little comment that is there telling you where to place the Target. The empty Target will look something like this:
        <!-- ...here's your project reference... -->
        </ProjectReference>
      </ItemGroup>
      <Import Project="$(WixTargetsPath)" />
      <Target Name="BeforeBuild">
      </Target>
    </Project>
The magic goes inside the BeforeBuild target. What you want to do there is:
- Use the MSDeploy stuff to “stage” the web site with all of its transformed configuration files and everything.
- Tell Wix where the staged output is.
- Tell Wix to generate a Wix source file that includes the entire staged web site contents.
- Do this for all of the project references that are marked as WebProject = True.
That’s done with just a few lines of MSBuild script:
    <Target Name="BeforeBuild">
      <MSBuild
        Projects="%(ProjectReference.FullPath)"
        Targets="Package"
        Properties="Configuration=$(Configuration);Platform=AnyCPU"
        Condition="'%(ProjectReference.WebProject)'=='True'" />
      <ItemGroup>
        <LinkerBindInputPaths Include="%(ProjectReference.RootDir)%(ProjectReference.Directory)obj\$(Configuration)\Package\PackageTmp\" />
      </ItemGroup>
      <HeatDirectory
        OutputFile="%(ProjectReference.Filename).wxs"
        Directory="%(ProjectReference.RootDir)%(ProjectReference.Directory)obj\$(Configuration)\Package\PackageTmp\"
        DirectoryRefId="INSTALLLOCATION"
        ComponentGroupName="%(ProjectReference.Filename)_Project"
        AutogenerateGuids="true"
        SuppressCom="true"
        SuppressFragments="true"
        SuppressRegistry="true"
        SuppressRootDirectory="true"
        ToolPath="$(WixToolPath)"
        Condition="'%(ProjectReference.WebProject)'=='True'" />
    </Target>
(Note that it’s line-wrapped for readability, but in the .wixproj file it’s only five lines in the Target.)
Let’s walk through that:
- The MSBuild task calls the “Package” target on each of the project references where WebProject = True. The property it passes in for “Platform” is AnyCPU because it’s a platform target that pretty much everything knows about by default. It’s important to specify a platform that all of the projects in your solution know about because that way project-to-project references will work. If you specify a platform that not every project knows about, you have to specify an OutputPath folder so the task can locate project-to-project build output locations… and that just gets messy. Stick with AnyCPU and make your life easy. (It also means output will be in expected locations like “bin\Debug” or “bin\Release.”) The “Configuration” value is used not only in figuring out where to build the staged output but also in your web.config transforms - that’s how it knows which transform to use. Finally, you’ll see the Condition on the MSBuild task - that’s how we make sure to only run this for web projects.
- The ItemGroup sets up an item for Wix. Wix needs to know where the staged output base path is. The Package target builds its staged output by convention. It goes in a folder called: obj\[Configuration]\Package\PackageTmp under your web application. (Again, sticking with “AnyCPU” as the platform value means you’ll have a predictable output location.) “Configuration” gets substituted in with the “Configuration” variable you passed into the MSBuild task. So if you were building the Debug configuration of an application in C:\MyWebApp, the Package target would build to: C:\MyWebApp\obj\Debug\Package\PackageTmp The crazy long MSBuild-script-variable string you see there builds up the location of the Package output using that convention.
- The HeatDirectory task builds the Wix source from the Package output. The file it builds will match the name of the ProjectReference, so if your web application is called “MyWebApp.csproj” then the Wix script it builds will be “MyWebApp.wxs.” The Wix component it builds (which you’ll need to know so it can be included in the main install script) is also named after your web application by adding a “_Project” suffix (e.g., “MyWebApp_Project”). You’ll see, again, the Directory we specify is that big long package output folder. And, finally, you also see that the Condition on the task makes sure we’re still only running this for project references where WebProject = True.
When that target runs, you’ll see a .wxs file pop out in the .wixproj project folder. Add the generated .wxs to your .wixproj project so it knows to include it in the build.
Finally, in your main Product.wxs file, add a ComponentGroupRef to the Feature that should install your web site and use the generated “ProjectName_Project” (e.g., “MyWebApp_Project”) component ID, like in this fragment:
    <?xml version="1.0" encoding="UTF-8"?>
    <Wix xmlns="http://schemas.microsoft.com/wix/2006/wi">
      <Product Id="YOURGUID-HERE-abcd-abcd-abcdabcdabcd" Name="YourProduct" ...>
        <Feature Id="YourFeature" Title="Your Feature" Level="1">
          <!-- Include your generated components here. -->
          <ComponentGroupRef Id="UI_Project" />
        </Feature>
      </Product>
    </Wix>
That’s it! (Actually, that wasn’t a small amount of work, but it’s not as hard as some things in Wix.)
Now don’t forget to set up the web site in IIS (that’s not done for you by the above - only getting the files into the installer). Good luck!
UPDATE 8/6/2010: I ran into an issue where a web project that has a project-to-project reference to a non-web project (e.g., a web project that references a class library as a .csproj rather than a .dll) may look in the wrong spot for the class library. I updated the article to accommodate for this. The change is thatif you specify AnyCPU as the platform, you don’t have to specify an output folder and things magically fall together.
UPDATE 3/8/2013: Updated code snippets for Wix 3.8, which brought some breaking changes. The MSBuild “BeforeBuild” snippet uses an ItemGroup with an item called LinkerBindInputPaths for the project package location instead of a PropertyGroup with a property called LinkerBaseInputPaths. Also, in the Product.wxs snippet, the reference to the Product.Generated component is removed since that is off by default in Wix 3.8.