Blogging from Word 2013
I’ve been wanting Windows Live Writer for Surface RT for a while but I noticed Hanselman mentioned you could blog from Word (which I never knew) so I thought I’d try it out.
If you’re reading this… I was successful. Yay!

I’ve been wanting Windows Live Writer for Surface RT for a while but I noticed Hanselman mentioned you could blog from Word (which I never knew) so I thought I’d try it out.
If you’re reading this… I was successful. Yay!
2012 has come and gone, and it’s time to look back at what happened. Because if I don’t, well… my memory isn’t quite what it used to be, you know?
It was a good year both personally and professionally, though I noticed I blogged a lot less. That happens, I guess. I find I post more of my little personal updates on Twitter or Facebook, which reduces the noise here but definitely splits up the content. Maybe that’s a good thing. You can subscribe to the stuff you like, ignore the stuff you don’t. (I use Twitter for more professional stuff whereas Facebook will show you more pictures of my kid and my cats.)
Professionally, I got promoted to be a Tech Lead at work, which is sort of like a team leader but without the “people management” part of things and more focus on product architecture and technology solutions. That’s totally my wheelhouse, so good things there.
I also became a co-owner of the Autofac project, which has been a lot of fun to work on. I started out over there as a contributor for the multitenant support and started playing a larger role with the restructuring for the upcoming 3.0 release. It’s great to work with smart folks like those on that project and it’s nice to be learning so much while (hopefully) providing some value to the masses.
Blog-wise, other than the usual “hey, I found this interesting” sorts of tips and articles…
So there’s all that. Maybe not high in quantity, but I’d like to think the quality is there.
Personally, my year (and most of my free time) has revolved around my daughter, Phoenix, who is now two years old. This year she went from walking and a small amount of vocabulary to running around rampantly and being a total chatterbox. She loves Batman, with the “Little People” playset as well as a Batman raincoat. (She’s on the ThinkGeek customer action shot page for that raincoat, too.) We took her to Disneyland and had a great time, though she didn’t take well to the costumed characters. I look forward to taking her again when she’s older and can understand a little more about what’s going on.
Every day she surprises me by saying or doing something new and I have to wonder where she gets all her material. Her latest thing is to “sneeze” (“ah… ah… AH-CHOO” like in cartoons) and then ask for a tissue (“Daddy, tissue me? I tissue. Please?”). I have no idea where she got that. This morning I yawned so she pointed to the kitchen and said, “Daddy, coffee?” Yes, baby, Daddy does need some coffee. You are the smartest toddler alive.
In going through some of our stuff, weeding out things we don’t use, I came across these baby sign language videos. We tried that since we’d heard a lot of success with it and wanted Phoenix to be able to communicate and not have those “I can’t speak so I’ll throw a tantrum” issues. We never could get Phoenix into it, though. She lost interest in the videos (we tried several kinds from different places) and just didn’t pick up on the signs. Instead, she pretty much skipped all that and just spoke or used less formal gestures to indicate what she wanted. We haven’t ever really had any issues figuring out what she’s saying and she’s never thrown any communication-related tantrums, so I suppose it all worked out in the end.
One thing I’ve sort of surprised myself with is the amount of television we let her watch. It’s not a lot, not like she’s just “glued to the tube,” but I thought I’d be one of those parents who would be, like, “NO TV EVER!” What I find, though, is that she really learns a lot from the stuff she watches. She knows a ton of animals from Go, Diego, Go. She is starting to get good problem solving skills from Mickey Mouse Clubhouse (“Which tool will solve this problem?”). She’s learned a lot about music and such from Little Einsteins. We don’t really watch anything with “no value” - arbitrary cartoons or whatever - but the educational stuff you see on PBS and Disney Junior has been really pretty good. She pretends a lot, she likes building with blocks and playing with those wooden Brio trains… and she knows how to navigate Netflix and the Disney Junior apps on the iPad to find the different shows she likes, so that’s pretty crazy to watch.
Toward the end of the year I’ve started getting into tea. I’ve never really been much of a tea-drinker in the past, but something clicked with me and I’m enjoying tea a lot. (Honestly,
In the upcoming year, I am thinking I’d like to move off the Subtext blog platform. I am a contributor over there, but the momentum behind the project has been lost and I don’t think it’s going to come back. I thought I’d be more into contributing and building on the blog engine than I ended up being. I met some great folks there and I’m glad I got involved, but I realize that, as far as a blog platform is concerned… honestly, at this point I just want it to work and have the software maintained by someone else. I want to own my content and I want to be able to tweak things if needed, but for the most part I don’t want a super-young platform and I don’t want to worry about whether there’s going to be an update coming. I honestly thought I’d want to tweak a bunch of stuff on my blog, write plugins, and do a bunch of things, but… well, not so much. As such, I will probably see what it will take to move to WordPress. It’s been around a long time, it’s a sort of de-facto standard, and it has an actual plugin model (something I’d wanted from Subtext for years). It also has no shortage of themes to choose from (something else I’d wanted from Subtext). It won’t be a simple process - I’ll need to figure out how to export all the Subtext content in WordPress Extended RSS format, redirect permalinks, etc. - but I think it’ll be worth it.
Beyond that, much as I would like to blog more and better things… I will have to see. I anticipate I’ll still use a lot of social media for the tiny updates, but hopefully I’ll have more interesting problems (and solutions!) to share with you all as the year progresses.
I’ve seen a ton of forum posts and blog posts trying to explain how to use mencoder or FFmpeg to rotate video that you took on your phone.
Thing is… they didn’t work for me.
No matter what I tried, something went awry.
…and so on. Ugh.
I’m a technical guy. Trying to figure this thing out I learned far more about audio and video codecs and container types than I really ever cared to know. It really shouldn’t be this hard.
The answer, for me, came with WinFF, a GUI wrapper on FFmpeg. There are some “presets” that come with it that set up the high quality video command line part of things so I only had to add the “rotate” bit.
For reference, the command line that worked for me was:
ffmpeg.exe -y -i input.mp4 -crf 15.0 -vcodec libxvid -acodec libfaac -ar 48000 -b:a 192k -coder 1 -flags +loop -cmp +chroma -partitions +parti4x4+partp8x8+partb8x8 -me_method hex -subq 6 -me_range 16 -g 250 -keyint_min 25 -sc_threshold 40 -i_qfactor 0.71 -b_strategy 1 -qcomp 0.6 -qmin 0 -qmax 69 -qdiff 4 -bf 8 -refs 16 -direct-pred 3 -trellis 2 -wpredp 2 -rc_lookahead 60 -threads 0 -b 12000k -vf transpose=1 output.mp4
Yeah.
The “transpose” option at the end is the bit that rotates.
And I know someone is going to want to comment something about blah blah orientation flag blah blah file metadata blah blah some players don’t support it. I know. I really just want the stupid thing rotated so I don’t have to figure out which players work and which ones don’t. Ubiquitous play, minimal loss of quality, video rotated. Done.
I may tinker with the audio to see if I can just get it to pass through without re-encoding, but since I finally got it to work after this much research, I figured I’d post it.
Note that command line works great with the build of FFmpeg that comes with WinFF, but they’ve updated some of the options in later builds so it needs to be adjusted.
Sublime Text 2 has a nice feature where you can hit “Ctrl+B” or select “Tools -> Build” from the menus and, based on the current file type, a build system will be automatically selected and executed against that file.
I recently released an update to my MSBuild package for Sublime Text 2 that includes some “build variants” for MSBuild that specifically set Debug or Release configuration during the build. Basically:
msbuild yourscript.proj /p:Configuration=Debug
or
msbuild yourscript.proj /p:Configuration=Release
I didn’t know this was possible until recently or I’d have put it in from the get-go. Note it assumes either that your project is a standard .csproj or .vbproj, or that you’re using the standard “Configuration” variable name to denote build configuration. It also doesn’t do anything with platform, so whatever your project defaults to, that’s what it’ll build.
As it turns out, it’s not clear how you access build variants from inside Sublime Text and it’s not obvious - it doesn’t show up on the menu.
To access Sublime Text 2 build variants:
Build variants are not specific to my package - other packages may also provide build variants with other names.
Related to this,some folks have asked why I haven’t supplied a “build and run” option the way some other packages have. The short answer is: I can’t. Here’s why:
MSBuild is sort of a scripting language. You can write an MSBuild script that just copies a bunch of files around or zips some things up. You can have an MSBuild script that just generates some reports. Or maybe your MSBuild script kicks off several other MSBuild scripts, each of which build something.
Even if you narrow the scope to .csproj or .vbproj files (which, yes, are in MSBuild format), you can build a lot of different things - an .exe, sure, but what if it’s a web site project? Or a WCF service? Or an Azure project? What does “build and run” do then?
The reason Visual Studio is able to handle this is that it narrows the scope of its handling (only actual project files can have “startup actions” - you can’t have that for a .proj or .targets file); and it “knows” about different project types and how to start them up.
When you have a web site project, it “knows” that in your project properties you should be able to specify which URL you want to view when it starts up the browser… and it knows to start up IIS Express (or the VS dev server) to host the site. Further, when you have a solution (multiple projects that all build together - like an MSBuild script that triggers several other MSBuild scripts) you can specify which project(s) should be started up and which actions should be taken at that time. That’s why you see all those .suo and .user files out there alongside your solutions/projects. It’s a system external to the build system that maintains all that information.
You can “make Visual Studio ‘know’ about new project types” by installing VS add-ins and components. For example, when you install the Azure SDK, it tells Visual Studio about Azure project types and how to handle the startup action.
Unfortunately, all of that’s a bit beyond the scope of what I can provide in Sublime Text.
If you would like a “build and run” experience, I would recommend writing a small “wrapper script” that triggers your real script and build that instead.
For example, say you have a project “MyProject.csproj” that builds “MyProject.exe.” A wrapper might look like this:
<?xml version="1.0" encoding="utf-8"?>
<Project DefaultTargets="BuildAndRun" xmlns="http://schemas.microsoft.com/developer/msbuild/2003" ToolsVersion="4.0">
  <PropertyGroup>
    <Configuration Condition="'$(Configuration)'==''">Debug</Configuration>
  </PropertyGroup>
  <Target Name="BuildAndRun">
    <MSBuild Projects="MyProject.csproj" Properties="Configuration=$(Configuration)" />
    <Exec Command="MyProject.exe" WorkingDirectory="$(MSBuildProjectDirectory)/bin/$(Configuration)" />
  </Target>
</Project>
In this way, the wrapper script knows what the “run” action is and you can still use the Debug/Release configuration build variants. Obviously if you have a web site or something other than a simple .exe, your “run”action is going to be more involved. I’ll leave that as an exercise for the reader.
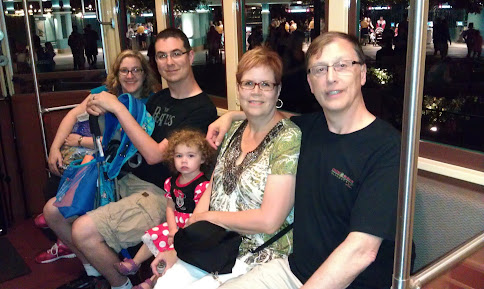
Almost a month ago now (wow!) Jenn, Phoenix and I went to Disneyland with my parents for a three-day park-hopping adventure.
It’d been four years since Jenn and I had been, and far longer than that for my parents, so we were excited to go. With Phoenix not quite being two, we figure she probably won’t remember much of the trip when she’s older, but she’s super into Mickey Mouse Clubhouse right now, so she’d at least have fun.
The first ride Phoenix went on was the Mad Tea Party tea cups. She loved it.
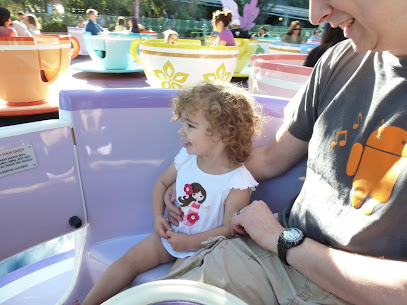
I’m glad she did for a couple of reasons. First, she likes carousels but she hasn’t really been on much besides that. I was afraid the tea cups might be too much, but she wanted more and smiled and giggled the whole time, so that was a relief. Second, both Phoenix and I are big Alice in Wonderland fans, so I’m glad she had a good first ride on an Alice-themed attraction.
She was excited to see Mickey… but only from a distance. We tried getting her to give Mickey a hug but we quickly discovered she’s not into the costumed characters. “NO MOUSE! NO HUG! NO TOUCH!”
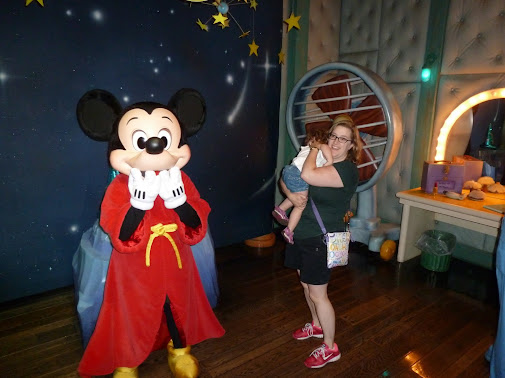
She didn’t seem to have a problem with the human characters (princesses, pixies, pirates) but the costumed characters that weren’t human were only allowed within about 10 feet before the alarms went off. We even tried one of the “character breakfasts” where you eat and the characters walk around from table to table. That didn’t go over well. Chip showed up and tried to say hello and Phoe went all DEFCON ONE ALERT ALERT ALERT so Chip backed off and that was pretty much the end of that.
We had actually scheduled the character breakfast at “Goofy’s Kitchen” because last time we were there the characters got all the kids to come out and bang pots and pans and dance. Phoenix is all about that sort of thing and we thought it’d get her to relax around the characters. Apparently they stopped doing that because parents complained that as the kids were coming back from the dancing, the characters continued to walk around and mingle and the unseated kids would miss characters coming past their table. I dunno. I think I’d rather have the dancing.
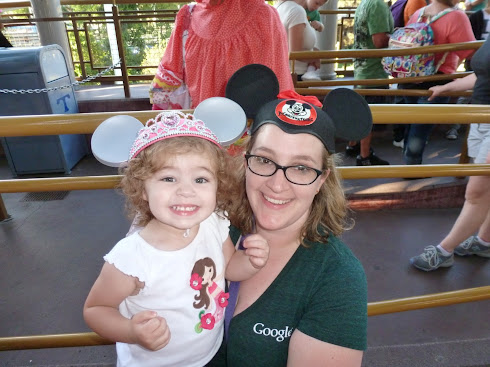
Of course we all got hats…

…and Phoenix wore hers everywhere. Even now, a month later, she still loves that hat.
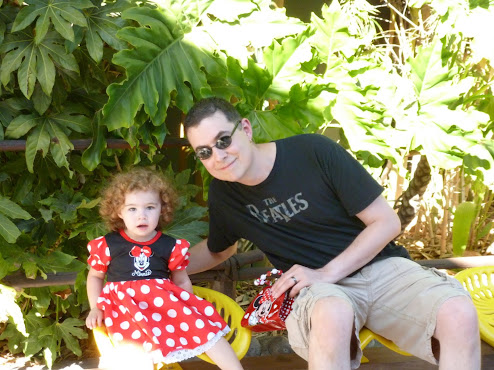
She also ended up getting a Minnie Mouse dress, which she also wore all over (and still does).
The big new attraction was Cars Land in the California Adventure portion of the park. We saw most of it, but it was pretty packed - even in the middle of October - so we didn’t get to see the whole thing. We also sort of left that for the last day and ran out of time.
We did get to ride all the other rides - from Splash Mountain to Star Tours, the Grizzly River Run to Soarin’ Over California. We missed quite a few last time we were here so it was good to catch them this time. We’ll try for the Cars Land rides next time.
Jenn lost her sunglasses on the Indiana Jones ride last time we were here, so I had to match her and lost my sunglasses in “Captain EO.” You’re probably wondering how I lost my sunglasses in a movie… I was, too. They must have just fallen out of my pocket. I realized as soon as we got out the exit, but when I turned around to go back the doors had already shut so I ran around to the ride attendant and explained the situation. Since the next show had already started I had to wait the 17 minutes for the movie to end, then I could go back in through the exit doors and search. That was honestly a pretty rough 17 minutes. I wouldn’t have been so worried if they were just $50 sunglasses or something, but they’re prescription - way, way more than $50.
Anyway, I went back in and searched for the two minutes they give you between when one crowd leaves and the next is seated. I didn’t find them, even with the attendant’s help. I called out to the audience members to see if anyone saw them but no one did. Jenn and I then got to sit through “Captain EO” again, you know, because they won’t let us do any real searching, and we searched again for the two minutes. I got some pretty harsh rug burns on my knees from that. Finally, after the second round of “Captain EO” (which I am now thoroughly sick of) one of the audience members announced he’d found my sunglasses and handed them to me. Thank goodness. It was an hour lost, but a couple hundred bucks saved. Big props to Jenn for standing by me on that one.
One of the cool things we did was see the “World of Color” show at the end of the last day. That show is over in the California Adventure park and they have a nice water display with lasers, lights, and video projection all set to music. From an engineering perspective, I really liked it - you can get these light-up ear hats that have some sort of receiver in them and the lights in the show will coordinate with how your hat lights up. Really cool stuff. Jenn and I had to get the hats and wear them. (When you’re not within range of the broadcast, the hats flash random colors and are still really cool.)
It was a fun, but long, vacation and at the end I think we were all ready to go home. Phoenix was a trooper, really being good most of the time despite the record heat (~95F each day) and not getting a nap. Toward the end we were all tired, she was starting to get naughty, and we’d all walked our feet off. I think that’s part of what makes it a good one, yeah?
I posted a few more pictures for folks interested. Good times, and I look forward to the next vacation.