Fix the VS2015 Icon
I installed Visual Studio 2015 today. I had the RC installed and updated to the the RTM.
One of the minor-yet-annoying things I found about the RTM version showed up when I pinned it to my taskbar next to VS2013:

Sigh.
Luckily it’s an easy fix.
Windows 7 / Server 2008
First, unpin VS2015 from your taskbar. You’ll put it back after you’ve fixed the icon.
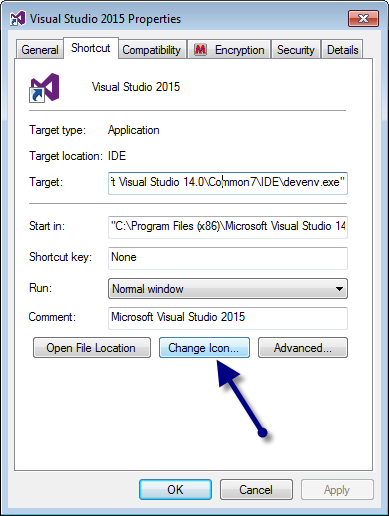
Open up your Start menu and right-click on the “Visual Studio 2015” shortcut in there. On the context menu, choose “Properties.” Click the “Change Icon” button.
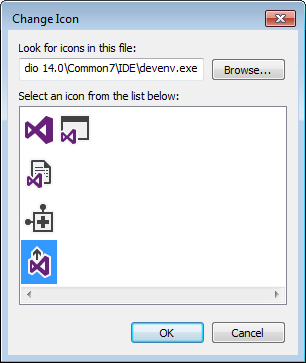
VS2015 actually comes with a few icons. They’re not all awesome, but they’re at least different than the VS2013 icon. I chose the one with the little arrow because it’s, you know, upgraded from VS2013.
Click OK enough times to close all the property dialogs. You’ll see the icon in the Start menu has changed. Now right-click that and pin it to the taskbar. Problem solved.

Windows 8 / Server 2012
If you haven’t pinned VS2015 to your taskbar yet, do that now so you can get a shortcut.
Open up the taskbar icons folder. This is at C:\Users\yourusername\AppData\Roaming\Microsoft\Internet Explorer\Quick Launch\User Pinned\TaskBar.
Copy the “Visual Studio 2015” shortcut out of that folder and onto your desktop.
Unpin VS2015 from your taskbar. The shortcut in that TaskBar folder will disappear.
Right-click on the “Visual Studio 2015” shortcut you copied to your desktop. On the context menu, choose “Properties.” Click the “Change Icon” button.
VS2015 actually comes with a few icons. They’re not all awesome, but they’re at least different than the VS2013 icon. I chose the one with the little arrow because it’s, you know, upgraded from VS2013.
Click OK enough times to close all the property dialogs. You’ll see the icon on your desktop has changed.
Right-click on the icon on your desktop and pin that one to your taskbar. A new shortcut with the correct icon will be added to that TaskBar folder and will appear on the taskbar. You can now delete the one from your desktop.