It’s been a few years since I’ve posted a look at NDepend and a lot has changed for me since then. I’ve switched my primary development machine to a Mac. I don’t use Visual Studio at all - I’m a VS Code person now because I do a lot of things in a lot of different languages and switching IDEs all day is painful (not to mention VS Code starts up far faster and feels far slimmer than full VS). Most of my day-to-day is in microservices now rather than larger monolith projects.
Full disclosure: Patrick at NDepend gave me the license for testing and showing off NDepend for free. I’m not compensated for the blog post in any way other than the license, but I figured it’d be fair to mention I was given the license.
I’ve loved NDepend from the start. I’ve been using it for years and it’s never been anything but awesome. I still think if you haven’t dived into that, you should just stop here and go do that because it’s worth it.
Get Going on Mac
The main NDepend GUI is Windows-only, so this time around, since I’m focusing solely on Mac support (that’s what I have to work with!) I’m going to wire this thing up and see how it goes.
First thing I need to do is register my license using the cross-platform console app. You’ll see that in the net8.0 folder of the zip package you get when you download NDepend.
dotnet ./net8.0/NDepend.Console.MultiOS.dll --reglic XXXXXXXX
This gives me a message that tells me my computer is now registered to run NDepend console.
Running the command line now, I get a bunch of options.
 pwsh> dotnet ./net8.0/NDepend.Console.MultiOS.dll
//
//  NDepend v2023.2.3.9706
//  https://www.NDepend.com
//  support@NDepend.com
//  Copyright (C) ZEN PROGRAM HLD 2004-2023
//  All Rights Reserved
//
_______________________________________________________________________________
To analyze code and build reports NDepend.Console.MultiOS.dll accepts these arguments.
NDepend.Console.MultiOS.dll can also be used to create projects (see how below after
the list of arguments).

  _____________________________________________________________________________
  The path to the input .ndproj (or .xml) NDepend project file.  MANDATORY

    It must be specified as the first argument. If you need to specify a path
    that contains a space character use double quotes ".. ..". The specified
    path must be either an absolute path (with drive letter C:\ or
    UNC \\Server\Share format on Windows or like /var/dir on Linux or OSX),
    or a path relative to the current directory (obtained with
    System.Environment.CurrentDirectory),
    or a file name in the current directory.


Following arguments are OPTIONAL and can be provided in any order. Any file or
directory path specified in optionals arguments can be:
  - Absolute : with drive letter C:\ or UNC \\Server\Share format on Windows
               or like /var/dir on Linux or OSX.
  - Relative : to the NDepend project file location.
  - Prefixed with an environment variable with the syntax  %ENVVAR%\Dir\
  - Prefixed with a path variable with the syntax   $(Variable)\Dir
  _____________________________________________________________________________
  /ViewReport                 to view the HTML report
  _____________________________________________________________________________
  /Silent                     to disable output on console
  _____________________________________________________________________________
  /HideConsole                to hide the console window
  _____________________________________________________________________________
  /Concurrent                 to parallelize analysis execution
  _____________________________________________________________________________
  /LogTrendMetrics            to force log trend metrics
  _____________________________________________________________________________
  /TrendStoreDir              to override the trend store directory specified
                              in the NDepend project file
  _____________________________________________________________________________
  /PersistHistoricAnalysisResult   to force persist historic analysis result
  _____________________________________________________________________________
  /DontPersistHistoricAnalysisResult   to force not persist historic analysis
                                       result
  _____________________________________________________________________________
  /ForceReturnZeroExitCode    to force return a zero exit code even when
                              one or many quality gate(s) fail
  _____________________________________________________________________________
  /HistoricAnalysisResultsDir to override the historic analysis results
                              directory specified in the NDepend project file.
  _____________________________________________________________________________
  /OutDir dir                 to override the output directory specified
                              in the NDepend project file.

     VisualNDepend.exe won't work on the machine where you used
     NDepend.Console.MultiOS.dll with the option /OutDir because VisualNDepend.exe is
     not aware of the output dir specified and will try to use the output dir
     specified in your NDepend project file.
  _____________________________________________________________________________
  /AnalysisResultId id        to assign an identifier to the analysis result
  _____________________________________________________________________________
  /GitHubPAT pat              to provide a GitHub PAT (Personal Access Token).

     Such PAT is used in case some artifacts (like a baseline analysis result) are
     required during analysis and must be loaded from GitHub.
     Such PAT overrides the PAT registered on the machine (if any).
  _____________________________________________________________________________
  /XslForReport xlsFilePath   to provide your own Xsl file used to build report
  _____________________________________________________________________________
  /KeepXmlFilesUsedToBuildReport  to keep xml files used to build report
  _____________________________________________________________________________
  /InDirs [/KeepProjectInDirs] dir1 [dir2 ...]
                              to override input directories specified in the
                              NDepend project file.

     This option is used to customize the location(s) where assemblies to
     analyze (application assemblies and third-party assemblies) can be found.
     Only assemblies resolved in dirs are concerned, not assemblies resolved
     from a Visual Studio solution.
     The search in dirs is not recursive, it doesn't look into child dirs.
     Directly after the option /InDirs, the option /KeepProjectInDirs can be
     used to avoid ignoring directories specified in the NDepend
     project file.
  _____________________________________________________________________________
  /CoverageFiles [/KeepProjectCoverageFiles] file1 [file2 ...]
                              to override input coverage files specified
                              in the NDepend project file.

     Directly after the option /CoverageFiles, the option
     /KeepProjectCoverageFiles can be used to avoid ignoring coverage files
     specified in the NDepend project file.

  _____________________________________________________________________________
  /CoverageDir dir            to override the directory that contains
                              coverage files specified in the project file.

  _____________________________________________________________________________
  /CoverageExclusionFile file to override the  .runsettings  file specified
                              in the project file. NDepend gathers coverage
                              exclusion data from such file.

  _____________________________________________________________________________
  /RuleFiles [/KeepProjectRuleFiles] file1 [file2 ...]
                              to override input rule files specified
                              in the NDepend project file.

     Directly after the option /RuleFiles, the option
     /KeepProjectRuleFiles can be used to avoid ignoring rule files
     specified in the NDepend project file.
  _____________________________________________________________________________
  /PathVariables Name1 Value1 [Name2 Value2 ...]
                              to override the values of one or several
                              NDepend project path variables, or
                              create new path variables.
  _____________________________________________________________________________
  /AnalysisResultToCompareWith to provide a previous analysis result to
                               compare with.

     Analysis results are stored in files with file name prefix
     {NDependAnalysisResult_} and with extension {.ndar}.
     These files can be found under the NDepend project output directory.
     The preferred option to provide a previous analysis result to
     compare with during an analysis is to use:
     NDepend > Project Properties > Analysis > Baseline for Comparison
     You can use the option /AnalysisResultToCompareWith in special
     scenarios where using Project Properties doesn't work.

  _____________________________________________________________________________
  /Help   or   /h              to display the current help on console

  _____________________________________________________________________________
  Code queries execution time-out value used through NDepend.Console.MultiOS.dll
  execution.

     If you need to adjust this time-out value, just run VisualNDepend.exe once
     on the machine running NDepend.Console.exe and choose a time-out value in:
        VisualNDepend > Tools > Options > Code Query > Query Execution Time-Out

     This value is persisted in the file VisualNDependOptions.xml that can be
     found in the directory:
        VisualNDepend > Tools > Options > Export / Import / Reset Options >
        Open the folder containing the Options File

_______________________________________________________________________________
NDepend.Console.MultiOS.dll can be used to create an NDepend project file.
This is useful to create NDepend project(s) on-the-fly from a script.

To do so the first argument must be  /CreateProject  or  /cp  (case-insensitive)

The second argument must be the project file path to create. The file name must
have the extension .ndproj. If you need to specify a path that contains a space
character use double quotes "...". The specified path must be either an
absolute path (with drive letter C:\ or UNC \\Server\Share format on Windows
or like /var/dir on Linux or OSX), or a path relative to the current directory
(obtained with System.Environment.CurrentDirectory),
or a file name in the current directory.


Then at least one or several sources of code to analyze must be precised.
A source of code to analyze can be:

- A path to a Visual Studio solution file.
  The solution file extension must be .sln.
  The vertical line character '|' can follow the path to declare a filter on
  project names. If no filter is precised the default filter "-test"
  is defined. If you need to specify a path or a filter that contains a space
  character use double quotes "...".
  Example: "..\My File\MySolution.sln|filterIn -filterOut".

- A path to a Visual Studio project file. The project file extension must
  be within: .csproj .vbproj .proj

- A path to a compiled assembly file. The compiled assembly file extension must
  be within: .dll .exe .winmd

Notice that source of code paths can be absolute or relative to the project file
location. If you need to specify a path or a filter that contains a space
character use double quotes.

_______________________________________________________________________________
NDepend.Console.MultiOS.dll can be used to register a license on a machine,
or to start evaluation. Here are console arguments to use (case insensitive):

  /RegEval      Start the NDepend 14 days evaluation on the current machine.

  _____________________________________________________________________________
  /RegLic XYZ   Register a seat of the license key XYZ on the current machine.

  _____________________________________________________________________________
  /UnregLic     Unregister a seat of the license key already registered
                on the current machine.
  _____________________________________________________________________________
  /RefreshLic   Refresh the license data already registered on the current
                machine. This is useful when the license changes upon renewal.

Each of these operation requires internet access to do a roundtrip with the
NDepend server. If the current machine doesn't have internet access
a procedure is proposed to complete the operation by accessing manually the
NDepend server from a connected machine.

_______________________________________________________________________________
Register a GitHub PAT with NDepend.Console.MultiOS.dll

A GitHub PAT (Personal Access Token) can be registered on a machine.
This way when NDepend needs to access GitHub, it can use such PAT.
Here are console arguments to use (case insensitive):

  /RegGitHubPAT XYZ  Register the GitHub PAT XYZ on the current machine.

  _____________________________________________________________________________
  /UnregGitHubPAT    Unregister the GitHub PAT actually registered on the
                     current machine.

As explained above, when using NDepend.Console.MultiOS.dll to run an analysis,
a PAT can be provided with the switch GitHubPAT.
In such case, during analysis the PAT provided overrides the PAT
registered on the machine (if any).
As usual, a great amount of help and docs right there to help me get going.
Create a Project
I created the project for one of my microservices by pointing at the microservice solution file. (Despite not using Visual Studio myself, some of our devs do, so we maintain compatibility with both VS and VS Code. Plus, the C# Dev Kit really likes it when you have a solution.)
dotnet ~/ndepend/net8.0/NDepend.Console.MultiOS.dll --cp ./DemoProject.ndproj ~/path/to/my/Microservice.sln
This created a default NDepend project for analysis of my microservice solution. This is a pretty big file (513 lines of XML) so I won’t paste it here.
As noted in the online docs, right now if you want to modify this project, you can do so by hand; you can work with the NDepend API; or you can use the currently-Windows-only GUI. I’m not going to modify the project because I’m curious what I will get with the default. Obviously this won’t include various custom queries and metrics I may normally run for my specific projects, but that’s OK for this.
Run the Analysis
Let’s see this thing go!
dotnet ~/ndepend/net8.0/NDepend.Console.MultiOS.dll ./DemoProject.ndproj
This kicks off the analysis (like you might see on a build server) and generates a nice HTML report.

I didn’t include coverage data in this particular run because I wanted to focus mostly on the code analysis side of things.
Since my service code broke some rules, the command line exited non-zero. This is great for build integration where I want to fail if rules get violated.
Dig Deeper
From that main report page, it looks like the code in the service I analyzed failed some of the default quality gates. Let’s go to the Quality Gates tab to see what happened.
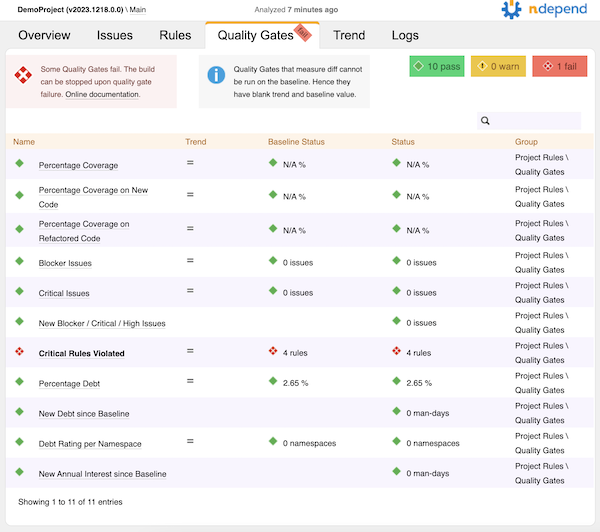
Yow! Four critical rules violated. I’ll click on that to see what they were.
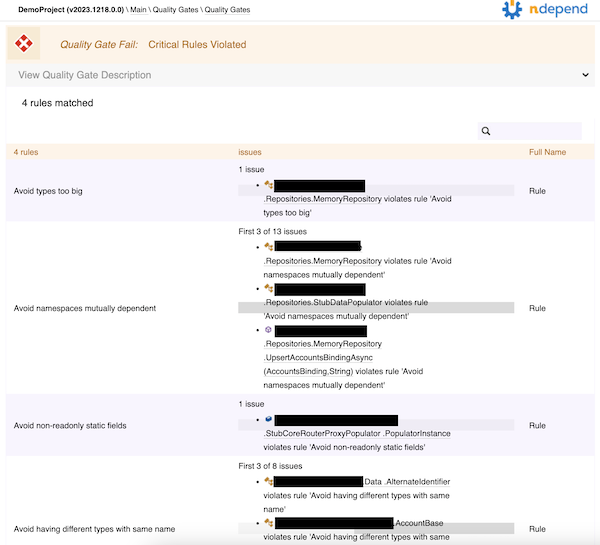
Looks like there’s a type that’s too big, some mutually dependent namespaces, a non-readonly static field, and a couple of types that have the same name. Some of this is easy enough to fix; some of it might require some tweaks to the rules, since the microservice has some data transfer objects and API models that look different but have the same data (so the same name in different namespaces is appropriate).
All in all, not bad!
I Still Love It
NDepend is still a great tool, even on Mac, and I still totally recommend it. To get the most out of it right now, you really need to be on Windows so you can get the GUI support, but for folks like me that are primarily Mac right now, it still provides some great value. Honestly, if you haven’t tried it yet, just go do that.
Room for Improvement
I always like providing some ideas on ways to make a good product even better, and this is no exception. I love this thing, and I want to see some cool improvements to make it “more awesomer.”
Installation Mechanism
I’m very used to installing things through Homebrew on Mac, and on Windows as we look at things like Chocolatey, WinGet, and others - it seems like having an installation that would enable me to use these mechanisms instead of going to a download screen on a website would be a big help. I would love to be able to do brew install ndepend and have that just work.
There’s some integration in Visual Studio for setting up projects and running NDepend on the current project. It’d be awesome to see similar integration for VS Code.
At the time of this writing, the NDepend getting started on Mac documentation says that this is coming. I’m looking forward to it.
I’m hoping that whatever comes out, the great GUI experience to view the various graphs and charts will also be coming for cross-platform. That’s a huge job, but it would be awesome, especially since I’m not really on any Windows machines anymore.
Invoking the Command Line
The cross-platform executable is a .dll so running it is a somewhat long command line:
dotnet ~/path/to/net8.0/NDepend.Console.MultiOS.dll
It’d be nice if this was more… single-command, like ndepend-console or something. Perhaps if it was a dotnet global tool it would be easier. That would also take care of the install mechanism - dotnet tool install ndepend-console -g seems like it’d be pretty nifty.
Commands and Sub-Commands
The command line executable gets used to create projects, register licenses, and run analyses. I admit I’ve gotten used to commands taking command/sub-command hierarchies to help disambiguate the calls I’m making rather than having to mix-and-match command line arguments at the top. I think that’d be a nice improvement here.
For example, instead of…
dotnet ./net8.0/NDepend.Console.MultiOS.dll /reglic XXXXXXXX
dotnet ./net8.0/NDepend.Console.MultiOS.dll /unreglic
It could be…
dotnet ./net8.0/NDepend.Console.MultiOS.dll license register --code XXXXXXXX
dotnet ./net8.0/NDepend.Console.MultiOS.dll license unregister
That would mean when I need to create a project, maybe it’s under…
dotnet ./net8.0/NDepend.Console.MultiOS.dll project create [args]
And executing analysis might be under…
dotnet ./net8.0/NDepend.Console.MultiOS.dll analyze [args]
It’d make getting help a little easier, too, since the help could list the commands and sub-commands, with details being down at the sub-command level instead of right at the top.
Graphs in HTML Reports
Without the full GUI you don’t get to see the graphs like the dependency matrix that I love so much. Granted, these are far more useful if you can click on them and interact with them, but still, I miss them in the HTML.
Support for Roslyn Analyzers
NDepend came out long before Roslyn analyzers were a thing, and some of what makes NDepend shine are the great rules based on CQLinq - a much easier way to query for things in your codebase than trying to write a Roslyn analyzer.
It would be so sweet if the rules that could be analyzed at develop/build time - when we see Roslyn analyzer output - could actually be executed as part of the build. Perhaps it’d require pointing at an .ndproj file to get the list of rules. Perhaps not all rules would be something that can be analyzed that early in the build. I’m just thinking about the ability to “shift left” a bit and catch the failing quality gates before running the analysis. That could potentially lead to a new/different licensing model where some developers, who are not authorized to run “full NDepend,” might have cheaper licenses that allow running of CQL-as-Roslyn-analyzer for build purposes.
Maybe an alternative to that would be to have a code generator that “creates a Roslyn analyzer package” based on CQL rules. Someone licensed for full NDepend could build that package and other devs could reference it.
I’m not sure exactly how it would work, I’m kinda brainstorming. But the “shift left” concept along with catching things early does appeal to me.