
Being Productive with Zero Admin on MacOS
Here’s the proposition: You just got a new Mac and you need to set it up for development on Azure (or your favorite cloud provider) in multiple different languages and technologies but you don’t have any admin permissions at all. Not even a little bit. How do you get it done? We’re going to give it a shot.
BIGGEST DISCLAIMER YOU HAVE EVER SEEN: THIS IS UNSUPPORTED. Not just “unsupported by me” but, in a lot of cases, unsupported by the community. For example, we’ll be installing Homebrew in a custom location, and they have no end of warnings about how unsupported that is. They won’t even take tickets or PRs to fix it if something isn’t working. When you take this on, you need to be ready to do some troubleshooting, potentially at a level you’ve not had to dig down to before. Don’t post questions, don’t file issues - you are on your own, 100%, no exceptions.
OK, hopefully that was clear. Let’s begin.
The key difference in what I’m doing here is that everything goes into your user folder somewhere.
- You don’t have admin, so you can’t install Homebrew in its default
/usr/local/binstyle location. - You don’t have admin, so you can’t use most standard installers that want to put apps in central locations like
/Applicationsor/usr/share. - You don’t have admin, so you can’t modify
/etc/paths.dor anything like that.
Contents:
- Strategies
- Start with Git
- Homebrew
- VS Code
- Homebrew Profile
- Homebrew Formulae
- PowerShell
- Azure CLI and Extensions
- Node.js and Tools
- rbenv
- .NET SDK and Tools
- Java
- Azure DevOps Artifacts Credential Provider
- Issue: Gatekeeper
- Issue: Admin-Only Installers
- Issue: App Permissions
- Issue: Bash Completions
- Issue: Path and Environment Variable Propagation
- Issue: Python Config During Updates
- Conclusion
Strategies
The TL;DR here is a set of strategies:
- Install to your user folder.
- Instead of
/usr/local/binor anything else under/usr/local, we’re going to create that whole structure under~/local-~/local/binand so on. - Applications will go in
~/Applicationsinstead of/Applications.
- Instead of
- Use your user
~/.profilefor paths and environment. No need for/etc/paths.d. Also,~/.profileis pretty cross-shell (e.g., bothbashandpwshobey it) so it’s a good central way to go. - Use SDK-based tools instead of global installers. Look for tools that you can install with, say,
npm install -gordotnet tool install -gif you can’t find something in Homebrew.
Start with Git
First things first, you need Git. This is the only thing that you may have challenges with. Without admin I was able to install Xcode from the App Store and that got me git. I admit I forgot to even check to see if git just ships with MacOS now. Maybe it does. But you will need Xcode command line tools for some stuff with Homebrew anyway, so I’d say just install Xcode to start. If you can’t… hmmm. You might be stuck. You should at least see what you can do about getting git. You’ll only use this version temporarily until you can install the latest using Homebrew later.
Homebrew
Got Git? Good. Let’s get Homebrew installed.
mkdir -p ~/local/bin
cd ~/local
git clone https://github.com/Homebrew/brew Homebrew
ln -s ~/local/Homebrew/bin/brew ~/local/bin/brew
I’ll reiterate - and you’ll see it if you ever run brew doctor - that this is wildly unsupported. It works, but you’re going to see some things here that you wouldn’t normally see with a standard Homebrew install. For example, things seem to compile a lot more often than I remember with regular Homebrew - and this is something they mention in the docs, too.
Now we need to add some stuff to your ~/.profile so we can get the shell finding your new ~/local tools. We need to do that before we install more stuff via Homebrew. That means we need an editor. I know you could use vi or something, but I’m a VS Code guy, and I need that installed anyway.
VS Code
Let’s get VS Code. Go download it from the download page, unzip it, and drop it in your ~/Applications folder. At a command prompt, link it into your ~/local/bin folder:
ln -s '~/Applications/Visual Studio Code.app/Contents/Resources/app/bin/code' ~/local/bin/code
I was able to download this one with a browser without running into Gatekeeper trouble. If you get Gatekeeper arguing with you about it, use curl to download.
Homebrew Profile
You can now do ~/local/bin/code ~/.profile to edit your base shell profile. Add this line so Homebrew can put itself into the path and set various environment variables:
eval "$($HOME/local/bin/brew shellenv)"
Restart your shell so this will evaluate and you now should be able to do:
brew --version
Your custom Homebrew should be in the path and you should see the version of Homebrew installed. We’re in business!
Homebrew Formulae
We can install more Homebrew tools now that custom Homebrew is set up. Here are the tools I use and the rough order I set them up. Homebrew is really good about managing the dependencies so it doesn’t have to be in this order, but be aware that a long dependency chain can mean a lot of time spent doing some custom builds during the install and this general order keeps it relatively short.
# Foundational utilities
brew install ca-certificates
brew install grep
brew install jq

# Bash and wget updates
brew install gettext
brew install bash
brew install libidn2
brew install wget

# Terraform - I use tfenv to manage installs/versions. This will
# install the latest Terraform.
brew install tfenv
tfenv install

# Terrragrunt - I use tgenv to manage installs/versions. After you do
# `list-remote`, pick a version to install.
brew install tgenv
tgenv list-remote

# Go
brew install go

# Python
brew install python@3.10

# Kubernetes
brew install kubernetes-cli
brew install k9s
brew install krew
brew install Azure/kubelogin/kubelogin
brew install stern
brew install helm
brew install helmsman

# Additional utilities I like
brew install marp-cli
brew install mkcert
brew install pre-commit
If you installed the grep update or python, you’ll need to add them to your path manually via the ~/.profile. We’ll do that just before the Homebrew part, then restart the shell to pick up the changes.
export PATH="$HOME/local/opt/grep/libexec/gnubin:$HOME/local/opt/python@3.10/libexec/bin:$PATH"
eval "$($HOME/local/bin/brew shellenv)"
PowerShell
This one was more challenging because the default installer they provide requires admin permissions so you can’t just download and run it or install via Homebrew.
For this, you have one of two options:
Option 1: Use the dotnet global tool.
If you can get by on bash until the dotnet install later, you can install PowerShell as a dotnet global tool.
dotnet tool install --global PowerShell
Option 2: Manual install.
First, find the URL for the the .tar.gz from the releases page for your preferred PowerShell version and Mac architecture. I’m on an M1 so I’ll get the arm64 version.
cd ~/Downloads
curl -fsSL https://github.com/PowerShell/PowerShell/releases/download/v7.5.0/powershell-7.5.0-osx-arm64.tar.gz -o powershell.tar.gz
mkdir -p ~/local/microsoft/powershell/7
tar -xvf ./powershell.tar.gz -C ~/local/microsoft/powershell/7
chmod +x ~/local/microsoft/powershell/7/pwsh
ln -s '~/local/microsoft/powershell/7/pwsh' ~/local/bin/pwsh
Now you have a local copy of PowerShell and it’s linked into your path.
An important note here - I used curl instead of my browser to download the .tar.gz file. I did that to avoid Gatekeeper.
Azure CLI and Extensions
You use Homebrew to install the Azure CLI and then use az itself to add extensions. I separated this one out from the other Homebrew tools, though, because there’s a tiny catch: When you install az CLI, it’s going to build openssl from scratch because you’re in a non-standard location. During the tests for that build, it may try to start listening to network traffic. If you don’t have rights to allow that test to run, just hit cancel/deny. It’ll still work.
brew install azure-cli
az extension add --name azure-devops
az extension add --name azure-firewall
az extension add --name fleet
az extension add --name front-door
Node.js and Tools
I use n to manage my Node versions/installs. n requires us to set an environment variable N_PREFIX so it knows where to install things. First install n via Homebrew:
brew install n
Now edit your ~/.profile and add the N_PREFIX variable, then restart your shell.
export N_PREFIX="$HOME/local"
export PATH="$HOME/local/opt/grep/libexec/gnubin:$HOME/local/opt/python@3.10/libexec/bin:$PATH"
eval "$($HOME/local/bin/brew shellenv)"
After that shell restart, you can start installing Node versions. This will install the latest:
n latest
Once you have Node.js installed, you can install Node.js-based tooling.
# These are just tools I use; install the ones you use.
npm install -g @stoplight/spectral-cli `
               gulp-cli `
               tfx-cli `
               typescript
rbenv
I use rbenv to manage my Ruby versions/installs. rbenv requires both an installation and a modification to your ~/.profile. If you use rbenv…
# Install it, and install a Ruby version.
brew install rbenv
rbenv init
rbenv install -l
Update your ~/.profile to include the rbenv shell initialization code. It’ll look like this, put just after the Homebrew bit. Note I have pwsh in there as my shell of choice - put your own shell in there (bash, zsh, etc.). Restart your shell when it’s done.
export N_PREFIX="$HOME/local"
export PATH="$HOME/local/opt/grep/libexec/gnubin:$HOME/local/opt/python@3.10/libexec/bin:$PATH"
eval "$($HOME/local/bin/brew shellenv)"
eval "$($HOME/local/bin/rbenv init - pwsh)"
.NET SDK and Tools
The standard installers for the .NET SDK require admin permissions because they want to go into /usr/local/share/dotnet.
Download the dotnet-install.sh shell script and stick that in your ~/local/bin folder. What’s nice about this script is it will install things to ~/.dotnet by default instead of the central share location.
# Get the install script
curl -fsSL https://dot.net/v1/dotnet-install.sh -o ~/local/bin/dotnet-install.sh
chmod +x ~/local/bin/dotnet-install.sh
We need to get the local .NET into the path and set up variables (DOTNET_INSTALL_DIR and DOTNET_ROOT) so .NET and the install/uninstall processes can find things. We’ll add that all to our ~/.profile and restart the shell.
export DOTNET_INSTALL_DIR="$HOME/.dotnet"
export DOTNET_ROOT="$HOME/.dotnet"
export N_PREFIX="$HOME/local"
export PATH="$HOME/local/opt/grep/libexec/gnubin:$DOTNET_ROOT:$DOTNET_ROOT/tools:$HOME/local/opt/python@3.10/libexec/bin:$PATH"
eval "$($HOME/local/bin/brew shellenv)"
eval "$($HOME/local/bin/rbenv init - pwsh)"
Note we did not grab the .NET uninstall tool. It doesn’t work without admin permissions. When you try to run it doing anything but listing what’s installed, you get:
The current user does not have adequate privileges. See https://aka.ms/dotnet-core-uninstall-docs.It’s unclear why uninstall would require admin privileges since install did not. I’ve filed an issue about that.
After the shell restart, we can start installing .NET and .NET global tools. In particular, this is how I get the Git Credential Manager plugin.
# Install latest .NET 8.0, 9.0
dotnet-install.sh -?
dotnet-install.sh -c 8.0
dotnet-install.sh -c 9.0

# Get Git Credential Manager set up.
dotnet tool install -g git-credential-manager
git-credential-manager configure

# Other .NET tools I use. You may or may not want these.
dotnet tool install -g dotnet-counters
dotnet tool install -g dotnet-depends
dotnet tool install -g dotnet-dump
dotnet tool install -g dotnet-format
dotnet tool install -g dotnet-guid
dotnet tool install -g dotnet-outdated-tool
dotnet tool install -g dotnet-script
dotnet tool install -g dotnet-svcutil
dotnet tool install -g dotnet-symbol
dotnet tool install -g dotnet-trace
dotnet tool install -g gti
dotnet tool install -g microsoft.web.librarymanager.cli
Java
Without admin, you can’t get the system Java wrappers to be able to find any custom Java you install because you can’t run the required command like: sudo ln -sfn ~/local/opt/openjdk/libexec/openjdk.jdk /Library/Java/JavaVirtualMachines/openjdk.jdk
If you use bash or zsh as your shell, you might be interested in SDKMAN! as a way to manage Java. I use PowerShell so this won’t work because SDKMAN! relies on shell functions to do a lot of its job.
Instead, we’ll install the appropriate JDK and set symlinks/environment variables.
brew install openjdk
In .profile, we’ll need to set JAVA_HOME and add OpenJDK to the path. If we install a different JDK, we can update JAVA_HOME and restart the shell to switch.
export DOTNET_INSTALL_DIR="$HOME/.dotnet"
export DOTNET_ROOT="$HOME/.dotnet"
export N_PREFIX="$HOME/local"
export JAVA_HOME="$HOME/local/opt/openjdk"
export PATH="$JAVA_HOME/bin:$HOME/local/opt/grep/libexec/gnubin:$DOTNET_ROOT:$DOTNET_ROOT/tools:$HOME/local/opt/python@3.10/libexec/bin:$PATH"
eval "$($HOME/local/bin/brew shellenv)"
eval "$($HOME/local/bin/rbenv init - pwsh)"
Azure DevOps Artifacts Credential Provider
If you use Azure DevOps Artifacts, the credential provider is required for NuGet to restore packages. There’s a script that will help you download and install it in the right spot, and it doesn’t require admin.
wget -qO- https://aka.ms/install-artifacts-credprovider.sh | bash
Issue: Gatekeeper
If you download things to install, be aware Gatekeeper may get in the way.
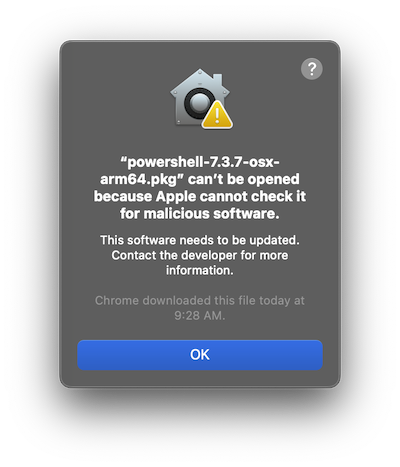
You get messages like “XYZ can’t be opened because Apple cannot check it for malicious software.” This happened when I tried to install PowerShell by downloading the .tar.gz using my browser. The browser adds an attribute to the downloaded file and prompts you before running it. Normally you can just approve it and move on, but I don’t have permissions for that.
To fix it, you have to use the xattr tool to remove the com.apple.quarantine attribute from the affected file(s).
xattr -d com.apple.quarantine myfile.tar.gz
An easier way to deal with it is to just don’t download things with a browser. If you use curl to download, you don’t get the attribute added and you won’t get prompted.
Issue: Admin-Only Installers
Some packages installed by Homebrew (like PowerShell) try to run an installer that requires admin permissions. In some cases you may be able to find a different way to install the tool like I did with PowerShell. In some cases, like Docker, you need the admin permissions to set that up. I don’t have workarounds for those sorts of things.
Issue: App Permissions
There are some tools that may require additional permissions by nature, like Rectangle needs to be allowed to control window placement and I don’t have permissions to grant that. I don’t have workarounds for those sorts of things.
Issue: Bash Completions
Some Homebrew installs will dump completions into ~/local/etc/bash_completions.d. I never really did figure out what to do about these since I don’t really use Bash. There’s some doc about options you have but I’m not going to dig into it.
Issue: Path and Environment Variable Propagation
Since you’ve only updated your path and environment from your shell profile (e.g., not /etc/paths or whatever), these changes won’t be available unless you’re running things from your login shell.
A great example is VS Code and build tools. Let’s say you have a build set up where the command is npm. If the path to npm is something you added in your ~/.profile, VS Code may not be able to find it.
- If you start VS Code by running
codefrom your shell, it will inherit the environment andnpmwill be found. - If you start VS Code by clicking on the icon in the Dock or Finder, it will not inherit the environment and
npmwill not be found.
You can mitigate a little of this, at least in VS Code, by:
- Set your
terminal.integrated.profiles.osxprofiles to pass-las an argument (act as a login shell, process~/.profile) as shown in this Stack Overflow answer. - Set your
terminal.integrated.automationProfile.osxprofile to also pass-las an argument to your shell. (You may or may not need to do this; I was able to get away without it.) - Always use shell commands to launch builds (specify
"type": "shell"intasks.json) for things instead of letting it default to"type": "process".
Other tools will, of course, require other workarounds.
Issue: Python Config During Updates
Some packages like glib have a dependency on Python for installs. However, if you have configuration settings you may need to set (for example, trusted-host), with Python being in your user folder, you may not have the rights to write to /Library/Application Support/pip to set a global config. However, sometimes these installers ignore user-level config. In this case, you may need to put your pip.conf in the folder with Python, for example ~/local/opt/python@3.12/Frameworks/Python.framework/Versions/3.12/pip.conf.
Conclusion
Hopefully this gets you bootstrapped into a dev machine without requiring admin permissions. I didn’t cover every tool out there, but perhaps you can apply the strategies to solving any issues you run across. Good luck!