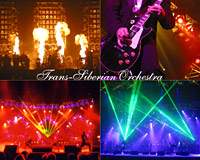
gaming, xbox comments edit

My copy of Rock Band arrived yesterday and it well and truly does rock.  The thing I was excited for was the drum kit; I’ve always fancied myself a drummer, and I finally get to test that out.

Turns out, I’m not all that bad.

A breakdown by instrument…

*Guitar **I’ve played my fair share of *Guitar Hero 2 and Guitar Hero 3, so I knew what to expect out of the guitar experience.  You can play lead or bass, your choice.  The actual playing experience with the guitar is roughly the same, so I won’t go too far into it.  That said, I did notice the difficulty level was significantly lower than GH3, and possibly slightly lower than GH2.  That’s not a bad thing - it just makes you feel cooler.

I can’t say much about the controller it ships with, though, because mine arrived broken (the directional pad on it is stuck so it constantly thinks the “down” arrow is being pushed - throws a wrench in the works, let me tell you).  Fortunately their support is really good and you can very quickly get an RMA and a replacement through their automated online system - no need for massive escalation or trouble.  Ordered my replacement this morning.

*Microphone (Vocals/Tambourine) **I haven’t played *SingStar but I gather the vocals portion here is the same as that.  It’s a little harder than I expected and it does require you to really know the words and the tune - including all the little fluctuations the singer makes while singing.  In some cases you can get by with volume over accuracy (which isn’t far from real life, right?) but generally you do need to know the song pretty well.

For example, I sing along to Bon Jovi’s “Wanted Dead or Alive” in the car, but it turns out I really only know about half the song… and thinking back, I do sort of hum my way through a lot in the car.  That said, I was able to get 100% (on Easy level) for The Clash song “Should I Stay Or Should I Go?”  So it’s not impossible, just sort of hard.

During musical solos, you can tap the mic in time with some “beats” that appear and play the tambourine.  This sort of reminds me of the clapping that you have to do in Donkey Konga.

Drums This is what I was waiting for.  It’s a heck of a setup and isn’t really small sitting in your living room, but it’s hella fun.  There are “notes” on the screen for hitting each of the four drum pads (just like Guitar Hero) and the kick drum is signified by a hard line that crosses all of the four note positions at once.  It takes a little getting used to, but once you figure it out, you’re in.  I’m working through Easy difficulty right now because I tried Medium and… well, there’s too much going on and I haven’t quite got drums down yet.

In some cases, though, I can’t figure out whether my drum controller is faulty or if I’m just a sucky drummer.  I swear I hit the right pad at the right time, it just says I didn’t.  Other times, everything’s fine.  I can get like 98% in some cases, I just miss a couple.  I would think if the controller was faulty it would be… more predictable. Again, the 60 day warranty might be good here.  Drums are definitely less forgiving than the guitar - with the guitar, you can “pretty much” get the note and it’ll count it; with drums, you either get it dead on or you don’t get credit.  I think that’s more likely what I’m running into.

That said, I really hope someone comes out with some after-market drums for this game.  I like the drums, but I’d like some of it to be a little more adjustable.  I’m 6’2” and I feel sort of cramped by the kit due to the placement of the kick drum pedal.  Maybe I just need to try some different positioning.

*The Game **The game itself is pretty good.  Far better set list than *Guitar Hero 3 had.  I also really like the way the campaign is set up as a “world tour” where you start in small venues and gather money and fans - it feels more tangible than the arbitrary progression you get in Guitar Hero.  You also have a really nice character creation system that allows you to personalize your character including face, hair, clothes… very cool.  There were only three points of confusion I had:

Point of Confusion 1:  Bands are attached to an Xbox Live profile and to a Rock Band character.  When you create a band, the person who’s creating the band gets the band saved to their Xbox Live profile. Further, as you select (or create) your character in the band, that specific character has to play in the band for the entire life of the band - they’re the band leader.  This is very important because…

Point of Confusion 2:  Characters can’t change instruments.  Once you create a character for a particular instrument (guitar/drums/mic), they can’t switch.  Jenn and I created a band where I was playing drums and she was playing guitar.  She wanted to try the drums out, so we tried to get it so her character was playing drums and mine was on guitar.  No dice - both of us were only allowed to create new characters.  And since my profile was the one with the band leader, and the band leader was playing drums, we either had to play under the other person’s profile or create a new band.  We created a new band.  (The third option, really, was to back out and do a “quick play” where you can form a band impromptu with anyone playing any instrument - no leader required.)

Point of Confusion 3: Once the instruments are attached to the Xbox 360, you can’t change their position.  So, say I attach the instruments and the drums are player 1, the guitar is player 2, and the mic is player 3.  By default, my console signs me in when it turns on, so I’m signed in as player 1 and I’m stuck on drums.  The easy way to fix this - connect all of the controllers to the Xbox, turn it on, and sign everyone out.  Everyone pick up the control they want to play with and sign in from there.  During the game if you want to change instruments, you can sign out and sign back in without exiting the game, so just do that - sign out on your current instrument and sign in on the one you want to switch to.  It sounds like a no-brainer when I say it here, but trust me, this was a huge problem for us to figure out.

Again, by-and-large, it’s an awesome game.  I’m also super happy [so far] with the ease of customer support.

Hey, since I’ve got the day off, I should probably go do a little rockin’ right now.

dotnet, vs comments edit

I just got done with installing Visual Studio 2008.  It now is the installation experience that I will rank other installation experiences against to see how badly they suck - on a scale of “Awesome” to “VS 2008.”  It went something like this:

  • Download VS 2008 ISO from MSDN.
  • Start up Virtual CD Control Panel and mount the ISO as a drive.
  • Install VS 2008.
  • Get about halfway finished and get asked to reboot.  Click the “OK” button and reboot.  No option available to not reboot.
  • Log in and watch the setup alert me, after “loading setup files” for 10 minutes or so, that setup has failed and I need to restart.
  • Figure out that there’s no option to automatically mount an ISO at startup using the Virtual CD Control Panel and guess the issue is probably that the drive disappeared after my reboot.  Hard to say, though, with no specific error message.
  • Mount the ISO again figuring I’ll give it another run.
  • Get about 75% finished and, again, get asked to reboot.  Again, no option not to reboot.  Click “OK” and reboot.
  • Watch very closely as I get logged in again and haul ass to get the Virtual CD Control Panel up and re-mount the ISO before the “loading setup files” gives me the failure message.  Get the drive mounted but still get the failure.
  • Decide to uninstall the bits that got installed, figuring something got corrupted.
  • 15 minutes into “generating setup script” for the uninstall, get a notice that I need to close Outlook because it has Word open.  Close Outlook.  Watch in horror as the “generating setup script” bit starts over from the beginning.
  • Finish the uninstall and reboot for good measure.
  • Decide that the Virtual CD Control Panel is bad news for me and that it’s time to burn the ISO to a DVD.
  • Realize after 20 minutes of futzing around that of the two computers in my office, one only has a CD-RW burner and the other has a DVD burner so old that the Windows Server 2003 OS doesn’t actually recognize it as a DVD burner.  No drivers, discontinued support.  No one else in my general cube vicinity has a DVD burner either.  What the…?
  • Download an ISO extraction utility and extract the contents of the ISO to my drive and start the installation from there.
  • Shut down everything on the machine that could remotely be construed as productive for fear that the install will be mad at me and restart midstream.  Includes Outlook, IE, Word, Messenger, etc.
  • Finally get through the install of both VS 2008 and the associated documentation.  Takes somewhere between “forever” and “holy crap” to finish.
  • …and now I’m installing all of my add-ins.

Elapsed time from start to installing add-ins: 6 HOURS.  Absolutely ridiculous.  From what I hear, I’m not the only one eating it on this one.  I don’t remember the betas kicking my ass like this.  What happened?

vs, downloads, windows comments edit

NOTE: I’m no longer maintaining the Command Prompt Round-Up. Instead, visit the Command Prompt Here Generator.

With the release of VS 2008 and yet-another-Visual-Studio-command-prompt, I figured I’d do a round-up of all of the “Command Prompt Here” power toys that I’ve gathered to assist me in keeping this all working.

  • Doshere.inf - Standard, no-frills command prompt (basically the original PowerToy).
  • powershellhere.inf - PowerShell command prompt (from Scott Hanselman).
  • VSNet2003cmdhere.inf - Visual Studio 2003 command prompt (from Scott Hanselman).
  • VSNet2005cmdhere.inf - Visual Studio 2005 command prompt (from Scott Hanselman).
  • VSNet2008cmdhere.inf - Visual Studio 2008 command prompt for x86 (my own).
  • VSNet2008Admincmdhere.inf - Visual Studio 2008 elevated/Administrator command prompt for x86 (my own).
  • VSNet2010cmdhere.inf - Visual Studio 2010 command prompt for x86 (my own).

Pick any or all of them, your choice.  Of course, if you only use one of the VS command prompts, you can just set it so your command prompt is always a VS command prompt, but that’s less intriguing when you have to support side-by-side VS installs.

Oh, and all of these together looks pretty crazy.  But it’s useful.

All of the Command Prompt Here options working
together.

Yours for the taking!

NOTE: I’m no longer maintaining the Command Prompt Round-Up zip file. Instead, visit the Command Prompt Here Generator.

UPDATE 3/12/09: If you need more in the way of easy run-as-admin elevation stuff, like the VS 2008 Admin command prompt tool, you’ll want to check out the Elevation Power Toys on TechNet. Everything from “elevate this script” to “PowerShell Admin prompt here” is waiting for you.

dotnet, vs comments edit

XML doc comment
screenshotIt occurred to me the other day that there’s information out there about the technical aspects of writing XML doc comments in .NET code (i.e., the markup tags) but there’s nothing out there about what you should put in that markup.  While not every developer is also a technical writer or novelist, sometimes all the users of your code have to go on is the documentation you generate, so it’s important to write it well.

And, no, you can’t just defer your users to Reflector.  You’d actually be amazed at how many people don’t even know what Reflector is.

TL;DR - THE GOLDEN RULES OF DOCUMENTATION There’s a lot here. If you don’t take anything else away, please at least take these two things:

  • Write like it’s MSDN. After you write the documentation, read it back to yourself, maybe even out loud. Does it sound like something you’d read from MSDN? How’s the grammar? They have smart people writing docs over there - learn from them the same as you “View Source” to learn good HTML.
  • Write like the reader doesn’t have the source code. Write the doc, then collapse all the method definitions so all you see is XML doc. Go get a coffee. Come back. Now read the documentation. Does it tell you everything you will need to know to work with the function? Pretend the reader doesn’t have Reflector (you’d be surprised, lots don’t).

Given those two rules, here are some tips on writing better XML doc comments:

  1. Think about what you’d like to see and write that.  I intentionally made this the number one rule because it’s the most important.  When you’re writing your documentation, step outside yourself for a minute and think, “If I was handed just this assembly and a help doc, and I didn’t have access to Reflector or anything like that, what sort of documentation would help me to understand how to use this code?”  Remember:
    • Your users won’t necessarily have the source to refer to, and even if they do, you shouldn’t force them to resort to that.
    • Not everyone knows everything you know about the code.
    • The flow of control may not actually be as obvious as you think.
  2. Learn the markup.  If you only know about the <summary/> tag that gets put in when you hit /// (or ''', for you VB people), you don’t know XML doc comments.  MSDN has the reference for the base tag set but there is a good reference here that includes a set of fairly widely accepted extensions. There’s a lot more to comments than the summary.
  3. Keep the <summary/> short.  The content in the <summary/> and <param/> tags shows up in Intellisense in the Visual Studio IDE.  Don’t write a novel there - one sentence, maybe two tops is all you need.  Leave the detailed comments for the <remarks/> section.
  4. Don’t explain something in terms of itself.  The documentation is where you should expound on what’s going on and, in some cases, why.  Say you have a custom “ICoolThing” interface and you implement that in a “ReallyCoolThing” class.  A bad <summary/> would be, “An implementation of the ICoolThing interface that is really cool.” That’s not at all helpful - it doesn’t tell you anything.  Instead, try something like, “Cool thing used to render XML doc comments.” (Or whatever it’s used for.)  Explaining something in terms of itself isn’t clarifying, it’s just redundant.
  5. Write in complete sentences…  Writing code is a very terse experience.  There’s a grammar, and it [generally] reads well enough,  but it’s a different beast than writing documentation. Documentation is where you need to describe in full, complete sentences and paragraphs what’s going on.
  6. …But be straightforward and don’t go overboard with verbosity.  Basically, “know when to say when.”  You’re not writing a legal document.  You’re not writing a scientific research paper.  (Or maybe you are, but you know what I mean.)  Don’t “fluff up” your docs with extra language.  Don’t over-formalize the language.  Make it easy to read, explain what’s going on, and call it a day.
  7. I can has grammarz?  Use proper spelling, grammar, and punctuation.  If you’re not confident in your writing abilities, have someone who is good at this proofread for you.  (Or, better still, integrate the proofreading into your code review process. You have a code review process, right?)  It may seem unimportant, but these things can make your documentation far easier to understand and may even give users more confidence in your code. (If the person writing the code can’t write a decent sentence, would you really have the confidence that all of the error handling and such is done right?)  The only time you can write your docs with bad spelling, grammar, and punctuation is if you’re writing in LOLCODE.
  8. Read your own documentation.  Once you’ve written your docs, read them through to see if they make sense.  This sounds like common sense, but it’s amazing how many times I’ve seen docs get written and the author never actually read through them to see if they were intelligible.  Docs aren’t a write-only stream - read and revise as necessary.
  9. Remember that whitespace doesn’t render.  Or at least not like you think it does.  Don’t forget that you’re writing in XML - throwing in a standard line break isn’t going to actually get you onto a new line.  So, for example, this:

    /// <remarks> /// This is the first line. /// This is the second line. /// </remarks>

    Renders as:

    This is the first line. This is the second line.

    Create paragraphs by using <para>...</para> tags (similar to the <p>...</p> in HTML - put your content between the <para> and </para> tags).  Generally you won’t actually want single line breaks anywhere because in the 80% case, you’ll actually be wanting to use a different construct - a list, a table, or paragraphs.  A revised version of the above block would be:

    /// <remarks> /// <para> /// This is the first line. /// </para> /// <para> /// This is the second line. /// </para> /// </remarks>

    The exception to this rule is the <code/> tag - whitespace is respected in there because it’s assumed to be a code snippet.

  10. Hyperlink, hyperlink, hyperlink.  The beauty of XML doc comments is how easily you can cross-reference related topics.  If you’re talking about one method from the documentation on another method, use a <see /> tag to add a link to the relevant method right from the comment body.  If there are related topics that are really important but may not have been linked to from the body of the comment (or maybe they warrant special attention via additional links), use <seealso /> tags at the bottom of your comment block.
  11. Use special markup for reserved words.  One of the extensions that NDoc added is the ability to use <see /> tags on certain reserved words.  When the documentation rendering engine sees these reserved words, it can apply special formatting or perform common expansions on them.  The syntax for this is <see langword="reservedword" />.  For example: <see langword="true" /> …renders as… true …and… <see langword="null" /> …renders as… a null reference (Nothing in Visual Basic)

    The recognized words are:

    • abstract
    • false
    • null
    • sealed
    • static
    • true
    • virtual
  12. Add valid code samples wherever possible.  Nothing helps a developer like seeing a code snippet.  The key is to not only add these snippets where possible (in a nested <code/> tag inside the <example/> tag) but also to make sure they’re valid.  This is sometimes a hard task.  A good way to come up with a valid snippet is to actually write a small demo program and copy the code from that - that way you know the snippet works.
  13. Don’t forget to XML encode entities.  Again, you’re writing XML, so don’t forget that < needs to be &lt;, > needs to be &gt;, and so on.  The compiler will generally catch errors for you, but sometimes things work when they shouldn’t and you’ll get some unexpected results.
  14. Update your doc when you update your code.  The worst problem you’ll run into is that the doc you wrote six months ago doesn’t actually reflect what the code is doing.  It’s easy to overlook updating your docs because the build doesn’t break when your docs are wrong.  Incorrect documentation is actually worse than bad documentation because while bad docs are hard to read, incorrect docs will potentially lead your users to spin wheels wondering why things aren’t working as documented.
  15. Make documentation a priority.  Don’t let documentation be a second class citizen to cranking out the code.  Give it equal rights in your development process and let developers on your team know that documentation is important, too.  If documentation isn’t seen to be important, it won’t get the focus it needs.  Add documentation to your checklist of what needs to be finished before a task is marked complete.

There are a few tools out there that can help you improve your XML doc comment writing experience.  My two favorites are:

  • GhostDoc- Gives you a starting point for writing XML documentation.  Really helpful when you’re implementing interfaces or overriding methods because it can grab the docs from the base method and use that as your starting point.
  • CR_Documentor - Shows a preview of what your documentation will look like when rendered. Also adds some XML documentation templates to the editor context menu.
  • CodeRush Templates
    • Expand templates to write documentation quickly and consistently.

Write the docs you’d like to see. Start with that, and the rest should fall into place for you.

The XO laptop - One Laptop Per Child
program.The One Laptop Per Child foundation has their “Give One, Get One” program going on where you buy two of these little XO laptops and one comes to your house, one gets donated to a child in a developing country.  It’s $400, and $200 of that is tax-deductible (the cost of the laptop that gets sent to the developing country).  The rest goes toward the laptop that hits your hot little hands.  (Ostensibly to give to a child in your life, but for me it’s more likely a toy to hack.)

A charity to help teach kids computing skills? Oh, hellz yeah.  I bought mine; have you got yours?