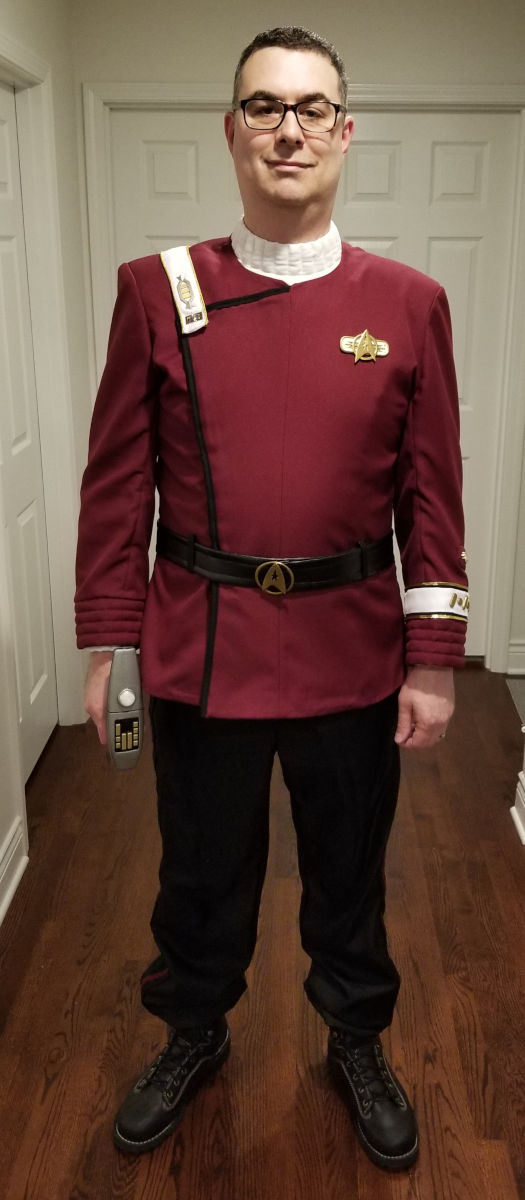
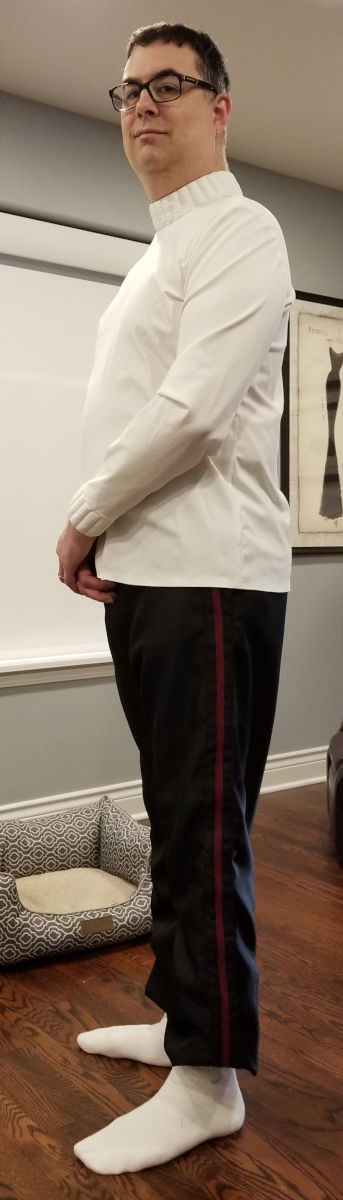
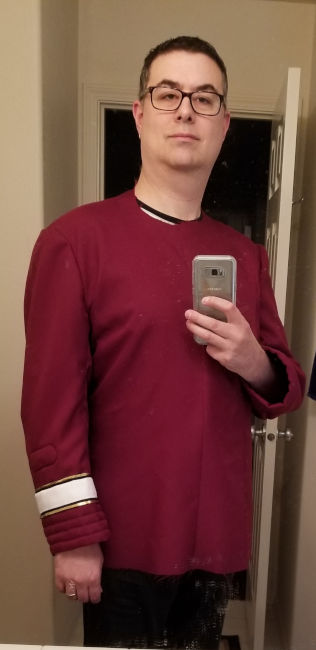
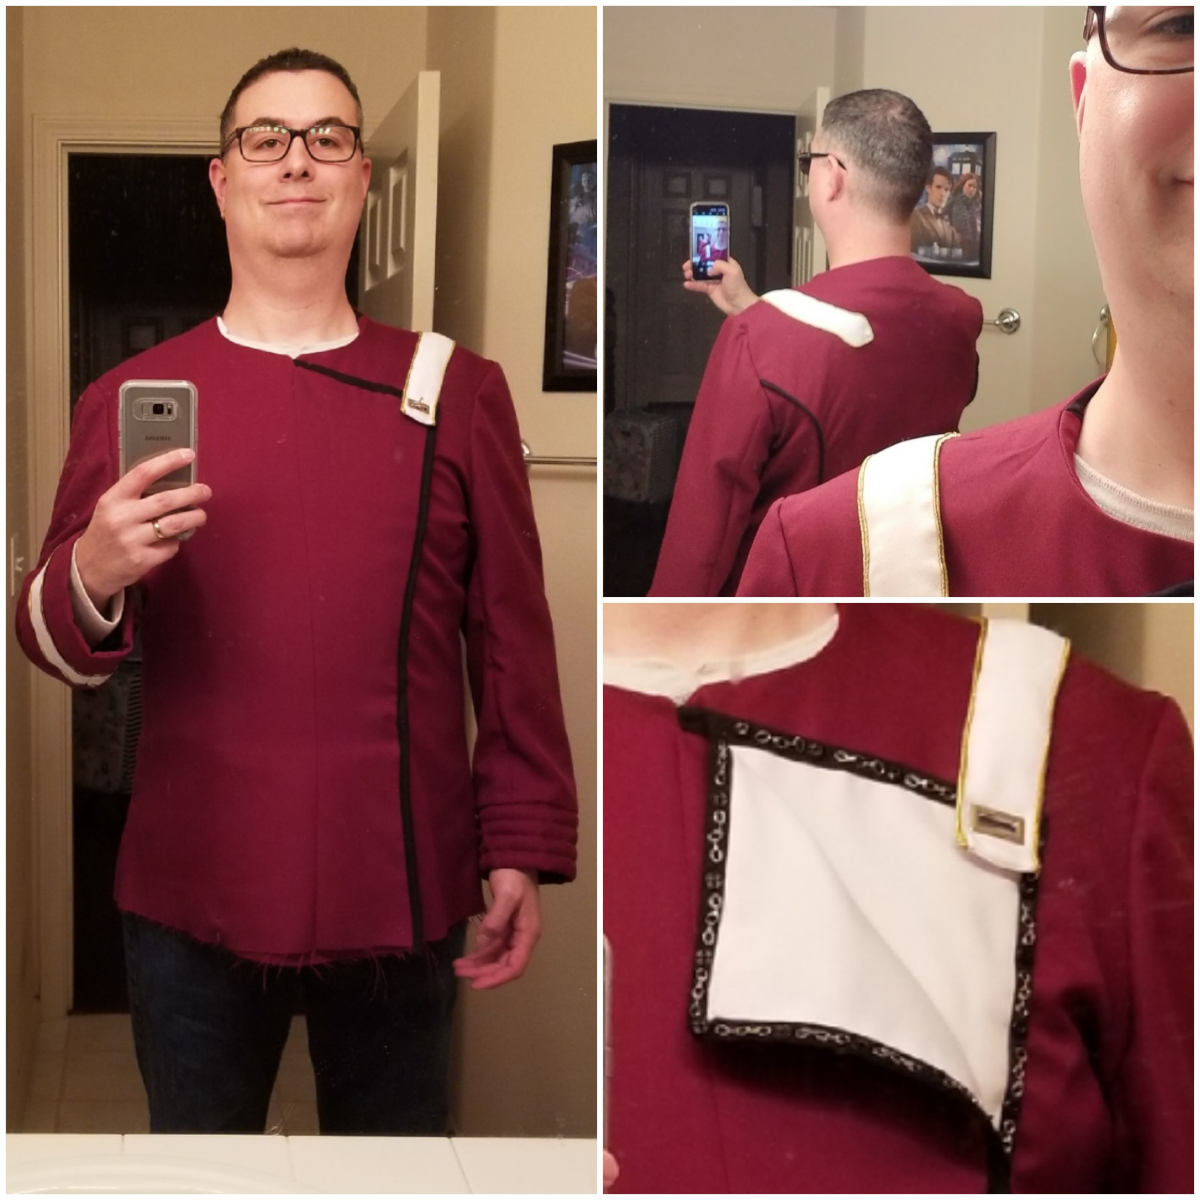
For Halloween 2019 I decided to make a Star Trek II “Monster Maroon” costume. This is the dress uniform you see folks wearing in the Star Trek II through IV movies.
I’ve wanted one for quite some time, so I went for it. I figured folks might be interested in some of the process to get this done.
Research
First, I did a lot of research. I track my research in a Google Doc and I have a folder where I save relevant images and things that I find online that can help. This is a lot of time, searching, finding images, following links, reading on forum posts, looking at movie frames for reference.
I determined that my complete costume would have:
- Jacket
- Pants
- Shirt (the white puffy neck/arm one)
- Chest insignia
- Shoulder strap rank pin
- Shoulder strap security device
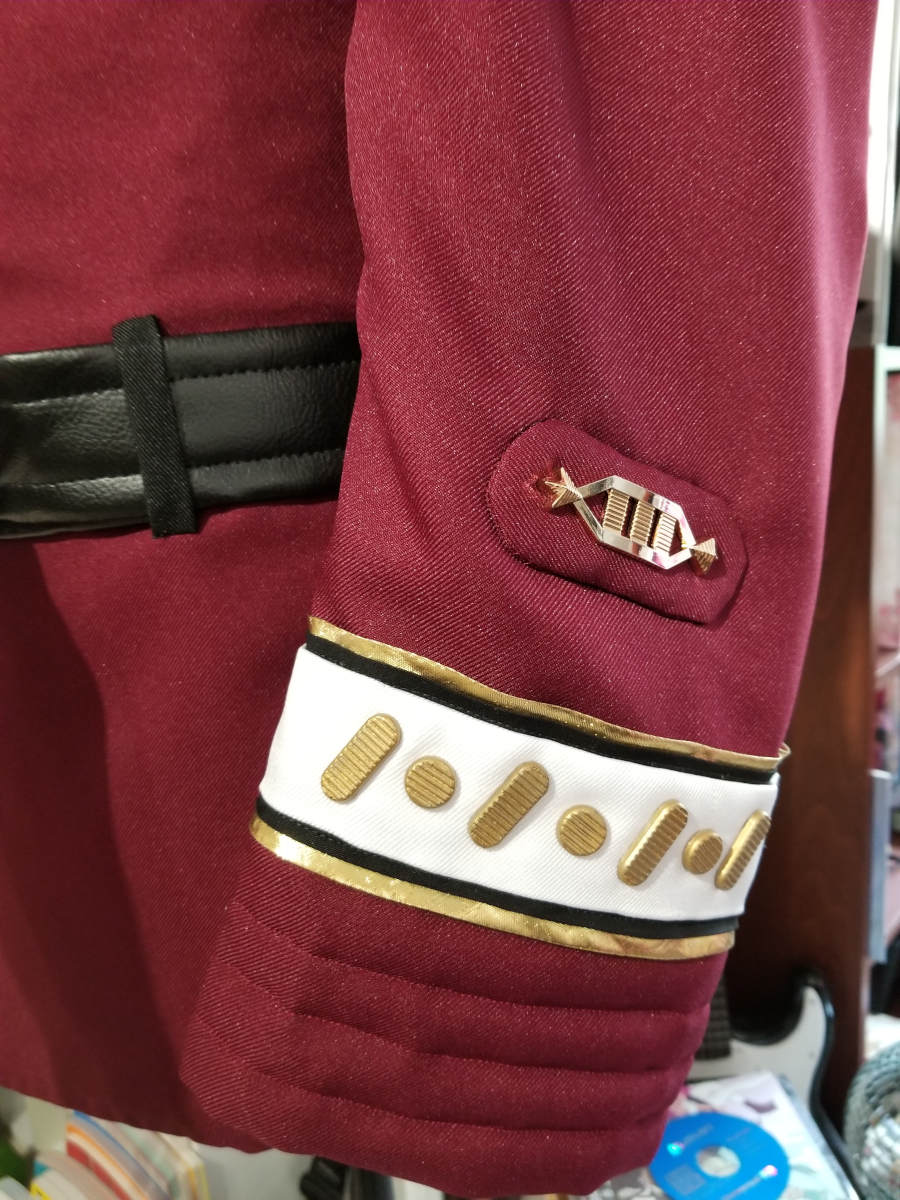
- Left sleeve rank pin
- Left sleeve “pips and squeaks”
- Belt
- Boots
- Phaser
I figured I’d want a phaser but I didn’t need a communicator. Too many handheld props and nowhere to put them.
I decided this broke down as such:
- Items to sew:
- Buy or 3D print:
- Shoulder strap rank pin
- Shoulder strap security device
- Left sleeve rank pin
- Left sleeve “pips and squeaks”
- Belt buckle
- Phaser
I skipped the boots because I already had some I planned on reusing. Not perfect, but good enough and it already appeared like a lot of work.
The Anovos version of this costume provided invaluable from a reference photo standpoint. It’s not “screen worn” but it does show how things should roughly line up and helped a lot.
This forum also has some great photos and info that I used while figuring things out.
Cost Breakdown
The probably-incomplete itemized parts list so I can scare myself when I see what got spent:
| Item |
Cost |
| Jacket pattern |
$24.95 |
| Pants pattern |
$18.95 |
| Shirt pattern |
$14.95 |
| Shoulder strap clasp |
$7.95 |
| S&H for patterns and clasp |
$12.95 |
| Fabric swatches for jacket, pants |
$11.75 |
|
Burgundy gabardine, 4 yd (jacket, pants stripes) |
$26.21 |
| White gabardine (2.75 yd) |
$9.99 |
| Black gabardine (4 yd) |
$15.98 |
| Ivory four-way stretch fabric (shirt, 5 yd) |
$59.97 |
| Thread |
$25.95 |
| Black bias tape |
$15.54 |
| Gold bias tape |
$2.79 |
| Interfacing |
$1.74 |
| Muslin |
$22.71 |
| Batting (for shirt and jacket puffy sleeves) |
$4.97 |
| Snaps |
$1.99 |
| Stitch Witchery |
$2.49 |
| Invisible zipper for shirt |
$2.99 |
| Invisible zipper for pants |
$4.99 |
| Shoulder pads |
$4.49 |
| Silver chain |
$6.38 |
| Spandex |
$23.78 |
| Knit ribbing for pants cuff |
$5.99 |
| Black broadcloth (pocket interior, 0.5 yd) |
$1.00 |
| Black lining (1.5 yd) |
$5.99 |
| Belt buckle (eBay) |
$20.99 |
| 2” elastic (pants waist, 2yd) |
$5.99 |
| Gold soutache cord |
$7.48 |
| Spray paint |
$50.00 |
| TOTAL |
$421.90 |
To soften the blow, I have to consider that I have some fabric left over and I didn’t use all of the thread or bias tape, so I have some I can use on other projects. I also had a few things already that I didn’t have to buy, like white thread, so it ends up kind of evening out.
The shirt fabric would have been half that price but I hosed it up and had to make it twice. Yeah, I’ll get there.
Unless otherwise listed, the vast majority of this went to Joann Fabrics and Crafts. I didn’t break out how much I “saved” using coupons or whatever so it’s not precise. And, of course, there’s stuff you don’t think about - the black bias tape finishes all the seams on the inside, so I used way more than I thought I’d need; I really screwed things up a couple of times and had to remake a couple of pieces, so used more fabric than I thought. That sort of thing.
I didn’t count my time as something that costs, but there was a lot of time here. Calendar time isn’t equal to effort time, though - I work on these things mostly for a few hours on the weekend or on a night or two each week after work. Getting that “me time” is really helpful for me psychologically and I think it makes me less generally cranky. But I don’t know how much “effort time” went in here.
Finally, the patterns - these are as close to screen accurate as you can find. They’re built from real screen-worn costumes as much as possible. However, the instructions are terrible. I don’t care if you’ve done one of the “advanced” patterns from Vogue, this isn’t how you expect. There are missing steps, duplicate steps, one small paragraph where you really need a lot… there’s one step on the pants which is basically, “OK, now put in the waistband.” No photos, no description. It’s like someone giving you an Ikea cabinet and not labeling anything. Just sorta figure it out! This caused a lot of difficulty. Now that I’ve done it once, I see how it should be so I could do it again if needed. I also see how to make it better.
The Phaser
I couldn’t find an affordable phaser and Thingiverse didn’t have quite what I wanted, so I ended up having to make my own using Autodesk Fusion 360. I used reference photos and tried to trace the shape as close as possible.
My first draft looked OK, but was pretty plain.
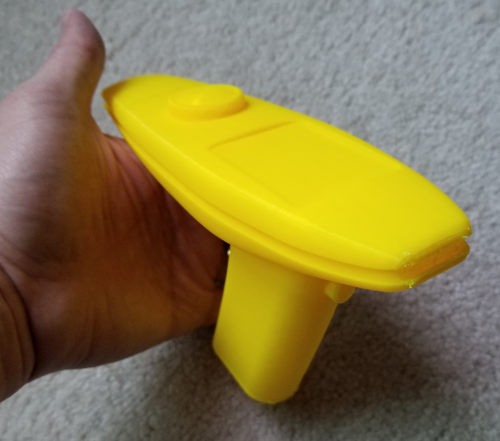
I started adding some details, moving some things around.
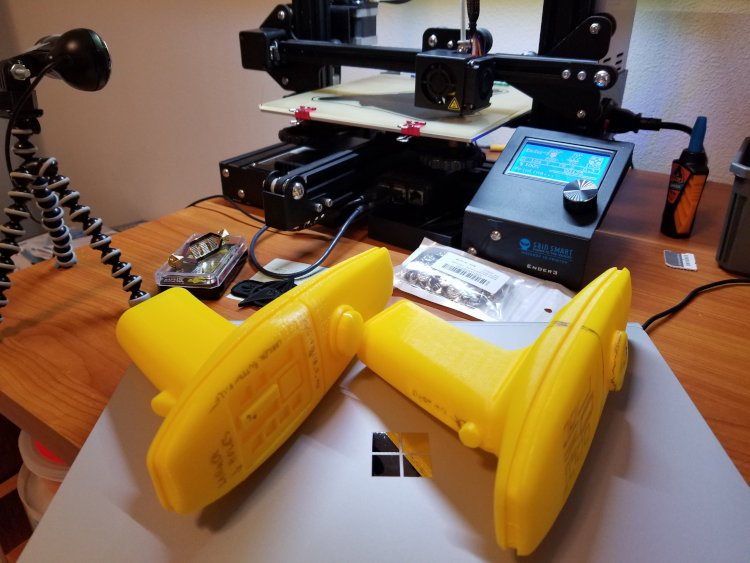
After a month or so, in mid-June I finally got something I was happy with and it looked pretty good painted up. If you’d like to make one, I put the model on Thingiverse for free.
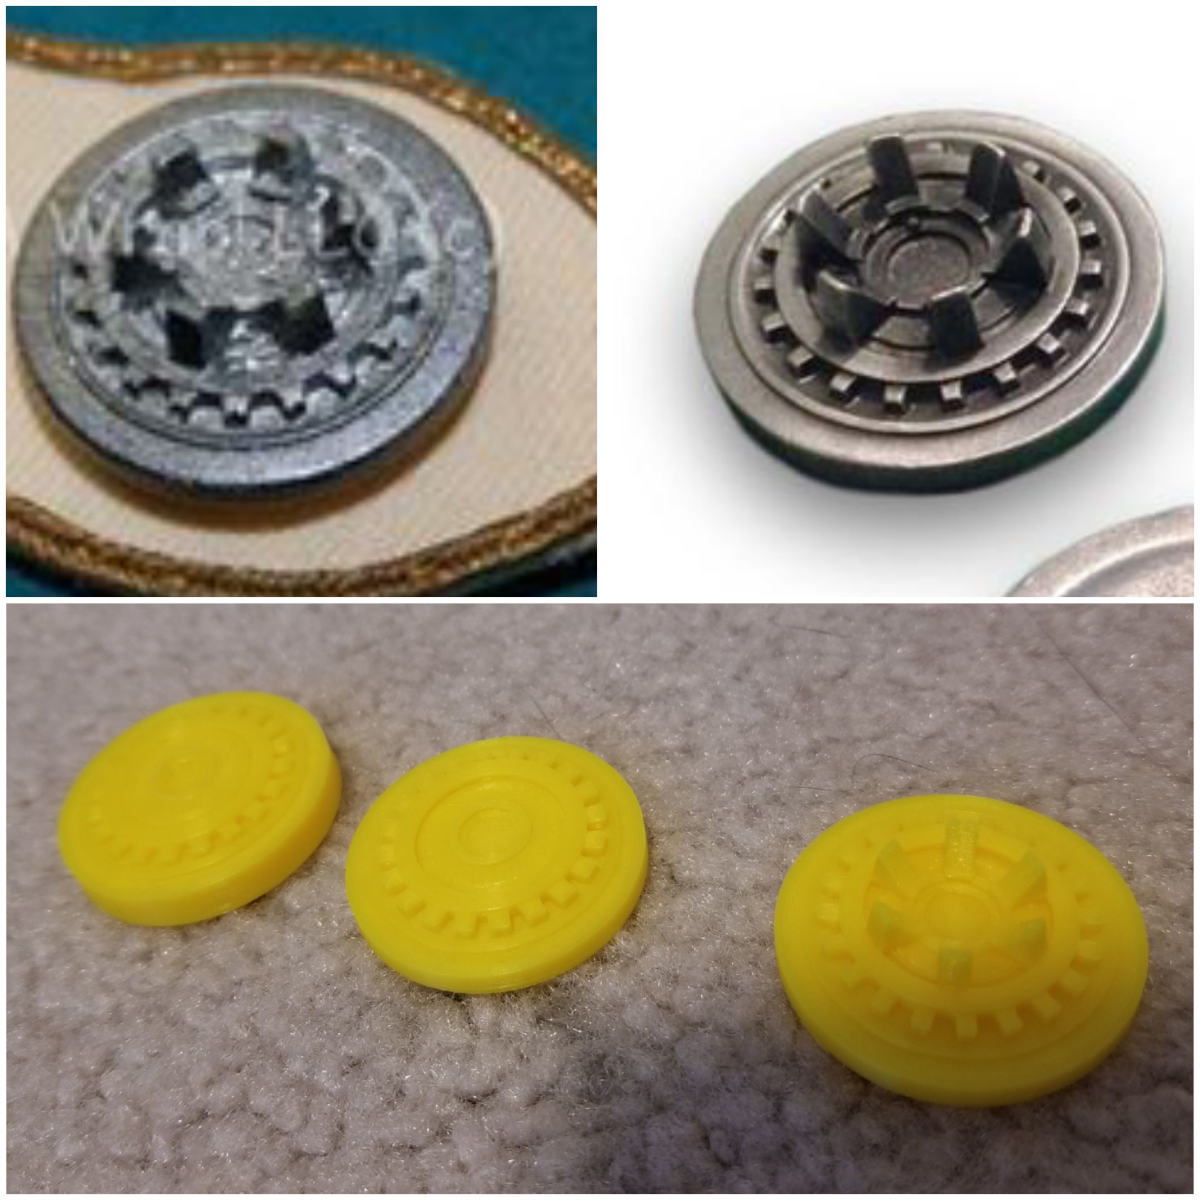
The Security Device
I followed a similar process as my phaser for the security device. Research tells me the actual screen-used one is a kit-bashed tank wheel from some plastic model kit. I used photos of the screen used props as well as a commercially available replica to create my model. If you want to make one of these, I put the model on Thingiverse for free.
The security device was done about a month after the phaser at the end of July.
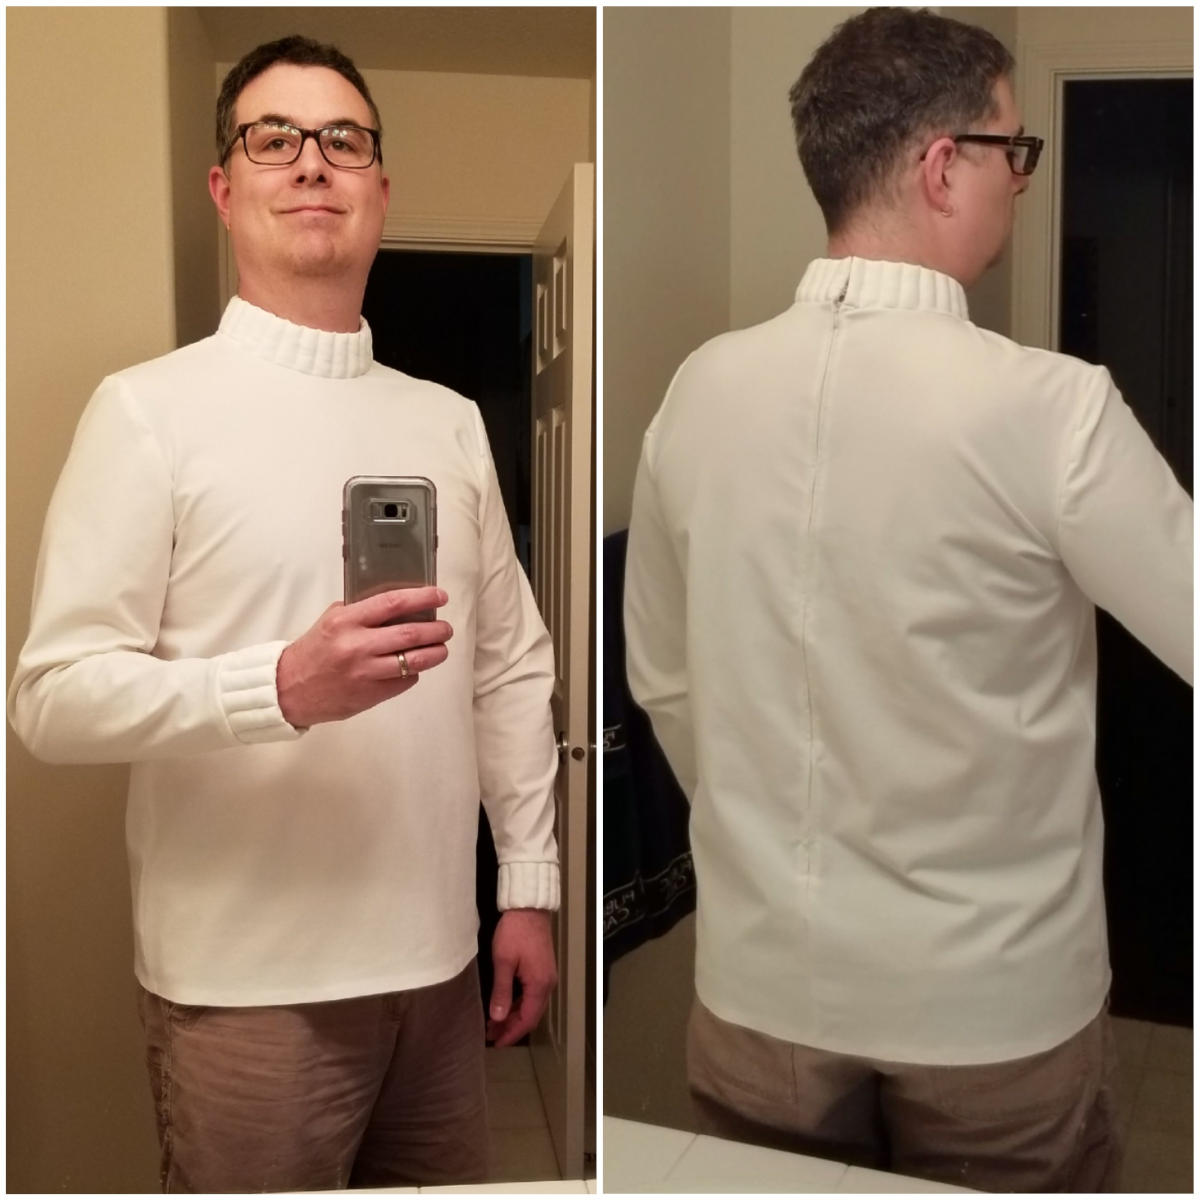
The Shirt
I started the shirt around the same time as the security device (early July), right after the phaser was finished. I had tried making a muslin version to determine the right size, and while I found the right size around and dove in, it turned out it wasn’t long enough for my torso. I moved too quick with the muslin one to realize I had forgotten to hem it, which shortens it up by an inch or so. Dammit. I had to throw out the whole shirt and start over because you can’t “add length” to the bottom of a shirt.
I also remade the sleeves and neck several times to try to get the “puffiness” right. Luckily these are separate pieces that fit on so when I saw they weren’t right I noticed before they were attached and saved having to remake the shirt more times.
One of the items in the parts list is Stitch Witchery. This is sort of like “fabric tape” - you put it between two pieces of fabric, iron them, and they stick together. That’s how the hem in the shirt works and looks “stitch-free.”
It took about a month (end of July) to get the shirt done.
The Belt
Making the belt was actually pretty easy. I had some vinyl left over from a different costume, so I wrapped the vinyl around some batting and stitched it up. I think this took maybe an hour.
However, the belt buckle was a struggle. I really wanted to 3D print one since I was so deep into making things, but I found that the PLA plastic can’t hold up to the strain of keeping a belt together. The little hook that keeps the belt closed simply breaks, even if it’s solid PLA. I ended up getting a metal belt buckle from eBay and calling it good.

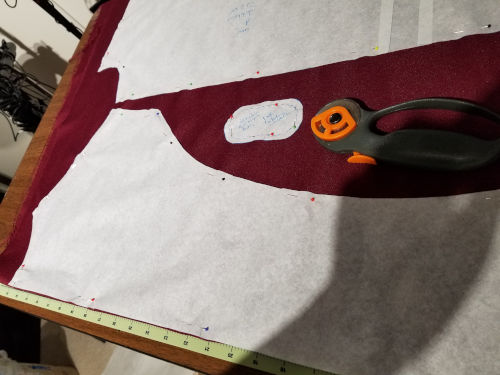
The Pants
I started with muslin for the pants which saved a lot of effort. I found that the size I thought I’d need was actually just a little too small.
The pants were my first run-in with how problematic the pattern instructions really are. There are no pattern markings, so when you’re trying to put in pockets which are “optional” you really don’t know how that’s supposed to go. The leg stripes ended up getting made a couple of times because the description of how to make them didn’t actually yield a result that matched the required measurements.
The waistband is my biggest gripe in all of this. There are fully four different ways you could make the waistband, each of which is a single paragraph that doesn’t explain enough about what has to happen, and there are no pictures. I sort of muscled something functional into place and I’m absolutely not happy with it. But I decided to skip remaking them (for now) in favor of getting the rest of the costume done.
It took another month (end of August) to get the pants done.
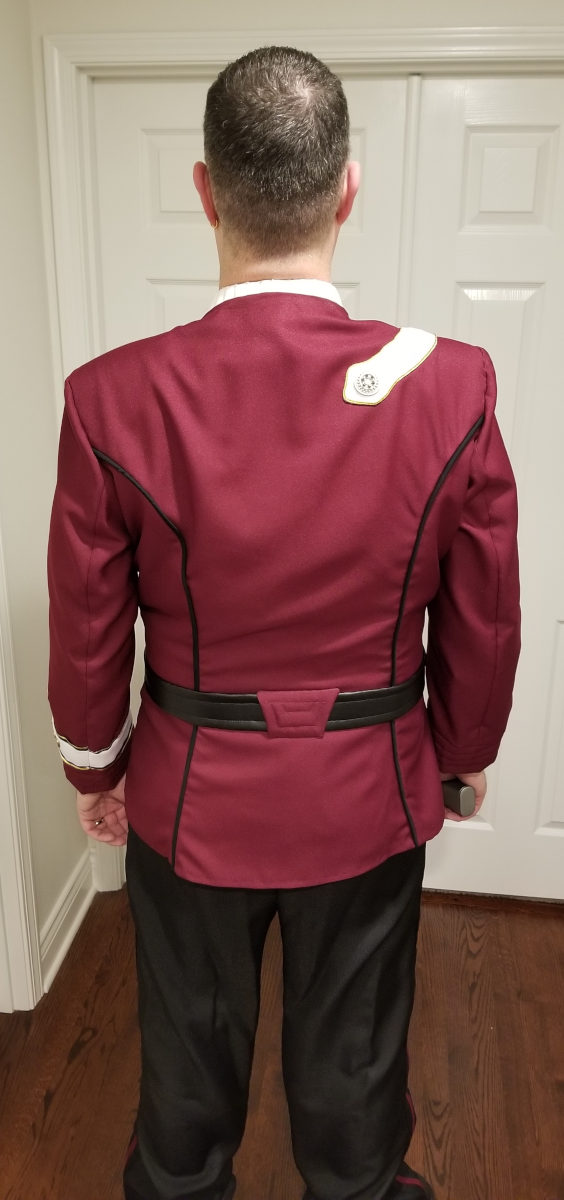
The Jacket
I also started the jacket with a muslin version and, knowing what I know about how short the shirt turned out, decided to add some length both to the arms and the torso.
As noted in the pants section, there are no pattern markings at all, so figuring out where to length pieces (as well as which pieces need to be lengthened) was entirely manual. It also assumed you know how the whole pattern comes together, which I only sort of did. I guessed pretty well and ended up only having to re-cut one piece.
By the end of the first week of September I had all the jacket pieces cut.
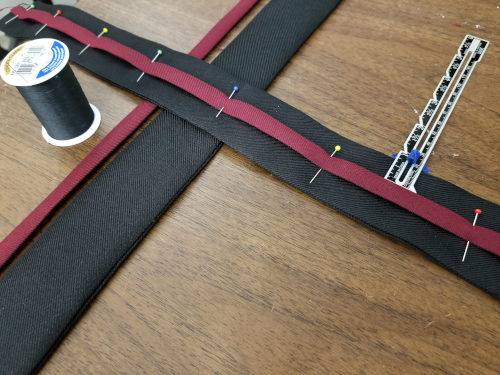
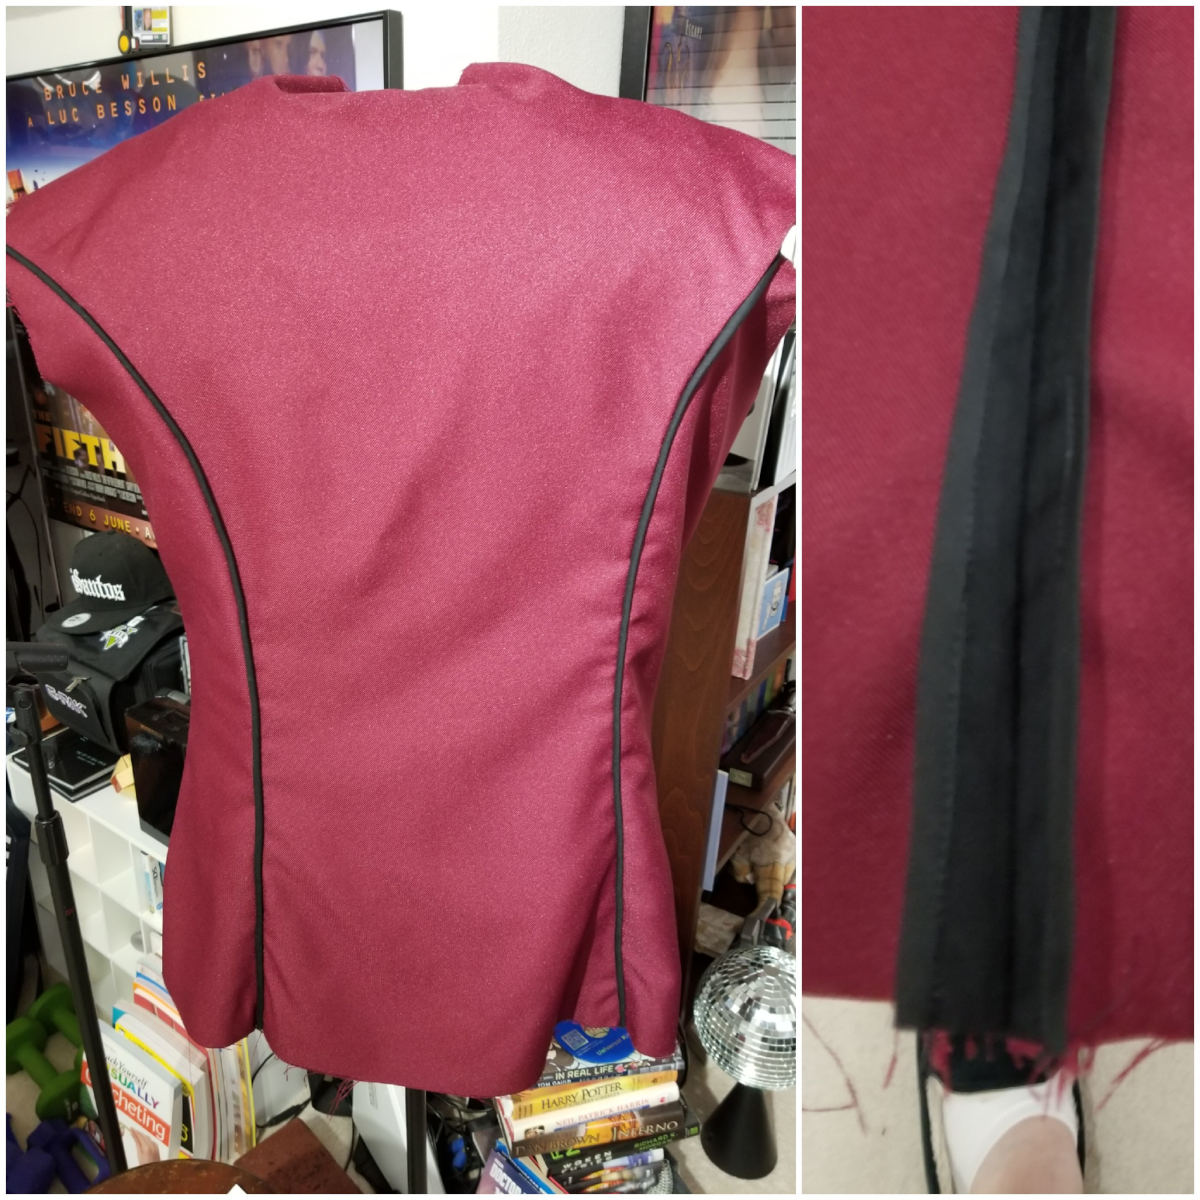
The black piping that runs down the sides of the back is all handmade by wrapping cord with bias tape.

Once it’s done, it looks pretty good.
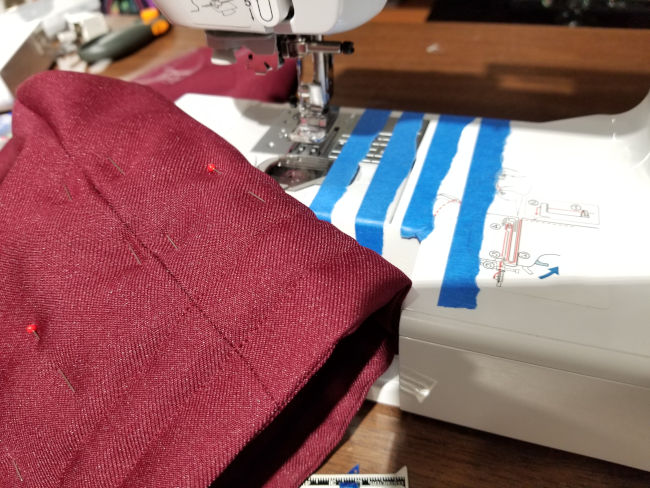
There’s some quilting that gets done on the end of each sleeve. My sewing machine doesn’t have one-inch markings up to the four inches required so I used some painter’s tape to make some temporary lines.
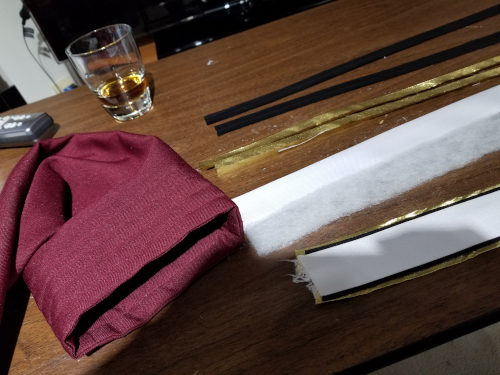
There’s a white stripe that goes on the left sleeve. This was another instructions challenge. The instructions say to assemble this with Stitch Witchery and attach it to the sleeve.
Problem 1: The stripe has batting in it to make it puffy. You can’t iron batting or it flattens out. Stitch Witchery needs to be ironed on high to adhere. Soooooo that’s not going to work.
Problem 2: The stripe pattern only gives you about 0.25” - 0.5” of working length on each end of the stripe. You rip open the seam on the back of the sleeve, insert one end of the stripe, wrap it around the sleeve (which is all puffy and quilted), and insert the other end of the stripe. With that small amount of working length, it doesn’t really work.
I ended up creating a “tube” of white cloth, using Stitch Witchery to adhere the black and gold bias tape on the sides, then taking the puffy batting and sliding it into the cloth tube. Totally not the way the directions explain it (or roughly diagram it) but the only way I could get it to work.
After all the stripes and quilting the sleeves were done.
The next part is the front facings - those white bits that are on the inside of the jacket.
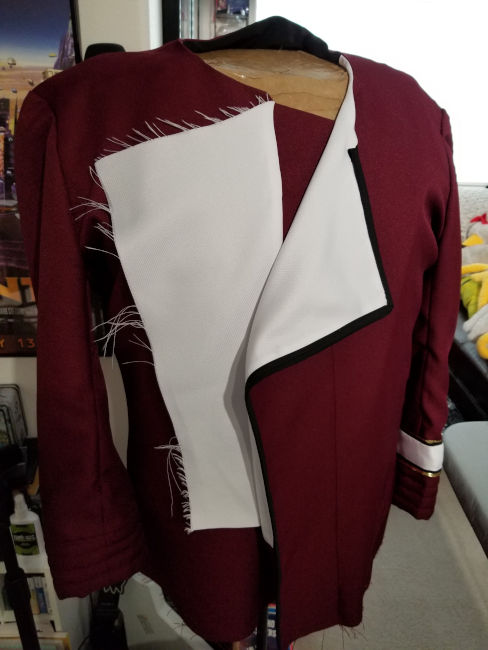
The gabardine frays really bad on the edges so you can’t see how cool it really is until it’s finished with the bias tape.
All the chain detail and snaps to hold the front together are hand sewn.

Once all that work is done, the jacket flap is complete! I added a snap close to the left armpit to hold the right side of the jacket in place as you close it. It seemed to be hard to keep in place otherwise; the pattern didn’t call for any of that, though.
The shoulder strap is another “tube filled with batting” situation. Once you have that done, gold soutache gets sewn to the edges and the clasp goes on.
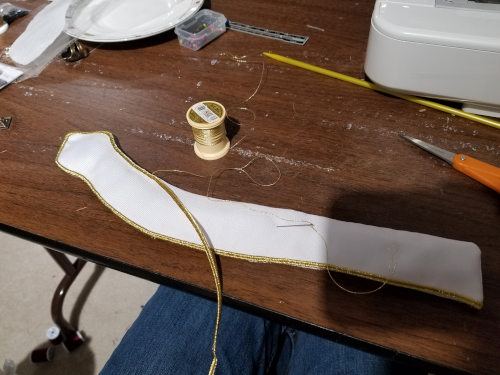
Looks pretty good once it’s attached.
There’s very little description in the pattern on how to put the lining in. There’s actually a whole step missing where it seems there’s an assumption that the lining gets inserted “somewhere around here” but no explanation of how it gets attached.
There’s no pattern requirement for shoulder pads, but the shoulders didn’t sit right without them so I added that. I can’t imagine there weren’t shoulder pads in the screen worn costumes.
Finally, because the gabardine frays so horribly, I finished it off using a Hong Kong seam with bias tape. I think it looks really good - finished without a full lining.

After the inside was done, it was time to attach pins, starting with the shoulder strap security device.
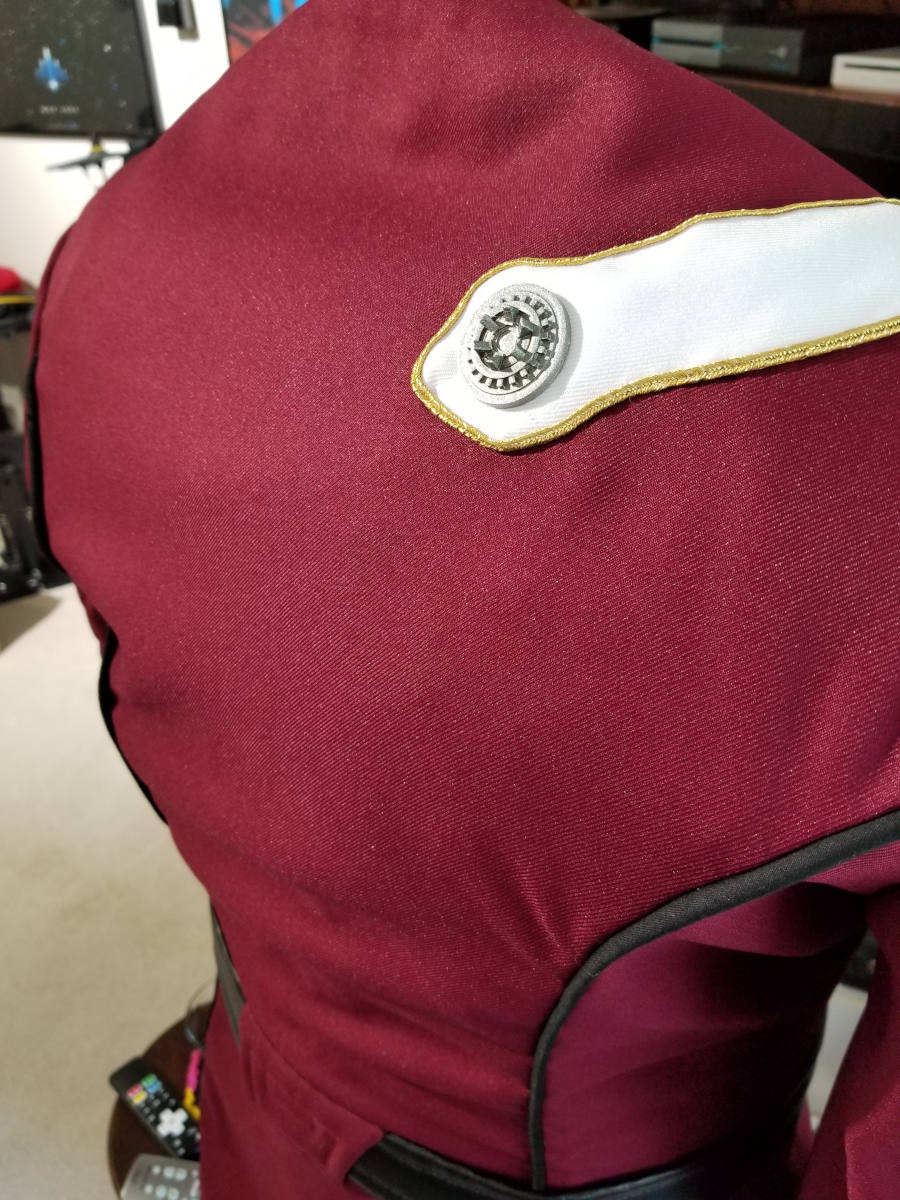
I made these “pips and squeaks” in a couple of hours on the 3D printer based on some reference measurements and photos. If you want to make these, I put the models on Thingiverse for free.
They’re placed in the same manner as Kirk had them in Star Trek 2. However, you’ll also possibly notice my rank pins and the rest of the uniform are Captain, not Admiral, while Kirk was an Admiral in ST2. I’m a little Spock and a little Kirk here. It’s not intended to be an exact replica of either.
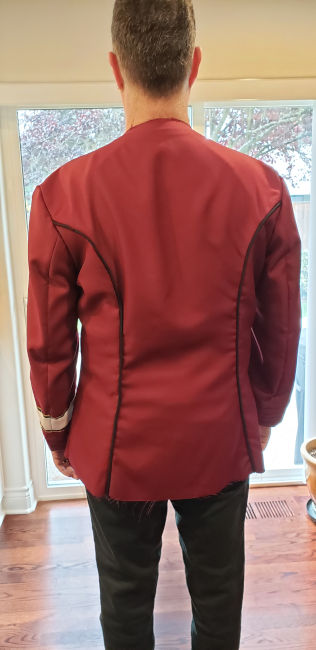
Overall, the jacket ran from early September to early October, so about a month.
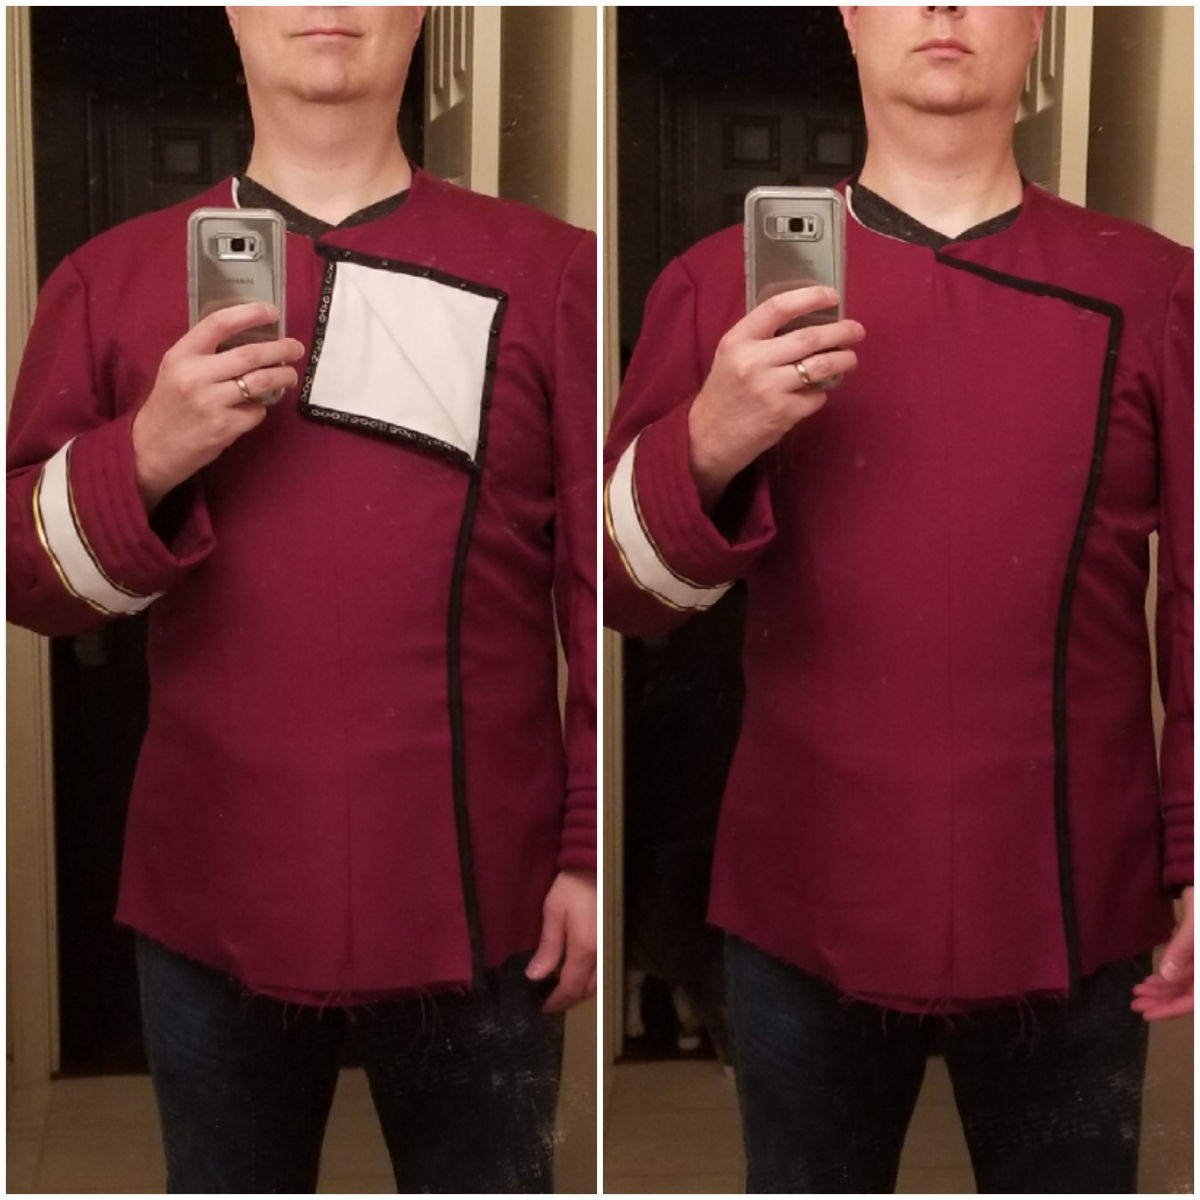
Chest Badge
The chest badge gave me a lot of grief and was where a lot of paint and time went.
I found a pretty good Thingiverse model for the badge and figured I’d “just need to paint it.”
I learned a lot about painting here.
- Don’t try to dilute acrylic enamel with water if you’re hand-painting it. It’ll leave air bubbles and look really lumpy.
- Reflective metallic spray paint is really hard to work with. It can take days to set, and even then may still leave fingerprints you can’t buff out if you touch it.
- You can’t really coat a metallic spray paint with anything. Polyurethane causes the paint to get darker because it changes the reflective properties. Lacquer doesn’t change the color but dulls it a lot.
- Frog Tape is amazing masking tape. It’s expensive but worth it.
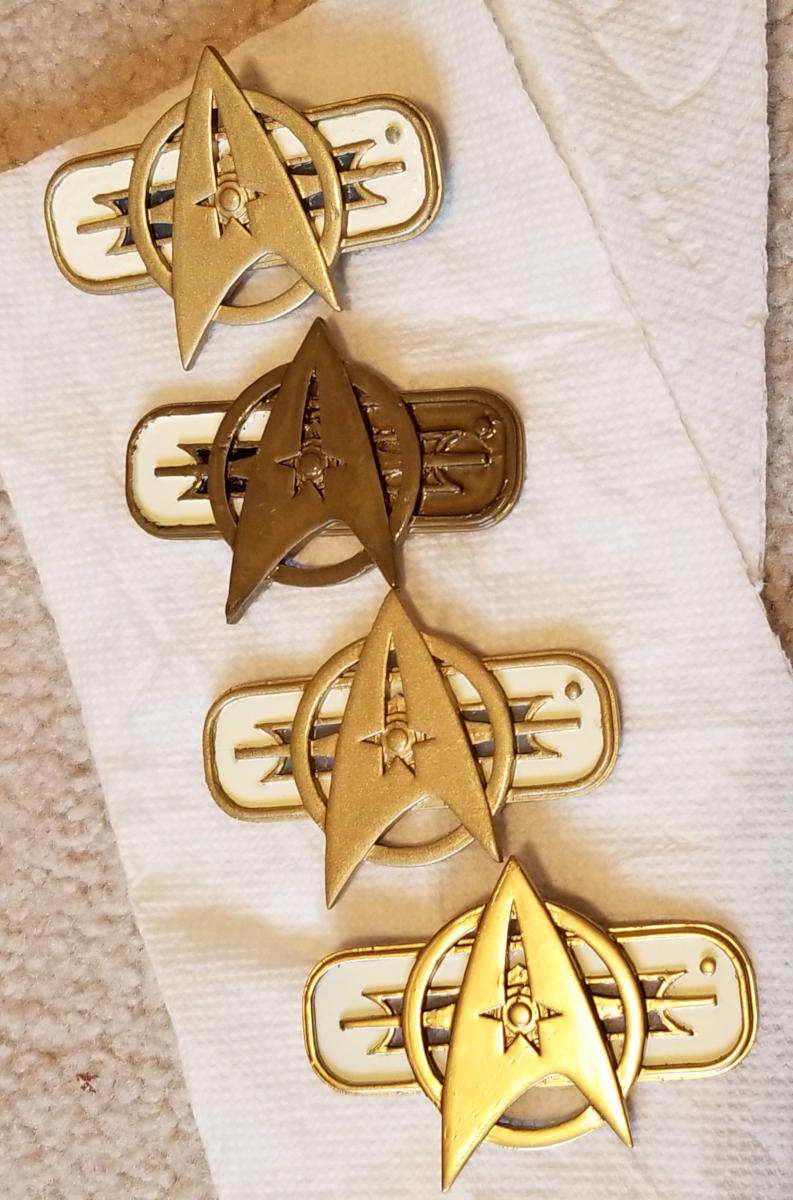
What I did was paint the inside bits - ivory and gray - then mask those parts off for the final metallic coat.
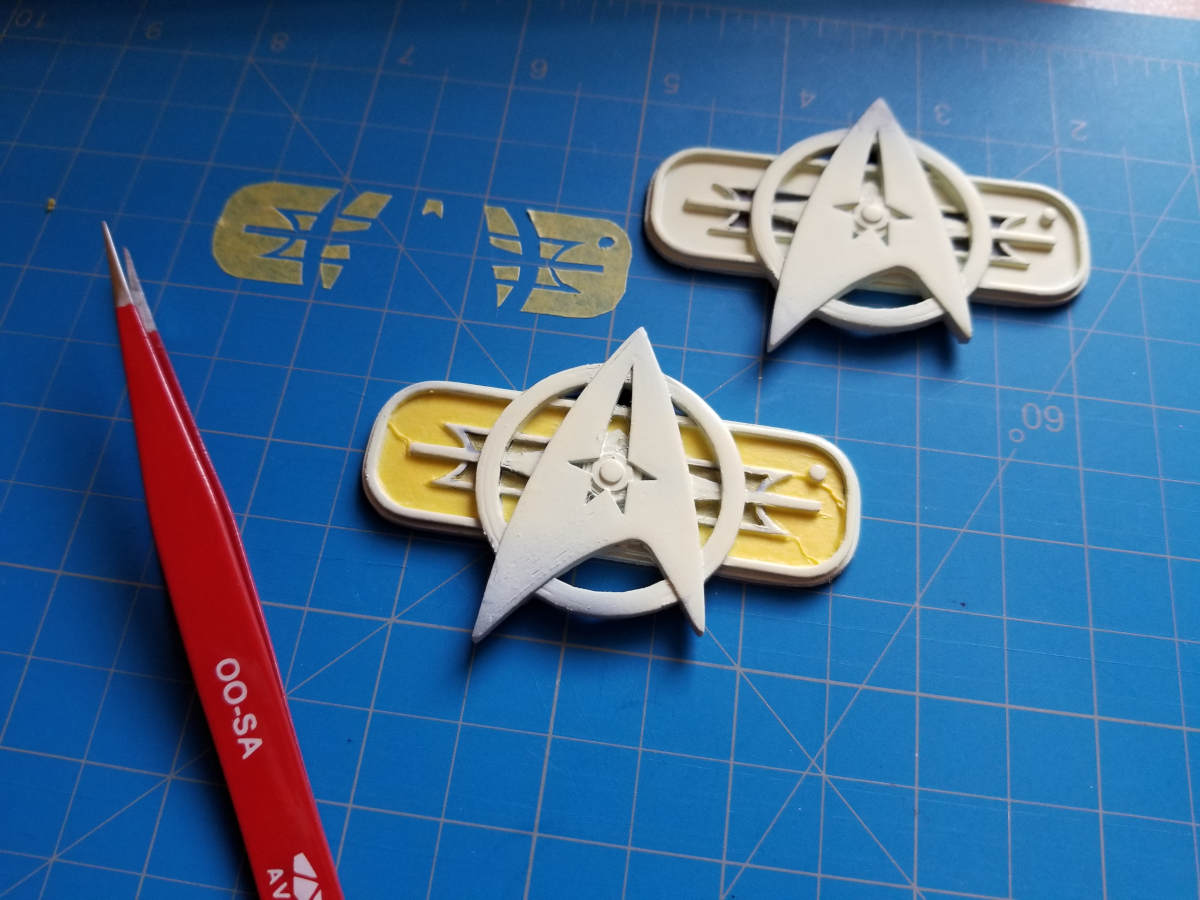
As you can see, I did several tests. The top one is a glittery but not too shiny paint and hand-painted insides. It’s not too smooth, but the paint doesn’t leave fingerprints. The second one has an airbrushed interior but I tried covering the reflective gold with a clear coat. The third one is an airbrushed interior with that original not-too-shiny metallic paint. The fourth one is the one I ended up using and just choosing to “not touch it” - airbrushed interior, reflective metal paint.
By the time I’d dealt with this I realize I probably should have just bought the damn badge for $20 and called it good. I did that with my rank pins. I dunno. I guess it turned into a mission.
Final Product
When all was said and done, from a calendar perspective I spent four-and-a-half months on this (early June to mid-October) but I think it turned out fantastic.