After doing that Hanselminutes on network attached storage, Synology,
and Windows Home
Server,
I figured I’d also talk about how we store our original media, in case
folks were wondering.
As of this writing, we have somewhere close to 1000 individual DVD
discs in various
forms - single or multi-disc movies, multi-disc TV sets, etc. - and
about as many CDs. Not all of the DVDs are on my Synology
DS1010+ - I
didn’t rip the “special features” discs, and in some cases where I have
multiple editions of the same movie, I only ripped the one we like the
most. That puts 890 DVD images in VIDEO_TS format on the DS1010+. All
of the music is on the Windows Home Server in iTunes, but not in a
consistent format - some is 256k MP3, some is 320k AAC, some is Apple
Lossless. Lately I prefer Apple Lossless since it doubles as a backup
copy of the music, but I haven’t gone through and re-ripped everything.
With all that media, how do we store it?
Basically, we gave up on keeping everything in the original cases
because it’s just too much volume.
The CDs are in threeOdyssey CD storage
cases, each of which
holds 400 discs in thin “DiscKeeper” sleeves. I have them in
alphabetical order by artist, except when it’s a compilation or
soundtrack album, in which case it’s in there by title. I made small
“dividers” by running some lettered file folders through a paper cutter.
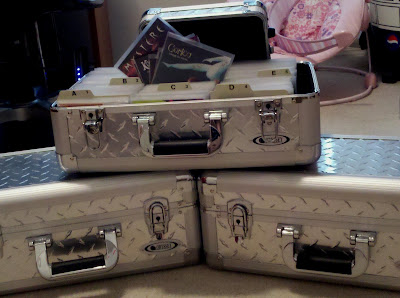
The DiscKeeper sleeves are extremely thin, which is good, because each
box is packed pretty tight.

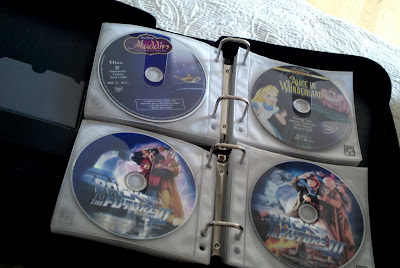
For the movie DVDs, I’m using MSDN binders, but they’re basically
like standard Case Logic CD
binders that have
individual CD-holding pages. I actually use the Case Logic
pages in the
binders, I just happen to have the MSDN binders available to me.

Each page holds two movies, and each binder is pretty full.
I keep all of the original inserts to the movie DVDs in a box, and the
cover art is in an expandable envelope, alphabetized by movie title. If
the movie came in a special keep case or printed box, that’s stored in a
giant tub in the attic; if it was just one of the standard plastic
clamshell cases, it gets recycled.
The binders are just for movie DVDs. TV DVD sets are on a set of
bookshelves, alphabetized by title.
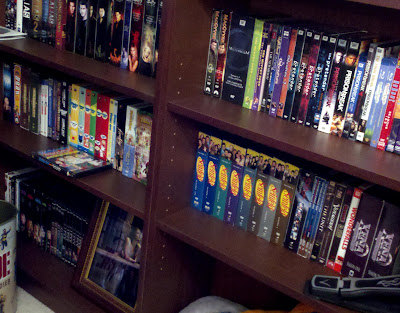
We considered putting the TV DVDs in binders, too, but we liked being
able to look at the discs like a library. Honestly, if I had a ton more
space, I’d like to have all the discs out like a library so you could
browse them, but we don’t have that sort of space.
We have very few Blu-ray titles right now, but those are on a different
bookshelf. If we get too many more, I may switch them to binders as
well.
Anyway, with all these discs, you can see how picking through binders to
grab discs to watch or whatever would be sort of a pain, and if you
wanted to browse for a movie, it’d be a similar pain. That’s why I ended
up with my media
center -
so we could, basically, have our own “internal Netflix” with all the
movies we own, on demand right there.
To keep track of our inventory (and to have a list for insurance
purposes), I use DVD Profiler to track my
video discs and Collectorz.com Music
Collector to track audio discs. I’ll
save details/evaluation on those packages for a different post, but if
you’re looking for catalog programs, I recommend both of those.
UPDATE: For my Blu-ray discs, I’m using DiscSox HiDef Pro
sleeves.