personal, tv, costumes, halloween comments edit

For Halloween this year I went as the Tenth Doctor from Doctor Who (originally played by David Tennant).

David Tennant as the Tenth Doctor

I make my costume every year (well, pretty much every year) and I enjoy sewing so it was fun to take this on. However, I don’t normally post “behind-the-scenes” stuff and there are folks who don’t really realize what goes into making a costume so I figured this year I’d do it. Oh, and if you want to see the pictures in a larger format, I have an annotated photo album on Google Photos.

Before doing anything else, I did some research. The Making My Tennant Suit blog was the best resource I found for info on the suit, the fabrics, and so forth. It has a really good fabric comparison showing different fabrics and sources that match/approximate the fabric from the suit. I also gathered a few pictures from the web to help me pick the right pieces.

I was due for some new glasses, so I picked some out that both look good on me (IMHO) and are close to the ones seen in the show.

My new Tennant-style glasses

I went to Jo-Ann Fabrics and searched for a pattern. None were exact, but I found that Vogue pattern 8890 was pretty close. I figured I could take “View A” jacket from the pattern, change it from a two-button jacket to four buttons, and add a custom breast pocket. The “View D” pants could be done unmodified.

Vogue Pattern 8890

The pattern was actually pretty ambitious. Given that it wasn’t a “costume pattern,” it was fully lined with all the extra stuff you’d find if you bought a suit - nicely finished pockets, extra give/pleats in the lining for movement… Definitely the most complex thing I’ve taken on to date.

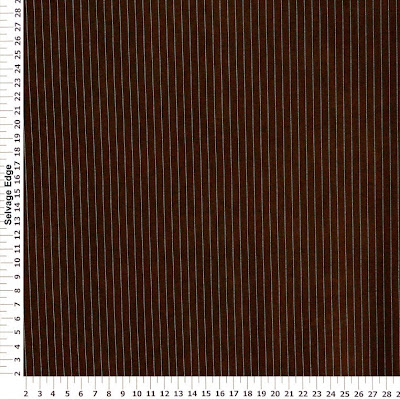
The fabric I picked was ordered online from Hancock Fabrics. It’s item #3859071 “Brown and Teal Pinstripe Suiting.” I got it on sale half-off so I bought something like eight yards so I wouldn’t run out if I made a mistake or had to lengthen the pants/sleeves on the suit.

My Tenth Doctor fabric from Hancock

This particular fabric was a little challenging to work with because it was somewhat light and stretchy. When you work with cotton or wool, it’s not really stretchy so you can cut and pin it without worrying about it moving on you or changing shape. With this, I had to be really careful about pinning it, making sure I wasn’t stretching it while it was getting cut, and so on.

The buttons I used were some pretty standard tortoise shell ones off the shelf.

The buttons I used on the suit

Thread was Coats & Clark #8960. It was the perfect brown to match the fabric so hems and seams were nice and hidden. I think I went through three of these spools of thread.

Coats & Clark #8960

The pocket insides, waistband lining, and other strong internals was all done with some off-the-shelf brown cotton twill. You don’t really see this from the outside, but it is a nice shade to offset the suiting. Not that I had a lot of choice; there was only one color of brown twill available when I went shopping and I wasn’t feeling too picky.

My cotton twill

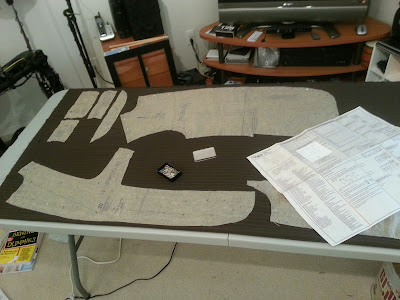
After I got all the materials together, I got down to work. I ironed the pattern (yes, ironed the pattern - on low heat, to make it easy to cut out and all flat), cut it out, and pinned the pattern to the fabric. There were something like 15 pieces to the pants and 30 pieces to the jacket.

Pinning the pattern

I did the pants first (though I didn’t get any pictures of the making of the pants). Normally I’ve found Vogue patterns run a little small, so I took my measurements and did the pants the next size up. This pattern seemed to run pretty true to size, so I had to take the pants in when they were done. I haven’t yet figured out how to fit a pattern on myself before it’s finished.

Doing the pants first helped me figure out that I needed to make the jacket true to size.

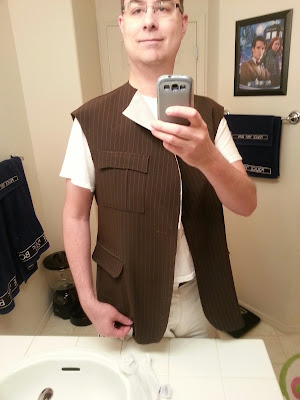
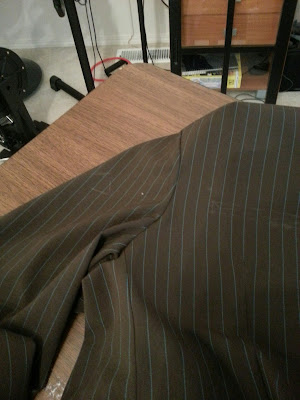
The first part of the jacket to be done is the main body outside. In this picture you can see I’ve replaced the breast pocket from the pattern with one of my own design so it matches the Tenth Doctor. I did that without a pattern, sort of taking an average measurement on width/height of pockets on other garments and fudging something together. This custom pocket is about 5.5” wide and 6” tall.

The outside jacket body

After the body of the jacket was done, it was time to sew the arms in. Putting arms in a jacket is always a real pain because the fabric at the top part of the arm is larger than the arm hole on the jacket body. They do that so you can move around, but it means you have to be really careful about putting the arm in and evenly distributing the extra fabric or you’ll get gathers along the seam where the fabric folds over onto itself. This is a particular problem with stretchy fabric, which likes to move around a lot. I had to rip out and redo a couple of areas to remove the gathering, but I got the arms in.

The right sleeve sewn in

Here’s the jacket with both sleeves sewn in but the lining not yet put in. The white stuff you see on the collar is interfacing - a sort of mesh-like fabric that you attach to make other fabric less flexible. You have interfacing in collars and cuffs, for example. I used “fusible interfacing” which is basically iron-on to attach. This pattern called for “hair canvas” interfacing, which is really expensive and much harder to work with. If I was making this as a suit and not as a costume, I probably would have tried to work with the hair canvas.

Both sleeves in, but no lining

With the outside done, it was time to do the lining. The first bit of lining was the inside front - the part with the inside pocket. Here’s the inside of the right front. You can see in the image a diagonal line where the collar is intended to fold over. You can also see a small, thin rectangle where the inside pocket will eventually go.

The inside right front, minus the inside pocket

Here’s the inside right front after getting the inside pocket in. You can see a small loop hanging down off the top of the pocket that will be used to button the pocket closed. The pattern called for 2” of ribbon (I used bias tape) for the loop, but that turned out to be too small to fold around the button that will be later attached below the pocket. If I were to do it again, I’d use 3” or 3.5” of ribbon. You can always move the button down a bit, but I had to sew my button right on the pocket welt (the twill “lip” lining the pocket).

The inside right front, this time with the inside pocket

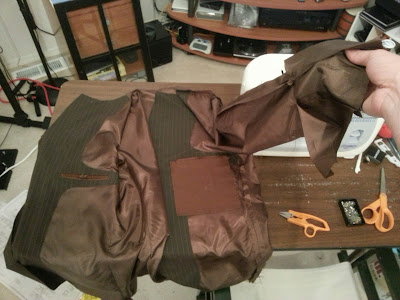
Here’s what the lining looks like fully assembled - both inside front pieces, the back, and the sleeves. If you’ve never lined a coat before, it’s sort of like making a second copy of the coat, just inside-out. Then you take the lining, put it in the jacket, and sew along the edges. Basically.

In the picture on the left you see the inside pocket as you’ll view it when wearing the jacket; on the right is the other side - that brown square is the other inside pocket.

The lining, fully assembled

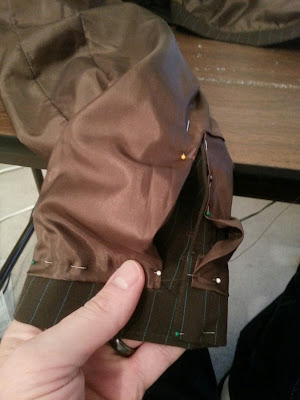
Once you put the lining in, you have to attach it. The back was able to be machine-sewn in, but the sleeves required hand sewing. Here you see I have the sleeve lining pinned in place so I can hand sew it in.

Sleeve lining pinned in place

Here’s the same sleeve lining after the hand sewing. I also have the sleeve buttons attached, so this sleeve is done.

The sleeve with the lining and buttons attached

Once the lining is in, the last thing to happen is the front buttons. Here’s the jacket entirely finished. You can see in the photo the white marks around the button holes on the front where I was sketching out the button locations.

Finished jacket with button hole markings

I did a little cleanup on the markings and here’s how it turned out.

First time wearing the complete jacket

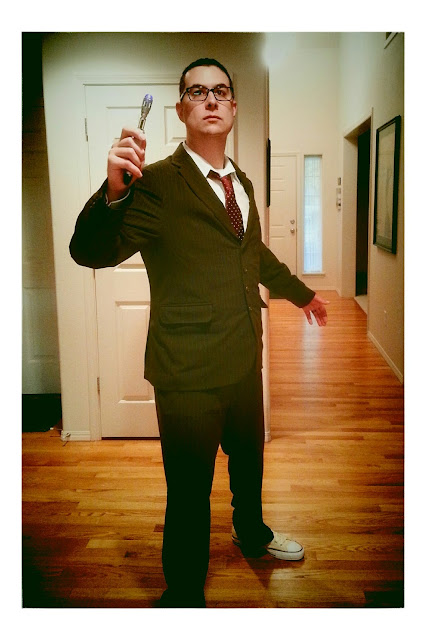
And, once the whole costume was on, here’s how it looked. I think it turned out pretty well.

Travis as the Tenth Doctor

For those interested: The shoes are unbleached white Converse Chuck Taylors. The shirt is one I already had; any old white dress shirt will do. The sonic screwdriver is the toy version that’s been out for a while. The tie is a maroon polka dot tie by Chevalier.

I don’t know how much time it took exactly, but I know that I watch TV/Netflix while I’m working and I made it through three seasons of Kyle XY, the Jekyll miniseries, a couple of movies, and half a season of The Blacklist… and I wasn’t watching something the whole time. So… it took a while.

As far as cost, that’s another thing I didn’t really keep track of, but roughly (guessing on a few of these)…

  • Shoes: $45
  • Tie: $15
  • Pinstripe Suiting: $50
  • Lining: $10
  • Interfacing: $10
  • Felt (for the collar): $5
  • Twill: $10
  • Thread, buttons, zipper, notions: $30

So… uh… $175? Give or take. It’s not cheap. Even if you take out the cost for the shoes and tie, which I can wear elsewhere, you’re still looking at over $100. Plus the time.

This definitely increases my admiration and respect for folks who do this on a convention circuit.

Again, if you want to see the pictures in a larger format, I have an annotated photo album on Google Photos.

testing, culture comments edit

One of the projects I work on has some dynamic culture-aware currency formatting stuff and we, of course, have tests around that.

I’m in the process of moving our build from Windows Server 2008R2 to Windows Server 2012 and I found that a lot of our tests are failing. I didn’t change any of the code, just updated a couple of lines of build script. What gives?

It appears Windows Server 2012 has different culture settings installed than the previous platforms. Per the documentation, “Windows versions or service packs can change the available cultures” and it appears I’m getting hit by that.

I cobbled together a quick program to do some testing using LINQPad.

var nfi = CultureInfo.CreateSpecificCulture("as-IN").NumberFormat;
Console.WriteLine("{0}:{1}:{2}",
  nfi.CurrencyNegativePattern,
  nfi.CurrencyPositivePattern,
  nfi.CurrencySymbol);

The results were the same on Windows 7 and Windows Server 2008R2 but different on Windows Server 2012:

Item Windows 7 Windows 2008R2 Windows 2012
CurrencyNegativePattern 12 12 12
CurrencyPositivePattern 1 1 2
CurrencySymbol

Notice the positive pattern is different? Yeah. That’s not the only culture or item that differs across the installed cultures.

So… now I have to figure out a way to craft our tests to be a little more… dynamic(?)… about the expected value vs. the actual value.

halloween, costumes comments edit

It was raining this year and I think that put a damper on the trick-or-treat count. We also didn’t put out our “Halloween projector” that puts a festive image on our garage, so I think the rain, combined with lack of decor, resulted in quite a bit fewer kids showing up. When it was busy, it was really busy; but when it wasn’t… it was dead.

2014: 176
trick-or-treaters.

The graph is starting to look like a big mess so I will probably start keeping more like “the last five years” on there. I’ll also keep an overall average graph to keep the bigger picture.

Average Trick-or-Treaters by Time Block

The table’s also starting to get pretty wide; might have to switch it so time block goes across the top and year goes down.

Cumulative data:

</tr> </thead> </table> My costume this year was the Tenth Doctor from _Doctor Who_. Jenn was Anna from _Frozen_. We both made our costumes and [I posted a different blog article walking through how I made the suit](/archive/2014/11/05/making-my-tenth-doctor-suit/). Phoenix decided she was going to be Sleeping Beauty this time, which was a time-saver for us since she already has a ton of princess costumes. ![Travis and Jenn](https://hyqi8g-ch3301.files.1drv.com/y2pgj3Dz3hKaw8KDWRL0zpdp7XPEDIB2qX7nLr2W3U7ZB19kvmPql7fHMDWHLIDC5orV7AzK1I2CaGQ1ryZ7J_Q30Wk0E-zt9whfmhcuBzU8Ek/20141103_costumes.jpg?psid=1)
  Year
Time Block 2006 2007</th> 2008</th> 2009 2010 2011 2013 2014
6:00p - 6:30p 52 5 14 17 19 31 28 19
6:30p - 7:00p 59 45 71 51 77 80 72 54
7:00p - 7:30p 35 39 82 72 76 53 113 51
7:30p - 8:00p 16 25 45 82 48 25 80 42
8:00p - 8:30p 0 21 25 21 39 0 5 10
Total 162 139 237 243 259 189 298 176

dotnet, ndepend comments edit

NDepend is awesome and I use it to analyze all sorts of different projects.

One of the nice things in NDepend is you can define queries that help qualify what is your code (JustMyCode) and what isn’t (notmycode).

I’ve seen two challenges lately that make rule analysis a bit tricky.

  • async and await: These generate state machines on the back end and NDepend always flags the generated code as complex (because it is). However, you can’t just exclude the code because basically the generated state machine moves your code in there, so excluding the state machine will exclude some of your code.
  • Anonymous types: I see these a lot in MVC code, for example, where the anonymous type is being used as a dictionary of values to truck around.

I haven’t figured out the async and await thing yet… but here’s how to exclude anonymous types from the JustMyCode set of code:

First, in the “Queries and Rules Explorer” window in your project, go to the “Defining JustMyCode” group.

Defining JustMyCode

In there, create a query like this:

// <Name>Discard anonymous types from JustMyCode</Name>
notmycode
from t in Application.Types where
t.Name.Contains("<>f__AnonymousType")
select new { t, t.NbLinesOfCode }

Save that query.

Now when you run your code analysis, you won’t see anonymous types causing any violations in queries.

windows comments edit

I develop using an account that is not an administrator because I want to make sure the stuff I’m working on will work without extra privileges. I have a separate local machine administrator account I can use when I need to install something or change settings.

To make my experience a little easier, I add my user account to a few items in Local Security Policy to allow me to do things like restart the machine, debug things, and use the performance monitoring tools.

In setting up a new Windows 2012 dev machine, I found that the domain Group Policy had the “Shut down the machine” policy locked down so there was no way to allow my developer account to shut down or restart. Painful.

To work around this, I created a shortcut on my Start menu that prompts me for the local machine administrator password and restarts using elevated credentials.

Here’s how:

Create a small batch file in your Documents folder or some other accessible location. I called mine restart-elevated.bat. Inside it, use the runas and shutdown commands to prompt for credentials and restart the machine:

runas /user:YOURMACHINE\administrator "shutdown -r -f -d up:0:0 -t 5"

The shutdown command I’ve specified there will…

  • Restart the computer.
  • Force running applications to close.
  • Alert the currently logged-in user and wait five seconds before doing the restart.
  • Set the shutdown reason code as “user code, planned shutdown, major reason ‘other,’ minor reason ‘other.’”

Now that you have the batch file, throw it on your Start menu. Open up C:\Users\yourusername\AppData\Roaming\Microsoft\Windows\Start Menu and make a shortcut to the batch file. It’s easy if you just right-drag the script in there and select “Create shortcut.”

Give the shortcut a nice name. I called mine “Restart Computer (Elevated)” so it’s easy to know what’s going to happen.

I also changed the icon so it’s not the default batch file icon:

  • Right-click the shortcut and select “Properties.”
  • On the “Shortcut” tab, select “Change Icon…”
  • Browse to %SystemRoot%\System32\imageres.dll and select an icon. I selected the multi-colored shield icon that indicates an administrative action.

Change the icon to something neat

Finally, hit the Start button and go to the list of applications installed. Right-click on the new shortcut and select “Pin to Start.”

Restart shortcut pinned to Start menu

That’s it - now when you need to restart as a non-admin, click that and enter the password for the local administrator account.