Kinks Worked Out
I think I have all the major kinks worked out. I may have to jimmy a few more things around as I see them, but for the most part, we’re cocked, locked, and ready to rock with the new look.

I think I have all the major kinks worked out. I may have to jimmy a few more things around as I see them, but for the most part, we’re cocked, locked, and ready to rock with the new look.
I think the update is going pretty well. As I grab a moment here and there, I’m able to complete more and more stuff. There’s still oddness, like the fact the site looks fine in Firefox but there’s this weirdness in IE where the main page sort of slants off to the left with each new entry… and bulleted lists in entries are different in IE than Firefox… but it’s not impossible to overcome. I’ll keep working on it, but I’m pretty pleased with what it’s shaping up into - Visual Paraesthesia .NET! Heh.
The site’s looking like crap right now because I’m partially through the update of the CSS and whatnot. Sorry, I don’t have a staging server, so you all get the brunt of it. Be patient, we’ll be fixed up soon.
I don’t really remember what I did on Friday night. I think I worked on the vest for my Wonka costume, but I don’t recall, which sort of implies that it was inconsequential seeing as how I wasn’t actually inebriated.
Saturday I took my car in for its 40,000 mile checkup. I was told when I scheduled the appointment that it’d take a couple of hours, so I scheduled it early (8:40a) and Jenn drove her car to the dealership to pick me up after I dropped my car off so we could cruise around that side of town, burn a couple of hours, and get my car when it was done.
We ended up going to probably three different malls, just wandering, and I picked up some Wonka TV Room Goggles, which fit over my glasses perfectly. I was wondering what I was going to do about my glasses, now I have an answer.
Long about 1:00p or so I was wondering what happened to my car, so I called the dealership and found out they’d “have it done by 4:00p, as scheduled.” What? Two hours suddenly turned into eight. That’s… that’s great.
Jenn and I ended up checking out Flightplan, which is a decent film, if a bit of a one-trick pony. By the time that finished, my car was ready, so we picked that up and headed home.
Saturday night was spent feverishly working on my Wonka vest. I got it very nearly done, but at 1:00a I had to go to bed.
Sunday Stu and Tif came over. Stu and I played bongos while Tif and Jenn washed their cars.
At one point, Stu and I went to the store and while I was parking I ran over a (new) package of diapers that someone kindly left behind in the parking space for me. Normally I’d not mention such a thing except that the plastic packaging from the diapers melted to some piece or other on the undercarriage of my car and now when I drive it smells like burning plastic. I’m going to have to get under there when I get home tonight and scrape that off.
Oh, and I came up with a new look for my site, so I’ll be implementing that soon. If you come in and something’s messed up, that’s probably why
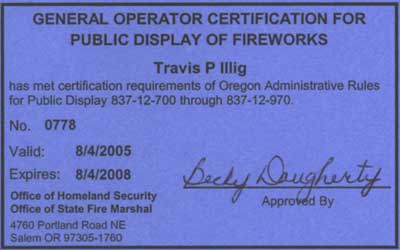 I noticed a couple of envelopes from the Office of Homeland Security
came in the mail today, which could mean only one thing: my
pyrotechnician license finally arrived.
I noticed a couple of envelopes from the Office of Homeland Security
came in the mail today, which could mean only one thing: my
pyrotechnician license finally arrived.
After a few years of working on shows for Western Display Fireworks (usually with Greg running the show), Jenn and I both took the pyro certification test, completed the prerequisites, and applied for our Oregon state pyro licenses. It took a while (notice the issue date is 8/4 but I just got it in the mail today), but it’s finally here.
Technically, that means we can legally buy professional fireworks and run our own show. Of course, there’s a heck of a lot more to it than just declaring you want to “have a show,” and I’m really not ready to take on that responsibility, so I don’t think that’ll be happening. But we’re could, and isn’t that what matters? (I think we’ll stick to working with Western. Heh.)