
85 Trick-or-Treaters
It was raining again this year and that definitely took down the number of visitors. Again this year we also didn’t put out our “Halloween projector” that puts a festive image on our garage. In general, it was pretty slow all around. I took Phoenix out this year while Jenn answered the door so I got to see what was out there firsthand. Really hardly anyone out there this year.
Trick-or-Treaters
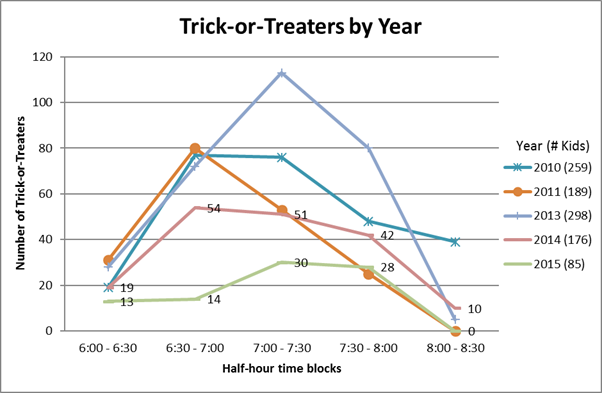
The table’s also starting to get pretty wide; might have to switch it so time block goes across the top and year goes down.
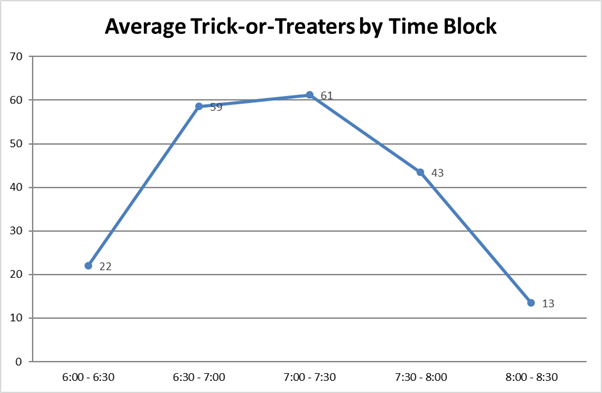
Cumulative data:
| Time Block | ||||||
|---|---|---|---|---|---|---|
| Year | 6:00p - 6:30p | 6:30p - 7:00p | 7:00p - 7:30p | 7:30p - 8:00p | 8:00p - 8:30p | Total |
| 2006 | 52 | 59 | 35 | 16 | 0 | 162 |
| 2007 | 5 | 45 | 39 | 25 | 21 | 139 |
| 2008 | 14 | 71 | 82 | 45 | 25 | 237 |
| 2009 | 17 | 51 | 72 | 82 | 21 | 243 |
| 2010 | 19 | 77 | 76 | 48 | 39 | 259 |
| 2011 | 31 | 80 | 53 | 25 | 0 | 189 |
| 2013 | 28 | 72 | 113 | 80 | 5 | 298 |
| 2014 | 19 | 54 | 51 | 42 | 10 | 176 |
| 2015 | 13 | 14 | 30 | 28 | 0 | 85 |
Costumes
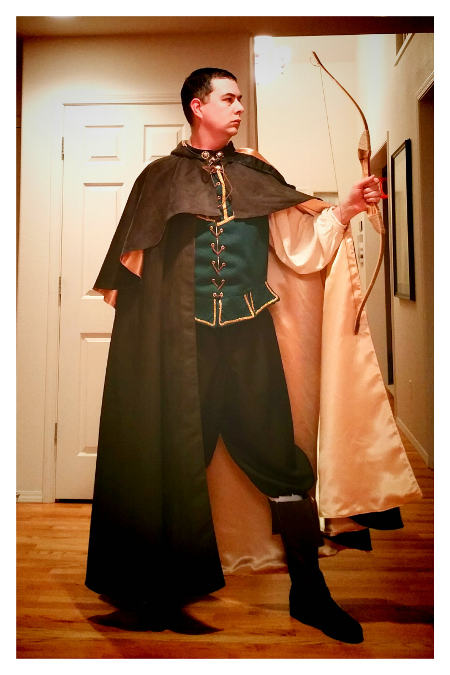
My costume this year was Robin Hood. Jenn was Merida from Brave so we were both archers. Phoenix had two costumes - for trick-or-treating at Jenn’s work she was a bride with a little white dress and veil; for going out in the neighborhood she was a ninja.
I posted some in-progress pictures of my costume on social media, but as part of the statistical breakdown of Halloween this year I thought it’d be interesting to dive into more of exactly what went into the making outside of the time and effort - actual dollars put in.
On my costume, I made the shirt, the doublet, the pants, and the cape. I bought the boots, the tights, and the bow.
Accessories and Props
Let’s start with the pieces I bought:
- White athletic compression pants, two pack - $20.79 (I got these instead of tights because actual tights are expensive.)
- Wooden bow and arrow - $19.75
- Funtasma Men’s Carribean Combat Boots - $58.56
Total: $99.10
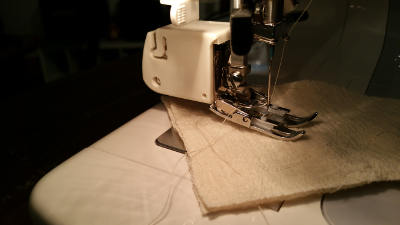
The Shirt
The shirt is made of a gauzy fabric that was pretty hard to work with. The pattern was also not super helpful because you’d see “a step” in the pattern consisting of several actions.
I did learn how to use an “even foot” (sometimes called a “walking foot”) on our sewing machine, which was a new thing for me.
- Shirt, doublet, and pants pattern - $10.17
- Gauze fabric - $6.59
- Thread - $3.29
- Buttons - $5.99
- Interfacing - $0.62
Total: $26.66
The Pants
I don’t have any in-progress shots of the pants being made, but they were pretty simple pants. I will say I thought I should make the largest size due to my height… but then the waist turned out pretty big so I had to do some adjustments to make them fit. Even after adjusting they were pretty big. I should probably have done more but ran out of time.
- Shirt, doublet, and pants pattern - (included in shirt cost)
- Black gabardine fabric - $23.73
- Thread - $4.00
- Buttons - $1.90
- Eyelets - $2.39
- Ribbon - $1.49
- Interfacing - (I had some already for this)
Total: $33.51
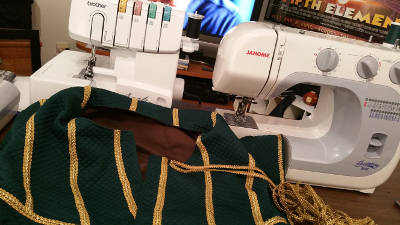
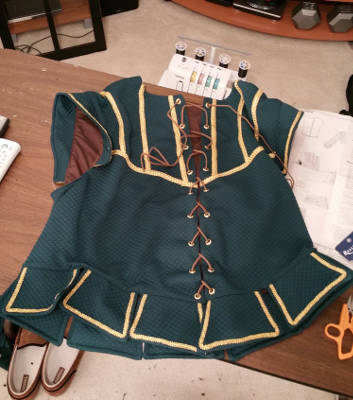
The Doublet
The doublet was interesting to make. It had a lot of pieces, but they came together really well and I learned a lot while doing it. Did you know those little “flaps” on the bottom are called “peplum?” I didn’t.
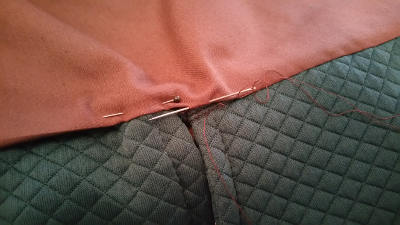
I hadn’t really done much with adding trim, so this was a learning experience. For example, this trim had a sort of “direction” or “grain” to it - if you sewed with the “grain,” it went on really smoothly. If you went against the “grain,” the trim would get all caught up on the sewing machine foot. I also found that sewing trim to the edge of a seam is really hard on thick fabric so I ended up adding a little margin between the seam and the trim.
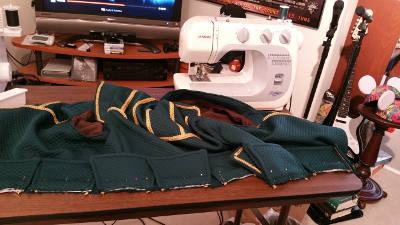
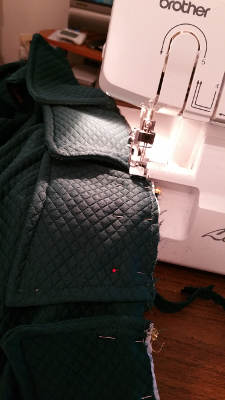
These are the peplums that go around the bottom of the doublet. You can see the trim pinned to the one on the right.

Once all the peplums were done, I pinned and machine basted them in place. Getting them evenly spaced was a challenge, but it turned out well.
After the machine basting, I ran the whole thing through the serger which gave them a strong seam and trimmed off the excess. This was the first project I’d done with a serger and it’s definitely a time saver. It also makes finished seams look really professional.
To cover the seam where the peplums are attached, the lining in the doublet gets hand sewn over the top. There was a lot of hand sewing in this project, which was the largest time sink.
Here’s the finished doublet.
- Shirt, doublet, and pants pattern - (included in shirt cost)
- Quilted fabric (exterior) - $15.73
- Brown broadcloath fabric (lining) - $5.99
- Thread - $8.29
- Eyelets - $8.28
- Trim - $23.95
- Leather lacing - $2.50
- Interfacing - $6.11
Total: $70.85
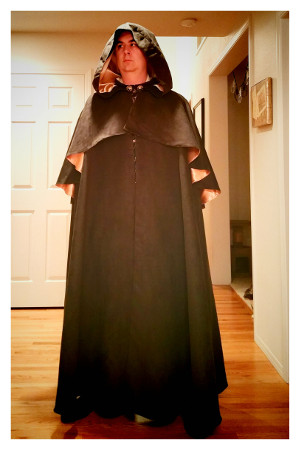
The Cape
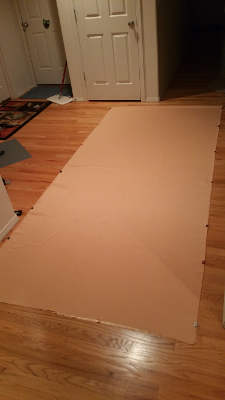
The cape was the least complex of the things to make but took the most time due to the size. Just laying out and cutting the pattern pieces took a couple of evenings.
As you can see, I had to lay them out in our hallway.
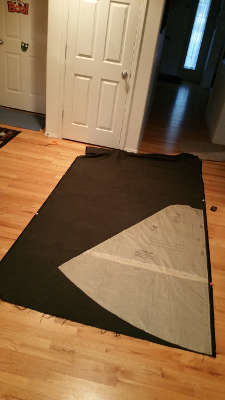
I learned something while cutting the outside of the cape: The pattern was a little confusing in that the diagrams of how the pattern should be laid out were inconsistent with the notation they describe. This resulted in my cutting one of the pattern pieces backwards and Jenn being kind enough to go back to the fabric store all the way across town and get the last bit of fabric from the bolt. I was very lucky there was enough to re-cut the piece the correct way.
I used binder clips on the edges in an attempt to stop the two fabric layers from slipping around. It was mildly successful.
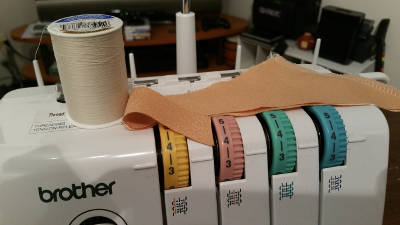
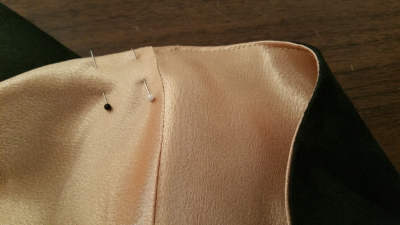
I found with the serger I had to keep close track of the tension settings to make sure the seams were sewn correctly. Depending on the thread and weight of the fabric being sewn, I had to tweak some things.
To help me remember settings, I took photos with my phone of the thread, the fabric being sewn, and the dials on the serger so I’d know exactly what was set.
Here are the settings for sewing together two layers of cape lining.
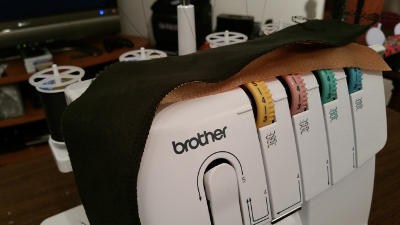
And the settings for attaching the lining to the cape exterior.
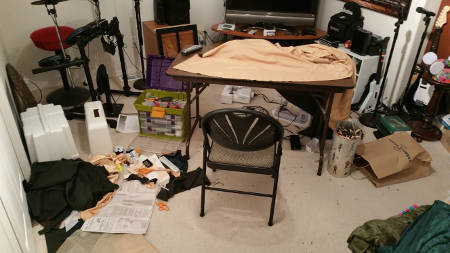
I took a shot of my whole work area while working on the cape. It gets pretty messy, especially toward the end of a project. I know where everything is, though.
You can also see I’ve got things set up so I can watch TV while I work. I got through a couple of different TV seasons on Netflix during this project.
One of the big learning things for me with this cape was that with a thicker fabric it’s hard to get the seams to lay flat. I ironed the junk out of that thing and all the edge seams were rounded and puffy. I had to edgestitch the seams to make sure they laid flat.
- Green suedecloth (exterior) - $55.82
- Gold satin (lining) - $40.46
- Dark green taffeta (hood lining) - $5.99
- Interfacing - (I had some already for this)
- Thread - $11.51
- Silver “conchos” (the metal insignias on the neck) - $13.98
- Scotchgard (for waterproofing) - $5.99
Total: $133.75
Total
- Accessories and props - $99.10
- Shirt - $26.66
- Pants - $33.51
- Doublet - $70.85
- Cape - $133.75
Total: $363.87
That’s probably reasonably accurate. I know I had some coupons where I saved some money on fabric (you definitely need to be watching for coupons!) so the costs on those may be lower, but I also know I had to buy some incidentals like more sewing machine needles after I broke a couple, so it probably roughly balances out.
I get a lot of folks asking why I don’t just rent a costume. Obviously from a money and time perspective it’d be a lot cheaper to do that.
The thing is… I really like making the costume. I’m a software engineer, so generally when I “make something,” it’s entirely intangible - it’s electronic bits stored somewhere that make other bits do things. I don’t come out with something I can hold in my hands and say I did this. When I make a shirt or a costume or whatever, there’s something to be said for having a physical object and being able to point to it and be proud of the craftsmanship that went into it. It’s a satisfying feeling.