
Backing Up Windows Home Server to CrashPlan
For a while I’ve been using MozyHome in a sort of weird, confusing fashion to back up the share content from my Windows Home Server. There were two problems with this setup:
- Lots of moving pieces. The way I had it, there was a scheduled copy task from the WHS to a remote machine, then that remote machine would do the MozyHome backup. That, of course, relied on the remote machine to always be on and running, the process to properly run, etc. A lot of indirection and moving pieces to get around the MozyHome shortcoming that it won’t install on Windows Home Server.
- MozyHome’s pricing is changing. They’re moving away from the $55/year unlimited storage plans and going to a tiered storage plan. Probably not so bad for most folks, but for the 250GB of data I have, it’d cost me around $350/year - seven times what I’m already paying. For that I can definitely find a different solution, even if it’s buying a bunch of 1TB USB drives.
For a while I started looking into the built-in WHS backup thing where you can attach a USB drive and use the WHS console to back up your shares… but it’s a totally manual process. Why they wouldn’t make that something I could run on a scheduled basis is beyond me. But, that being the case, I took it out of the running. It’s gotta be automated.
Luckily, I found a solution:CrashPlan.
I’m not sure why these guys didn’t come up in my initial research, but they seriously solved all my problems.
- $50/year for unlimited storage. And if you get multiple years’ worth of storage, you can get it down to $35/year. For unlimited storage. That addresses the pricing problem.
- Installs directly on Windows Home Server. Technically it’s not “officially supported” but it works like a charm. They even have a wiki page explaining how to install it.
- Allows you to automate backup to the cloud and to a local drive. With the multiple-backup-destination feature CrashPlan offers, you can automatically back up your data to the cloud (“CrashPlan Central,”), to another machine on your network, to a local drive/folder, or even to a friend’s machine. The local drive/folder support addresses my too-many-moving-pieces issue: back up to a USB drive right on your home server.
So, goodbye, Mozy - hello, CrashPlan.
Follow the wiki instructions and get CrashPlan installed. That wiki page also tells you how to configure the WHS shares to be backed up.
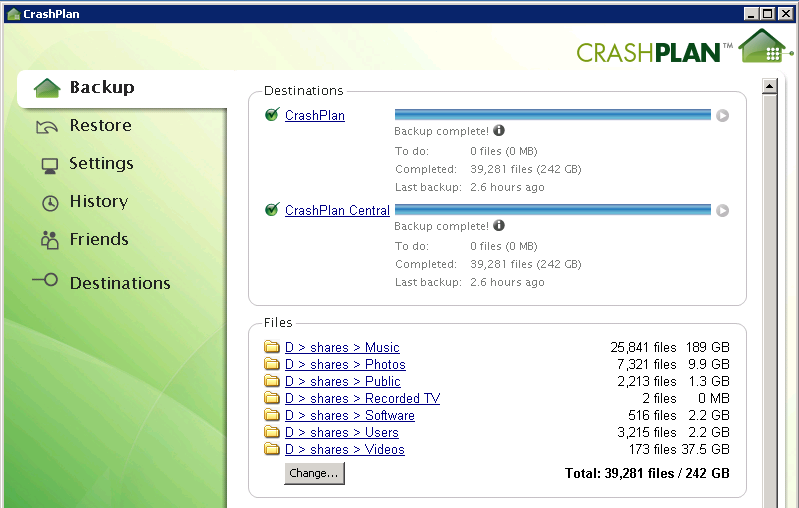
Once you have the shares configured, you’ll see them in the CrashPlan app on the “Backup” tab listed in the “Files” section.
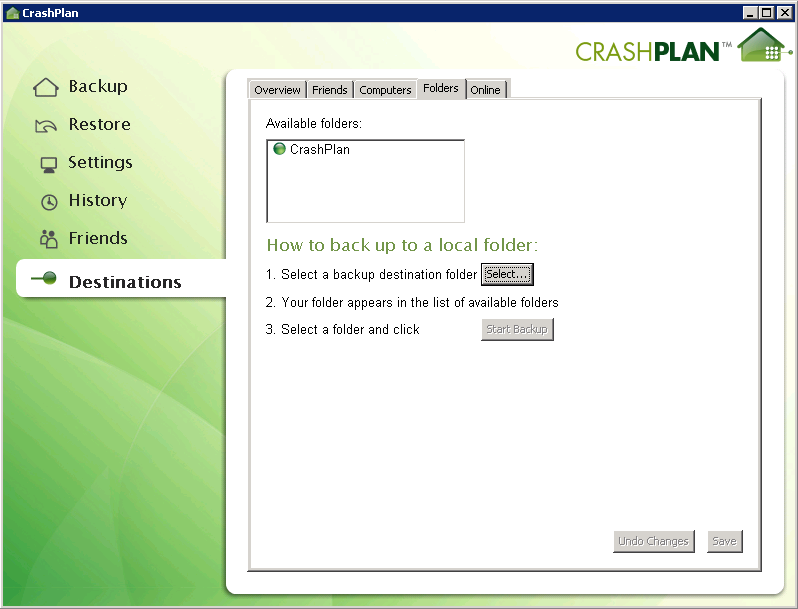
Next, attach your USB drive to the WHS. Make sure you don’t add it to the storage pool or set it up as a server backup. You want it unincorporated so CrashPlan can use it.
Your drive is attached, so in CrashPlan, jump down to the “Destinations” tab and select “Folders.” In here, click the “Select…” button and select the location you want your backups sent to. I made a folder at “E:\CrashPlan” for my backups. Once it’s selected, the name of the folder shows up in the destination list - that’s why you see “CrashPlan” there in my list. Don’t start the backup yet, you’re not done.
Something to note about the folder you select there: The stuff that gets dumped in there won’t be human-readable. It’s all random numbered files and indexes and things. CrashPlan encrypts the stuff that gets dumped in there (just as it will encrypt it if you back up to a friend’s house, so your friend can’t get your stuff). It just means you can’t take the drive and plug it in elsewhere and copy/paste stuff off of it. You will have to restore through the CrashPlan app.
Now, still under “Destinations,” click “Online.” Make sure you’ve got “CrashPlan Central” listed and going. It should already be there, but it’s good to check.
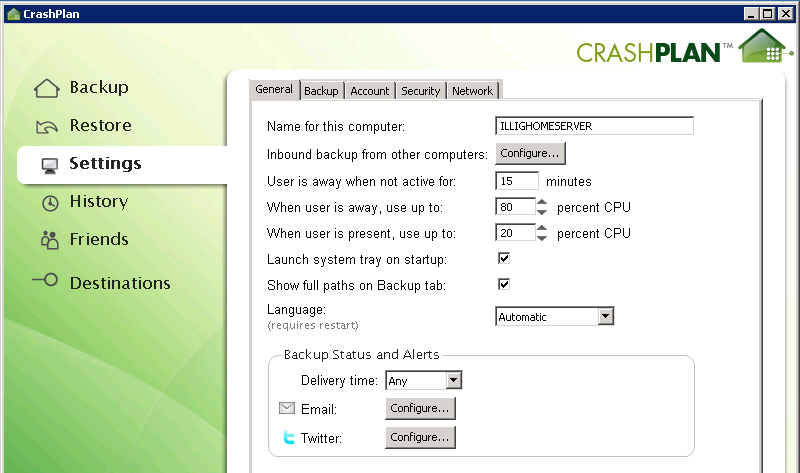
Hop up to the Settings tab and configure your alerts. CrashPlan can notify you on a periodic basis of your backup status and data usage. It can also notify you if there’s any problem. Very slick, and something MozyHome never did. The buttons for that are at the bottom under “Backup Status and Alerts” on the “General” tab.
Finally, still in Settings, select the “Backup” tab and configure how many revisions of each file to keep in your backup archive. Do this by clicking the “Configure…” button next to “Frequency and Versions.” This was the most confusing part for me since there really isn’t any documentation.
You sort of have to read it like sentences:
- Backup a new version every six hours. (Basically, this selects how often to run the backup process.)
- For backups in the last week, keep all the versions found every six hours.
- For backups beyond the last week but within the last 90 days, keep a daily version.
- For backups beyond the last 90 days but within the last year, keep a weekly version.
- Beyond the last year, keep a monthly version.
- If I delete a file, remove the deleted file from my backup archive after six months.
Since the files on my home server don’t change much, this is reasonable. I have a feeling I may have too many versions of things being retained, but I can always change the policy later.
Now you can run the backup. Go back to the main “Backup” tab and you’ll see a little arrow next to each of the backup sources. It looks like a “Play” button in a media player program. Click that on each source and the backup will start. Only one backup will run at a time, so if you click the button on both CrashPlan Central and your local folder, the last one clicked will run first; after it completes, the other source will run. It doesn’t really matter what order they run in that first time since they both have to complete anyway. After that it’ll all be automatic. (You can see these little arrows in my first screenshot at the top, grayed out since my backup is complete.)
If you ever need to restore a file, you can do that through the “Restore” tab in the CrashPlan app:
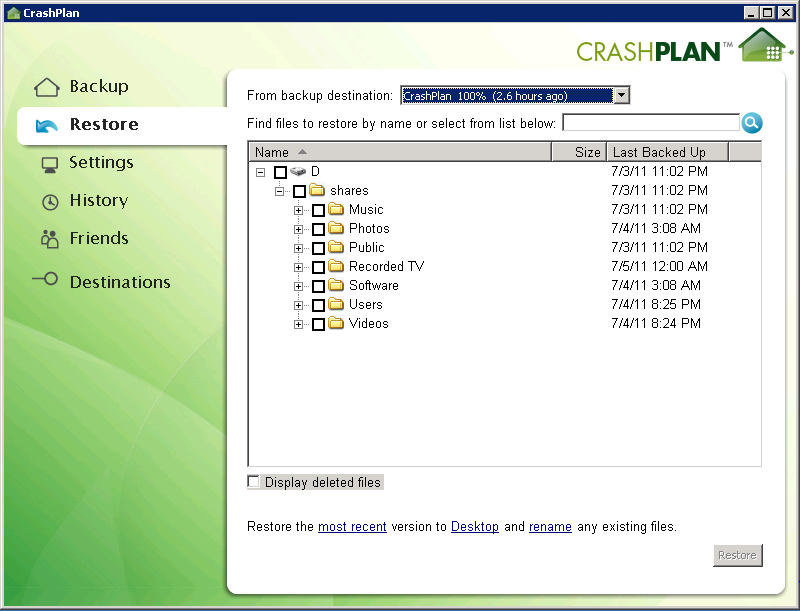
The links at the bottom there allow you to change which version of the files you want to restore, where they get restored to, and what happens when there’s a naming collision.
The only real downside I’ve seen so far is the lack of shell integration. I can’t just right-click and look at previous versions of a file or something like that. On the other hand, for my home server, that’s not as big of a deal.
Last thing to mention: If you start running out of disk space, you need to compact the backup database. On the Destinations tab, under “Folders,” select the folder you’re backing up to and you can see the amount of space currently taken. Use the “Compact” button to compact the database.
There’s a similar button for the online source at CrashPlan Central. You can read more about compacting the database and what that means on the CrashPlan wiki. Anyway, I’m not quite there yet so I can’t really vouch for this part of things.
If you’re looking for a nice way to back up your Windows Home Server, I’d recommend CrashPlan. Easy to set up, easy to use, and totally automatic. I wish I’d found this a long time ago.