
Running Typemock Isolator Outside Visual Studio
I’ve blogged before about getting Typemock, NUnit, and NCover all working together in MSBuild. Though that’s admittedly a tad stale, with a bit of tweaking the contents of that article still apply.
I got a question about running tests that use Typemock Isolator outside of Visual Studio, though, so I figured I’d post this article with some additional info and clarifications.
First, the setup:
- NCover 3.4.16
- Typemock Isolator 6.0.6
- MSTest with Visual Studio 2010
If you have different versions of these tools, you may need to tweak things. Also, I’m building on a 64-bit machine, so you may see some paths referring to 32-bit over 64-bit tools because MSTest is a 32-bit runner so you need to use the 32-bit NCover to get coverage.
When you have Typemock Isolator installed, running tests through the built-in Visual Studio test runner “just works” because Isolator installs a Visual Studio add-in helper. To get coverage, you can use TestDriven.NET to “Test With -> NCover” and it works great.
If you want to run coverage outside of Visual Studio, though, there are a few things you might think to try, some of which work and some of which don’t.
THE BIG TAKEAWAY: You have to start things in a specific order.
- Start Typemock so it can link with NCover.
- Start NCover so it can run and profile your unit tests.
- Start your unit test runner so NCover can gather statistics.
- When the test runner ends, NCover automatically ends.
- Make sure Typemock stops when everything is over, regardless of whether the tests pass or fail.
If you don’t start things in the right order, your tests won’t work and you won’t get the expected results.
WHY IS THAT ORDER REQUIRED?
The way Isolator works, it’s sort of a “pass-through profiler.” NCover is a profiler, too, which is how it takes coverage statistics. You can only have one profiler running at one time. The cool “trick” Isolator does is that it “links” with other profilers so calls pass through Isolator first, your mocks get inserted, and then pass along to the linked profiler like NCover. You can actually watch Typemock switch registry entries around on the fly when you start and stop it - it’ll temporarily put itself into the registry where you’d expect to see NCover, so if you “start NCover” you’re actually starting Typemock, which then chains in NCover.
However, if you try to start the other profiler like NCover first, the linking doesn’t happen so your mocks don’t show up when you expect them. Problems.
Given that, let’s talk about ways to run Typemock Isolator and get coverage when outside of Visual Studio.
Build Scripts
Running things through a build script is the most common and recommended way of doing things. It allows you to automate the whole build process and use the same script on a developer machine and in a continuous integration server.
Let me drop some code on you and then we’ll walk through it:
<?xml version="1.0" encoding="utf-8"?>
<Project DefaultTargets="All" xmlns="http://schemas.microsoft.com/developer/msbuild/2003" ToolsVersion="4.0">
<PropertyGroup>
<!-- Coverage logs and such will be placed here. -->
<LogDirectory>$(MSBuildProjectDirectory)\log</LogDirectory>
<!-- Build configuration (Debug or Release). -->
<BuildConfiguration>Debug</BuildConfiguration>
<!-- Path to the NCover 32-bit installation (MSTest is 32-bit). -->
<NCoverPath>$(ProgramFiles)\NCover\</NCoverPath>
<!-- Path to the NCover build tasks (different path than NCover 32-bit on a 64-bit machine). -->
<NCoverBuildTasksPath>$(ProgramW6432)\NCover\</NCoverBuildTasksPath>
<!-- Path to the Typemock Isolator installation. -->
<TypemockPath>$(ProgramFiles)\Typemock\Isolator\6.0\</TypemockPath>
<!-- Path to the unit test assembly for easier test execution. -->
<UnitTestAssembly>$(MSBuildProjectDirectory)\CoverageDemoTests\bin\$(BuildConfiguration)\CoverageDemoTests.dll</UnitTestAssembly>
</PropertyGroup>
<!-- Get the Typemock and NCover build tasks. -->
<Import Project="$(TypemockPath)\TypeMock.MSBuild.Tasks"/>
<UsingTask TaskName="NCover.MSBuildTasks.NCover" AssemblyFile="$(NCoverBuildTasksPath)Build Task Plugins\NCover.MSBuildTasks.dll"/>
<Target Name="All" DependsOnTargets="Clean;Compile;Test" />
<Target Name="Clean">
<Message Text="Removing build output artifacts in preparation for a clean build." />
<RemoveDir Directories="$(LogDirectory)" ContinueOnError="true" />
<RemoveDir Directories="$(MSBuildProjectDirectory)\CoverageDemo\bin" ContinueOnError="true" />
<RemoveDir Directories="$(MSBuildProjectDirectory)\CoverageDemo\obj" ContinueOnError="true" />
<RemoveDir Directories="$(MSBuildProjectDirectory)\CoverageDemoTests\bin" ContinueOnError="true" />
<RemoveDir Directories="$(MSBuildProjectDirectory)\CoverageDemoTests\obj" ContinueOnError="true" />
</Target>
<Target Name="Compile">
<Message Text="Compiling the solution." />
<MSBuild Projects="CoverageDemo.sln" Targets="Build" Properties="Configuration=$(BuildConfiguration)" />
</Target>
<Target Name="Test">
<MakeDir Condition="!Exists('$(BuildLogDirectory)')" Directories="$(BuildLogDirectory)"/>
<CallTarget Targets="Test_BuildTasks;Test_CommandLine" />
</Target>
<Target Name="Test_BuildTasks">
<Message Text="Testing with Typemock and NCover build tasks." />
<TypeMockStart Link="NCover3.0"/>
<NCover
ContinueOnError="false"
ToolPath="$(NCoverPath)"
TestRunnerExe="MSTest.exe"
TestRunnerArgs="/testcontainer:"$(UnitTestAssembly)""
IncludeAssemblies="CoverageDemo"
LogFile="$(LogDirectory)\Test_BuildTasks.log"
CoverageFile="$(LogDirectory)\Test_BuildTasks.xml"
IncludeAutoGenCode="false"
RegisterProfiler="false"/>
<CallTarget Targets="__TestFinally"/>
<OnError ExecuteTargets="__TestFinally"/>
</Target>
<Target Name="Test_CommandLine">
<Message Text="Testing with Typemock and NCover command lines." />
<PropertyGroup>
<!-- Path to Typemock Console Runner. -->
<TMockRunner>$(TypemockPath)TMockRunner.exe</TMockRunner>
<!-- Path to NCover.Console Runner. -->
<NCoverConsole>$(NCoverPath)NCover.Console.exe</NCoverConsole>
</PropertyGroup>
<Exec Command=""$(TMockRunner)" -first -link NCover3.0 "$(NCoverConsole)" //x "$(LogDirectory)\Test_CommandLine.xml" //l "$(LogDirectory)\Test_CommandLine.log" //a CoverageDemo MSTest.exe /testcontainer:"$(UnitTestAssembly)"" />
</Target>
<Target Name="__TestFinally">
<!-- Make sure we stop Typemock whether there's an error or success in the tests. -->
<TypeMockStop/>
</Target>
</Project>
Now, let’s walk through it.
The first thing we do is set up some helpful properties. This will make creation of the various command lines and such a little easier. In this case, it’s mostly paths to tools.
Next we include the Typemock and NCover build tasks. That way we can use those to run our tests.
The “All,” “Clean,” and “Compile” targets are standard fare.
- The “All” target is our build script entry point. Run that target and it does the full clean/build/test run.
- The “Clean” target deletes all the binaries and log files so we can get a nice clean build run.
- The “Compile” target actually builds the assemblies. In this case, I have two - a class library and the corresponding set of unit tests.
The “Test” target creates the folder where we’ll dump our coverage logs and then fires off the unit testing.
Now we get to the interesting bit: Showing the two ways you can run tests with coverage.
The Test_BuildTasks target shows coverage using the provided build tasks. This is the recommended way of doing things since the build task interface makes your script a lot more readable and you get some “compile time checking” in case you mistype one of the build script attributes. Plus, in some cases the build script tasks make things a little easier to specify than the longer, more cryptic command lines. You’ll notice that we’re starting things and stopping them in the order mentioned earlier. That’s important, and it’s why this works.
The Test_CommandLine target shows coverage using a command line executable. Typemock Isolator comes with a program called “TMockRunner.exe” which is a lot like NCover.Console.exe that comes with NCover - it lets you start up a process that will have Typemock enabled on it. If you dissect that big long command line, you’ll see:
- We lead with TMockRunner.exe, tell it we’ll be running coverage (-first) and link it to NCover (-link NCover3.0).
- We run NCover.Console.exe with its usual command line options, telling it where to put logs and which assembly to profile.
- Finally we run MSTest.exe and tell it where our unit tests are.
In the command line version, we don’t have to explicitly shut down Typemock Isolator because it’s only enabled for that one process, just as NCover.Console.exe only enables NCover for the one process it starts.
Command Line Execution
I showed you a command line in the build script example above, but you don’t have to use it inside a build script. It’ll work just as well outside the script environment. The only downside to using it alone is that you won’t be able to use the handy variables to make the command line more readable the way you can in the build script, but if you make a little batch file or something with the command line in it, that’ll work perfectly.
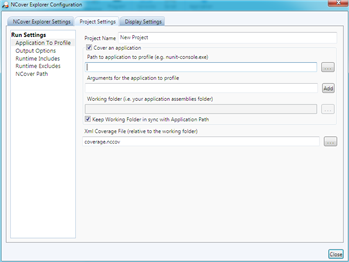
NCover Explorer
NCover Explorer offers a way to start an application and profile it from right in the UI.
This won’t work the way you think because NCover Explorer tries to start NCover first. Remember the critical ordering, above, where Typemock Isolator needs to be started first? That doesn’t happen here. NCover Explorer expects to start NCover straight away. So how do you get it to work?
Start NCover Explorer using TMockRunner.exe and Typemock will be enabled during your test runs. A sample command line is as follows:
"C:\Program Files (x86)\Typemock\Isolator\6.0\TMockRunner.exe" -first -link NCover3.0 "C:\Program Files\NCover\NCover.Explorer.exe"
When you run that, the console window where you started NCover Explorer will stay open. Leave it. Now when you set up your project, set the application to profile as MSTest.exe and set your “testcontainer” to your unit test assembly:
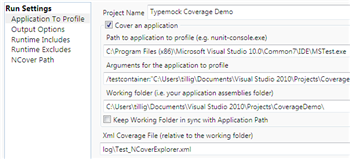
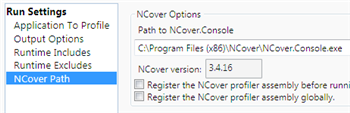
And for NCover Path, make sure you point to the 32-bit version of NCover.Console.exe because MSTest.exe is 32-bit:
Now when you click the “Run Coverage” button, things will work as expected because TMockRunner.exe has enabled Typemock Isolator inside NCover Explorer.
NUnit GUI Or Other Test Runner Tools
I know we’re using MSTest in this example, but I figured a quick note was in order:
If you’re using, say, NUnit and want Typemock to work inside the NUnit GUI, you need to do a similar trick as we did in NCover Explorer, above
- start NUnit GUI through TMockRunner.exe, just omit the “-first” and “-link NCover3.0” command line options. This same trick holds for other test runner tools - starting the tool through TMockRunner.exe should get you the results you’re looking for.
Hopefully this helps you get your tests running with Typemock Isolator outside Visual Studio. Happy testing!