
How To Set Up a DVD Library in Windows Media Server
Getting a DVD library going in Windows Media Server is not quite as straightforward as you might think. The information is out there on how to do it, but it’s spread far and wide as people writing it up assume you know a bunch of stuff you don’t know. Hopefully this will help get you started. [Note: For some context as to how my entire Media Server solution is set up and the goals I had in doing it, check out my overview.]
The goal here is to get your DVDs ripped into a digital format, stored somewhere a Windows Media Center PC can access them, be able to browse the list of available DVDs in a friendly format, and play the DVD as though you had placed the DVD into the tray - menus, extra features, the whole bit.
Note: It may be easier to do some of the things I’m about to describe if you don’t hold yourself to the “play it like it’s a full DVD” requirement - compressing the movie into an MP4 or something. I’m not going to cover that here because that process is more, “rip the movie, drop it in a folder, and you’re done.” I’m a quality freak and I want the whole kit-and-kaboodle, so that’s what I’ll cover. On the other hand, the only way to get things to work through a Media Center Extender (like an Xbox 360) is by compressing the movie. I’m not doing that, so my quality freak nature holds.
Note 2: I’m explaining this in Windows Vista terms, so paths and such will be Vista-oriented. There are similar settings you can use in Windows XP Media Center, but I haven’t actually tried them so I don’t want to provide advice on them.
Step 1: Determine where to store the ripped movies.
 A
ripped DVD can take up to 8GB of space. For a sizable library, you’re
looking at possibly a terabyte drive or larger. If you plan on only
having one Windows Media Server, it can all be attached to that PC. If
you might want to have more than one Windows Media Server, you’ll want
to store the ripped DVDs on a file server on your network somewhere.
A
ripped DVD can take up to 8GB of space. For a sizable library, you’re
looking at possibly a terabyte drive or larger. If you plan on only
having one Windows Media Server, it can all be attached to that PC. If
you might want to have more than one Windows Media Server, you’ll want
to store the ripped DVDs on a file server on your network somewhere.
There are plenty of solutions for storing stuff on your network, from NAS solutions to dedicated file servers. I ended up getting a Windows Home Server and really like it. If you are able, I recommend it.
Step 2: Choose a format to rip your movies in.
For a full-disc rip, you have your choice of ripping the disc in ISO format or VIDEO_TS format. ISO format basically takes a full image of the disc, sector for sector, and stores that in one file. VIDEO_TS format just takes the files that are on the disc and puts those in a folder you specify. From a backup standpoint, ISO is going to produce a more literally accurate reproduction of the disc, but you can burn VIDEO_TS folders back to a DVD you can watch in a regular DVD player, too, so if you don’t mind losing things like, oh, the disc’s volume label, I’d go with VIDEO_TS for two reasons:
First, VIDEO_TS seems to be much more portable from an application playback standpoint. If you happen to have a Windows Media Center and a Mac running Front Row, for example, both can play back the same VIDEO_TS folder structure without issues. If it’s ISO, you generally need to configure some sort of ISO mounting tool on each front end to fool the system into thinking it’s a real DVD.
Second, VIDEO_TS rips seem to take much less space on disk. Space conservation, when you’re sometimes looking at one or two GB, is a good thing.
To that end, this step is sort of misleading. You’ll want to rip your movies in VIDEO_TS. But now you know why. (I’ve also posted a blog entry with some additional details about choosing a format. Much of this DVD Library setup guide won’t pertain to you if you choose a format other than VIDEO_TS, but if you want to look at different formats, here’s my comparison.)
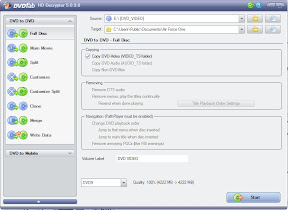
Step 3: Rip your movies.
There are lots of different DVD ripping tools out there to choose from. I, personally, use the free DVDFab HD Decrypter, which comes as part of the commercial DVDFab product. (Make sure you get the “CSS Version” or you’ll not be able to rip CSS encrypted movies. The link I provided should get you there.)
When you rip your movies, the organization is important. Movies should generally exist in a flat folder structure, and every folder name must correspond to the name of the movie it contains. This is probably easier to show in an example.
Say I have everything stored on a \\server\DVD share. When I explore \\server\DVD, I’ll see a hierarchy like this:
- \\server\DVD
- Movies
- Aliens (1986)
- AUDIO_TS
- VIDEO_TS
- Blade Runner (1982)
- AUDIO_TS
- VIDEO_TS
- Die Hard (1988)
- AUDIO_TS
- VIDEO_TS
- Aliens (1986)
- TV
- Alias
- Season 01
- s01e01e02e03
- AUDIO_TS
- VIDEO_TS
- s01e04e05e06e07
- AUDIO_TS
- VIDEO_TS
- s01e01e02e03
- Season 01
- Alias
- Movies
…and so on. Under that \\server\DVD share, I split things into Movies and TV.
Under the Movies folder, there’s one folder for each movie named with the movie title and year, and in each movie’s folder, you’ll see AUDIO_TS and VIDEO_TS folders - the results of the ripping process.
Under TV, there’s a folder for the TV series, then a folder for each
season, and for each disc in the season there’s a folder that is named
with the convention sXXeYYeYY that tells which season and which
episodes are on each disc. In the example, you can see two discs in
Alias season 1 - the first disc has season 1 episodes 1 through 3; the
second disc has season 1 episodes 4 through 7.
UPDATE 12/29/11: This folder structure is slightly more detailed than my originally chosen structure due to my new adoption of XBMC as the front end. It doesn’t impact my use of Windows Media Center, though - it will work for both so it’s a good structure all around.
Using your ripper, rip the entire movie in VIDEO_TS format to the appropriate area on your network. It seems to be generally faster to rip to a local drive and copy the results of the rip over to the right location on the network than it is to rip directly to the network, but YMMV.
Two notes if you choose to use DVDFab HD Decrypter: First, it creates sort of an odd folder structure that actually seems to put the AUDIO_TS and VIDEO_TS folders down two or three levels from where you tell it to rip to. If you’re ripping local and copying to the network, just copy the stuff it rips and nests down in the folder structure - you don’t need to go all the way back up to the “FullDisc” folder it creates (you’ll know it when you see it). Second, DVDFab HD Decrypter gives you the option to rip non-movie-related files, like PC content (Flash executables, images, etc.) when you rip the movie. I do this, but you don’t have to. If you happen to see a “JACKET_P” folder that it rips as a peer to VIDEO_TS, that’s what that is. When you copy to the network, go ahead and copy all of the extra files it rips, too. It won’t hurt anything, it just won’t be used by Windows Media Center.
UPDATE 3/30/09: I created a script that fixes up the DVDFab HD Decrypter folder structure so you don’t have to fuss with the “FullDisc” folder anymore.
Step 4: Determine how you want to handle your metadata.
When you browse through your movies, you’ll probably want to see the cover image for the movie, the title, the year it was made, and other metadata about the movie. There are a lot of ways to get this to happen, and all of them require some sort of noodling around. This is, by far, the hardest step on the list because there are so many choices.
A lot of folks use, and enjoy, the My Movies plugin for Windows Media Center. It’s a very robust plugin that has a server component (which serves up the metadata and is where you manage your collection) and a client component (which gets installed on the Windows Media Center itself), and it may be that you have to install both on the same box if you only have the one Windows Media Center. It lets you navigate in all sorts of ways through your library - by genre, cast member, etc. It also has a very robust metadata engine that can either get data from a web service or import it from DVD Profiler, an amazing collection management tool (that I do use and recommend).
That said, My Movies is a plugin, and it does require a lot of fudging around, and I’m a big fan of just getting the out-of-the-box stuff to work for me with minimal hackery (less hackery == less that should break, though sometimes that’s incorrect). If you choose My Movies, more power to you - this is where this guide ends for you.
On the other hand, if you choose to use as much out-of-the-box Windows Media Center functionality, you’ll be looking at enabling the “DVD Library” functionality to read your ripped movies and display the metadata there.
So, again, this was sort of a trick step - we’re going with the built-in “DVD Library” in Windows Media Center.
UPDATE 9/24/08: There are some shortcomings with the built-in DVD
player you might not like which I discovered after writing this guide
and ripping a lot of movies. I’ve found that the quality is mediocre,
and if you have a DVD that plays in “4 x 3 widescreen” (that is, it’s
a 4 x 3 movie that has letterboxing such that you see a black box all
the way around the movie), the built-in DVD player won’t let you “zoom
in” or anything to clean that up. There is not, as far as I can tell,
a way to integrate a different DVD player into the “DVD Library”
feature. If you want a different DVD player, My Movies has good
integration with the TheaterTek player and that seems to be a very
common solution to the problem.
UPDATE 1/6/09: You can mess around with the aspect ratio and zoom options in the built-in DVD player by pushing the info “i” button on the remote or, I think, right-clicking on the video as it plays.
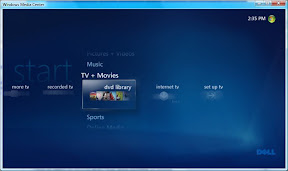
Step 5: Enable the DVD Library in Windows Media Center.
Out of the box, the “DVD Library” feature on Windows Media Center isn’t enabled. You’ll need to enable it with a registry setting. Per this Microsoft KB article (and my own experience), locate this registry subkey: HKEY_CURRENT_USER\Software\Microsoft\Windows\CurrentVersion\Media Center\Settings\DvdSettings …and find the ShowGallery key. Change the value of ShowGallery to be Gallery.
Once you’ve applied that, when you launch Windows Media Center you’ll see the “DVD Library” under “TV + Movies.”
Step 6: Configure Windows Media Center to find your ripped DVDs.
Now you need to tell Windows Media Center where your DVDs are ripped to.
- Open Windows Media Center.
- Go to Settings -> Library Setup.
- Select “Add folder to watch” and click Next.
- Here you can either select to “Add folders on this computer” (if you ripped your DVDs to the Windows Media Center PC) or “Add shared folders from another computer” (if you ripped your DVDs to a network location). Click Next.
- Select the place where you ripped your DVDs. You only need to select the top level folder (e.g., \\server\DVD) and you’re set.
There is a decent walkthrough of this when using a Windows Home Server over at We Got Served that has some screen shots.
Note: Some folks have found that after adding the folder to watch their movies don’t show up, even after restarting Media Center. If you’ve added your movie folder and it’s not finding your movies, try restarting Media Center. If it still doesn’t find your movies, you may have to add the folder through the DVD Library:
- Open Windows Media Center.
- Go to the DVD Library.
- Inside the DVD Library, right-click and select “Add Movies.” This will take you to a similar screen as the Library Setup (noted above) where you can add folders to watch that contain movies.
Step 7: Add the movie metadata.
Getting the metadata attached to your ripped movies is the last step in getting a nice DVD library going. Once you have metadata, navigating through your library and picking movies is simple, easy, and friendly for all members of the family.
Cover Image Only:
If you don’t care about anything but the cover image, it’s excruciatingly simple. Place a cover image for the movie inside the folder just above the VIDEO_TS folder and call the image folder.jpg. That’s it. Windows Media Center will use the name of the folder as the name of the movie and automatically use this image as the cover image and you’re done. It’d look like this:
- \\server\DVD
- Movies
- Aliens (1986)
- folder.jpg
- AUDIO_TS
- VIDEO_TS
- Blade Runner (1982)
- folder.jpg
- AUDIO_TS
- VIDEO_TS
- Die Hard (1988)
- folder.jpg
- AUDIO_TS
- VIDEO_TS
- Aliens (1986)
- Movies
I actually want full metadata, though, so that’s not good enough for me.
Full Metadata:
The way Windows Media Center stores metadata is not necessarily straightforward, so it helps to undestand it before you make a choice on how to deal with this.
When you insert a real DVD, Windows Media Center reads an ID from the disc. This ID is a set of two eight-digit hex numbers, like “70464E8C-56B47572.” Windows Media Center uses this information to go online and retrieve information about the movie like cast information, the main movie length, and the cover image.
The information it retrieves gets stored in the C:\Users\USERNAME\AppData\Roaming\Microsoft\eHome\DvdInfoCache folder (where “USERNAME” is the name of the user running Media Center). For each disc loaded, you’ll see a corresponding XML file. Using the above example, you could look in that DvdInfoCache folder and you’d see a file called 70464E8C-56B47572.xml. The contents of that file look like this:
<?xml version="1.0"?>
<METADATA xmlns:xsi="http://www.w3.org/2001/XMLSchema-instance" xmlns:xsd="http://www.w3.org/2001/XMLSchema">
  <MDR-DVD>
    <MetadataExpires>2008-12-10T18:49:18.5430057-08:00</MetadataExpires>
    <version>5.0</version>
    <dvdTitle>13 Going on 30</dvdTitle>
    <studio>Columbia TriStar</studio>
    <leadPerformer>Jennifer Garner; Mark Ruffalo; Judy Greer; Andy Serkis; Kathy Baker</leadPerformer>
    <director>Gary Winick</director>
    <MPAARating>PG13</MPAARating>
    <language />
    <releaseDate>2004 01 01</releaseDate>
    <genre>Romance</genre>
    <largeCoverParams>cov150/drt400/t455/t45554fmujx.jpg</largeCoverParams>
    <smallCoverParams>cov075/drt400/t455/t45554fmujx.jpg</smallCoverParams>
    <dataProvider>AMG</dataProvider>
    <duration>98</duration>
    <title>
      <titleNum>1</titleNum>
      <titleTitle>13 Going on 30 [Special Edition]</titleTitle>
      <studio>Columbia TriStar</studio>
      <director>Gary Winick</director>
      <leadPerformer>Jennifer Garner; Mark Ruffalo; Judy Greer; Andy Serkis; Kathy Baker</leadPerformer>
      <MPAARating>PG13</MPAARating>
      <genre>Romance</genre>
      <synopsis />
      <chapter>
        <chapterNum>1</chapterNum>
        <chapterTitle>Start</chapterTitle>
      </chapter>
      <chapter>
        <chapterNum>2</chapterNum>
        <chapterTitle>Thirteen</chapterTitle>
      </chapter>
      <!-- Add'l chapters elided for demo purposes -->
      <chapter>
        <chapterNum>28</chapterNum>
        <chapterTitle>Course Correction</chapterTitle>
      </chapter>
    </title>
  </MDR-DVD>
  <NeedsAttribution>true</NeedsAttribution>
  <DvdId>70464E8C|56B47572</DvdId>
</METADATA>
There’s a whole bunch of content in there - that’s the stuff that gets displayed on the screen, and that’s what you need to get into your ripped movies. You need to fool Windows Media Center into getting the proper DVD ID from each of your rips.
Fortunately, that’s actually easier than you think.
What you can do is place a tiny XML file in the folder that contains the VIDEO_TS folder. The name of the XML file is “MovieName.dvdid.xml” where “MovieName” is the name of the movie (which should also be the name of the folder containing the movie - it all needs to match). That looks like this:
- \\server\DVD
- Movies
- Aliens (1986)
- Aliens.dvdid.xml
- AUDIO_TS
- VIDEO_TS
- Blade Runner (1982)
- Blade_Runner.dvdid.xml
- AUDIO_TS
- VIDEO_TS
- Die Hard (1988)
- Die_Hard.dvdid.xml
- AUDIO_TS
- VIDEO_TS
- Aliens (1986)
- Movies
Inside these tiny XML files are two lines - the name of the movie and the movie’s DVD ID. A sample looks like this:
<?xml version="1.0" encoding="utf-8"?>
<Disc>
  <Name>13 Going on 30 Special Edition</Name>
  <ID>70464E8C|56B47572</ID>
</Disc>
When Windows Media Center sees that, it thinks it’s a real DVD and it’ll go to its online service and automatically download all of the real metadata into the DvdInfoCache like I showed you earlier. The question is, how do you get those tiny “dvdid” files?
UPDATE 12/29/11: If you’re using DVDFab HD Decrypter to rip your discs, there’s an option in it to leave the dvdid file in the folder along with the rip so you don’t need to use the DVDXML web site.
If you already have the rip or otherwise need the file, though, what you need to do is go to the DVDXML web site and get a free account. The point of the DVDXML site is to provide you with these tiny “dvdid” files that you need to fool Windows Media Center into downloading the rest of the metadata for you. Sign up, sign in, and search to find the one that matches the DVD you ripped. It seems to be a pretty complete database.
What if the info isn’t on DVDXML? You have a couple of options. First, you could post to their forums and request it. Second, you could create it yourself, and there’s a tutorial on how to do it, but I can’t say I’ve done this yet so I don’t know how easy it is. That tutorial mentions that DVDFab 5 (the commercial version of DVDFab HD Decrypter) will make these for you, but I’ve not tried it. In general, the trick is going to be getting the DVD ID; it doesn’t seem that the “Name” element in that “dvdid” has to actually match anything. It’d probably be easy enough to do by hand if you can get the ID.
What if I’m not online or want to generate the full metadata myself? Seriously, it’s going to be far easier for you if you just let the system do the download work for you, but if your Windows Media Center isn’t connected to the network and you need to generate it all yourself, there seem to be a few options. Eric Charran has done it using a program called DVD Library Manager that uses Amazon and IMDb to get info. There’s another program called “MyDVDs” that is on a site that contains pre-generated complete versions of the data and will automatically download those for you (or you can manually download individual files). The idea is that you still get a “dvdid” file, but it generates the stuff in the DvdInfoCache for you, too, and omits the need for the system to look the data up. Again, the simplest route is to use DVDXML and put the “dvdid” file in your movie folder and let the system do the work for you.
What if I customize the metadata that gets downloaded? For example, you may change the title of the movie that gets displayed to be more accurate. If you do, there’s a bit of an interesting issue. The metadata comes with an expiration tag that has a date on which the item will be refreshed in the DvdInfoCache folder. If you change the metadata XML, your changes will be lost when the data gets refreshed. You can either manually edit the file in the DvdInfoCache to be a date really far in the future (so it never expires), you can remove the “MetadataExpires” element from the top, or you may actually want to generate the full metadata yourself. See above for more on that.
What do I recommend (so far)? I’m learning, so I’ll probably update this post and this recommendation as time goes on, but right now what I’m doing is:
- Use DVDFab HD Decrypter and/or DVDXML to get the initial “dvdid” file. You’ll need that anyway.
- Open Media Center and visit the DVD Library once to download the initial set of metadata. This does a quick, automated pre-population of most of the requisite fields.
- Use DVD Library Manager to update any missing fields and/or modify the titles, etc. through Amazon and IMDb. Saving in DVD Library Manager will also remove the “MetadataExpires” attribute so you don’t have to fear any changes getting deleted.
I’m also going to set up my DvdInfoCache so it’s stored on the server using a mapped drive via the Vista “mklink” command. That way any additional Media Center PCs I hook up will have all the same data.
I haven’t determined yet if I can/should leverage the DVD Profiler database that I already have going. There are nice high-res cover scans there that I’d like to take advantage of, and it’s a nicely formatted and consistent set of data to pull from.
This process is exactly what I’m doing to get my full DVD library ripped and accessible. So far it has pretty decent Wife Acceptance Factor, and I like having accessibility to my movies without having to do a lot of additional work. Hopefully this can help you to get your DVD library in order.