
How to Debug the XAML Designer
In working on a recent project I started getting a bunch of big red X marks in the XAML designer due to various issues in design time. To fix it, I had to debug into the XAML designer itself.
There are several articles out there that say “just attach to XDesProc.exe with the debugger” but this alone didn’t work for me because the errors I was encountering were happening in just such a spot that I couldn’t attach to the designer process before it had already occurred. (We’ll get into why later on.)
Here’s how to debug the XAML designer:
- Close all instances of Visual Studio.
- Open a command prompt window.
- Enter the command
setx XPROCESS_PROMPT 1and hit enter. - Close the command prompt.
- Open the problem project in Visual Studio and get to the designer to trigger the problem.
-
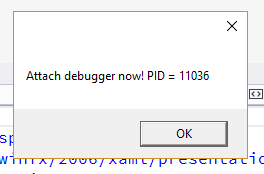
When the designer is about to start, you’ll get a little dialog box telling you exactly which process to debug.
-
Open a second instance of Visual Studio and attach to that process. Make sure in the “Attach to Process” dialog you select “Managed (v4.6, v4.5, v4.0)” - you may have to manually change the value here.

- If you’re interested in setting a breakpoint on your project code, open your project in that second copy of Visual Studio (the one attached to
XDesProc.exe) and set your breakpoints. - Click the “OK” button in the “Attach debugger now!” dialog to allow the first instance of VS to continue the design-time rendering.
When you’re finished debugging you need to turn the prompt off or it’ll keep happening when you start the designer.
- Close all instances of Visual Studio.
- Open a command prompt window.
- Enter the command
setx XPROCESS_PROMPT ""(yes, empty double-quotes) and hit enter. - Close the command prompt.
Gotcha: This doesn’t help with assembly binding problems.
The problem I was having was an assembly binding problem. The red X in the designer pointed to an error where an assembly couldn’t be found at design time. It was there fine at runtime, but for some reason the designer couldn’t find it.
It turns out the designer has a “shadow cache” where it keeps a copy of your app for execution during design time. It’s in a location that looks something like this:
C:\Users\yourusername\AppData\Local\Microsoft\VisualStudio\15.0_317bf9c1\Designer\ShadowCache
Each app gets a uniquely-named directory under there. What you’ll find is:
- The designer creates a separate folder in the unique app directory for each assembly it shadow-copies.
- Not everything in your app’s
binfolder actually makes it to the shadow copy.
That latter point - that not everything makes it to the shadow copy - was causing my problem.
I never did figure out the logic behind what does get to the shadow copy vs. what doesn’t get there. Adding a direct reference to the assembly or NuGet package doesn’t necessarily guarantee it’ll make it.
When you run into this, you get managed C++ errors trying to marshal FileNotFoundException info back to .NET but without any requisite inner exception or stack trace details. It’s basically impossible to figure it out unless you want to start trolling through memory dumps and WinDBG. That would tell you what’s missing but still wouldn’t reveal the logic as to why it’s missing.
I worked around the problem with a two-pronged approach:
- Make judicious use of design-time checking via
if (DesignMode.DesignModeEnabled)checks in appropriate places to behave differently in design. - Use knowledge of how the JIT compiler works to separate code that requires the missing assemblies from code that needs to run at design time.
Let me expand a bit on that latter one, since it’s key.
When the XAML designer executes code, it only compiles the code it requires to run. If it touches a type in the system, it compiles it (from the MSIL code in the assembly) so it can be used.
Say you have a control MyControl. MyControl has a view model MyViewModel which then uses an EF DbContext to get some data. If all of that is in code in MyControl then the designer needs to compile MyControl, MyViewModel, and the DbContext. If the designer can’t find all the required EF assemblies, the DbContext compilation will fail, which means MyViewModel will fail, which will bring the whole design time thing crashing down and yield a red X.
To get around that, you can create an interface IViewModel with the properties on MyViewModel. Add IViewModel to MyViewModel and create a second view model just for design time - DesignViewModel - that also implements IViewModel with some simple properties. Now in the constructor of your control, you set your control’s view model to the DesignViewModel when DesignMode.DesignModeEnabled is true. MyViewModel can be passed in as a constructor parameter from elsewhere or set as the data context later in other code.
Point being, you’ve now separated your control code from the view model code by using an interface - and the designer won’t need to JIT compile the full “real” view model, so it won’t look for assemblies that aren’t there and you’ll get a good design time experience.
Yeah, it’s sorta complicated. If I could figure out the logic of what causes the designer to bring an assembly into the shadow copy I’d just, uh, “flag” the missing assemblies (or whatever) and bypass this whole complex thing.
UPDATE 10/25/2017: This may be fixed as part of this issue in VS 2017 15.5.