
Use CodeRush Templates to Help Write XML API Documentation
I write a lot of API documentation. I do it to help the people consuming my code… and to help me a year from now when I have to come back and can’t remember how the thing works. I have CR_Documentor out there to help you see what your docs will look like rendered, but sometimes you also need help getting the content right.
Your first stop should beGhostDoc to get some basic bits in place. GhostDoc doesn’t actually write good documentation, but it can help you get things started. After that, though, you may need some easy ways to get some of the fancier tags in there or a little bit of standard shorthand to get things in place. That’s where CodeRush templates come in.
CodeRush templates are like magic macro expansions. You type a little text and hit the expansion key (usually a space or tab, pending on what you have configured) and magic happens. I say magic because you can do a lot with templates beyond just expanding some text. You can add required namespace registrations to a file… you can do different things based on context (are you in the code editor or in the designer? HTML or XML?)… you can insert content from your clipboard… Lots of stuff.
You can set up some pretty nice templates for helping you write standardized documentation. Here’s how.
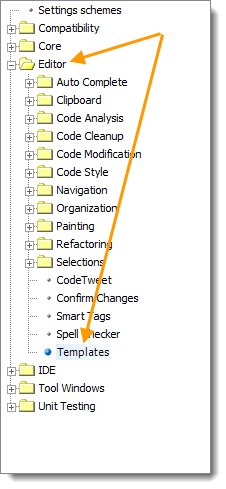
First, open up the CodeRush Options window (Ctrl+Shift+Alt+O or
DevExpress -> Optionsfrom the Visual Studio menu). On the left side,
in the tree view, expand the “Editor” node and select “Templates.”
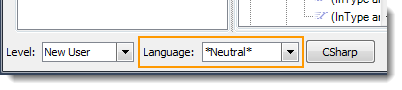
At the bottom of the Options window, select the “*Neutral*” language. Do this so you can add the expansions to work for both VB.NET and C# and keep them together. Otherwise you have to switch back and forth between the two languages every time you want to modify or add a template.
At this point, stop for a second. I’m going to walk you through how to make your own templates, but at the end of the article I’m also going to let you download some I’ve already made to get you jumpstarted. If you download/import the ones I made, you don’t need to do this next step where you create the “XML Doc Comment” templates folder. Importing mine will create this for you.
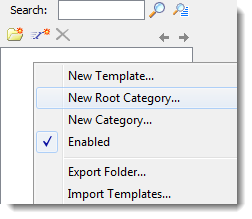
Create a new folder to hold your XML Doc Comment templates [if you’re not downloading/importing mine first]. Right-click somewhere in the middle tree-view area, select “New Root Category…” and give it a good descriptive name like… “XML Doc Comments.”
You can make any other sort of hierarchy in there that you want. If you import my templates, you’ll see some folders for canned documentation blocks, some inline expansions, list templates, and some general standard block comment types.
Now I’ll walk you through creation of a simple template. One of the
templates in my pack will expand the word null in an XML doc comment
to <see langword="null" /> so you get the proper
expansion/highlighting when it renders. I’ll show you how to create that
and set the appropriate values so you don’t end up with XML doc comments
in the middle of your code.
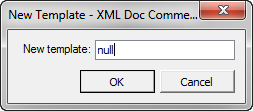
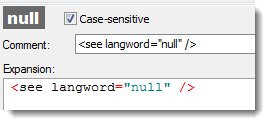
Select a folder for a new XML comment template and click the “New Template” button. Type the key combination you want to expand. In this case, put “null” in there.
Fill in the “comment” for the expansion and the actual text you want to see when it’s expanded. Also check the “case-sensitive” box because you don’t want “Null” or “NULL” expanding.
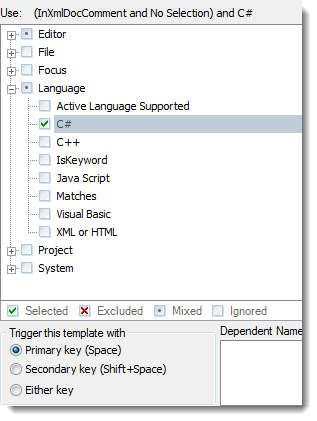
The last and most important thing is the context for the expansion. You want your template to only run when:
- The active language is C# (you can set up a similar “Nothing” expansion for VB, which comes with my template set).
- There is no selection in the editor.
- You are typing code (not in the designer).
- You are working in an XML doc comment (not in executable code).
To accomplish this, there are three boxes to check in the context tree view below your macro expansion:
- Editor/Code/InXmlDocComment
- Editor/Selection/No Selection
- Language/C#
There is a very, very rich context selection mechanism in CodeRush, so I won’t show you the entire tree view with all of the boxes selected - I’ll just show you the C# box here, but you need to check all three boxes.
Click “OK” to save your template and close the Options window.
Now, in a C# code editor, start an XML doc comment like this:
/// <summary>
/// Template test for null
/// </summary>
public class TestClass
{
}
Press “space” after the keyword null in that XML doc comment. You
should see it expand to:
/// <summary>
/// Template test for <see langword="null" />
/// </summary>
public class TestClass
{
}
Pretty simple, right? Now you can just type your doc comments and not have to think about expanding that markup.
Like I mentioned before, I’m going to let you download some templates I use.
First, download the zip of the templates. It has one XML file in it - the exported set of templates. Unzip that file somewhere you’ll remember. Now, in the Options window, after you select Editor/Templates and set the language to “*Neutral*” (as outlined in the steps above), right-click in the center tree view area and select “Import Templates…”
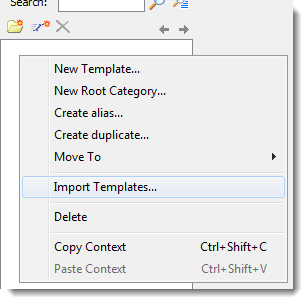
Select the XML file you downloaded and unzipped. (Don’t select the ZIP file, that won’t work. You need to unzip it first.) Once you’ve done that, you’ll see a bunch of templates available to you:
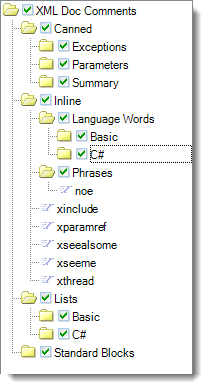
There is a lot here, so I recommend you explore and see what’s there, what’s useful, etc. Conventions I used in naming templates:
- Documentation blocks/elements are generally prefixed with “d” (for
“documentation”).
- “ds” - document <summary> content.
- “dx” - document <exception> content.
- “dp” - document <param> content.
- One-liner tags just start with “x” (for XML) because there’s no content.
- Keywords that expand are the exact keyword (e.g., “null”) so you don’t have to think about it.
- List template expansions start with “l”.
Some particular highlights I use almost daily:
dxargnullexpands to standard<exception type="System.ArgumentNullException">documentation for when a parameter is null including a placeholder for parameter reference info.dxargemptyexpands to standard<exception type="System.ArgumentException">documentation for when a parameter is empty including a placeholder for parameter reference info.<see langword="..." />expansions for all of the standard C# language words (null, abstract, true, false, sealed, static, virtual) and VB.NET language words (CanOverride, False, MustInherit, Nothing, NotInheritable, Shared, True).xseealsomeexpands to a<seealso cref="..." />link where the link destination is the current type you’re working on.xseemedoes the same thing, but<see cref="..." />lbstarts you a bullet list with one item.ltstarts you a table with a header and one item.licreates a new list item with both the<term>and<description>elements.
Again, you’ll only see these things expand in XML API doc comment context, so you shouldn’t worry about crazy things happening in your code - it’ll just help you write doc faster. And if I have templates you don’t like, you can always import what I’ve got and delete the stuff you don’t want. It should all import into the same folder, so it won’t “corrupt” your other settings.
Tips for writing your own doc comment templates:
- Pick a consistent set of template naming schemes. I outlined mine, above, but if you don’t like that one, pick something different. It’s good if it’s consistent, though, because if you have a lot of templates that you don’t use daily, it can be easy to forget what you have. Consistency means you can possibly “guess” if you already have it and you may well be right.
- Copy/paste contexts. Once you have a working template set up, you don’t need to always manually check all the boxes to set up the context. When you create a new template, right-click on an existing working template and select “Copy Context,” then right-click on your brand new template and select “Paste Context.” All the boxes will be checked for you.
- Pay attention to the little “Command” dropdown beneath the
“Expansion” box. It inserts things that can help you out in your
template. For example, selecting “Caret” in there will place a
special marker
«Caret»into your template. After your template finishes expanding, this is where the cursor will end up and where you’ll start typing. The “Paste” command can insert data you have on the clipboard. Make use of things like this to make powerful templates. I use many of these in my templates.
Finally, if you’re looking for tips on writing good XML documentation, check out my previous article on the subject.