
How to Add a VSIX Installer to a DXCore Plugin
As of CodeRush/Refactor/DXCore 11.2, DXCore supports installation of plugins using Visual Studio Extensibility (VSIX) just like any other extension you might find in the gallery. This is beyond cool for a couple of reasons.
First, I’ve been [slowly] working on a couple of different ways to create some nature of “plugin gallery” for DXCore extensions. There are so many community plugins, plus things like CR_Documentor and CR_CodeTweet that aren’t on the community plugin site, that it’s really hard to know what’s out there. This would allow DXCore plugins to use the standard Visual Studio Gallery mechanism for browsing.
Second, once you install a DXCore plugin, there’s no real “auto-update”mechanism. You have to go check to see if there’s a new release and manually do installation yourself. With VSIX and the gallery, you can get notified of new versions of the plugins via the standard Extension Manager in Visual Studio. Auto-update: solved!
I decided my pilot project would be to get a VSIX installer attached to CR_Documentor. If you have a DXCore plugin, you can use these same steps to get a VSIX installer for your plugin. If you’re starting a new plugin, you can check out this great article from Alex Skorkin on how to start a fresh plugin with the provided DXCore/VSIX plugin template.
TWO IMPORTANT NOTES before you begin:
- I converted a C#/.csproj plugin so the steps I took here assume you’re using C#, too.If you’re using VB, you may have to do some different/additional steps that I’m unaware of.
- You will lose support for Visual Studio versions before 2010 because you’ll need to update the target .NET framework. If you can’t afford to lose that support for your plugin, stop now.
First, install the prerequisites. You’ll need…
- The Visual Studio SDK so you have all the stuff required to compile VSIX. Be sure to get the right version for your Visual Studio install or you’ll get odd errors. If you have VS 2010 SP1, you need the VS 2010 SP1 version of the SDK.
- DXCore 11.2 or higher. If you have a CodeRush/Refactor license, you’ve already got this. If you’re starting fresh, you’ll need at least DXCore (free). But you know what?****Just get the CodeRush/Refactor license**. I’ll wait. I promise it’s worth it.** (And if you’re using an Express Edition of Visual Studio, you can even get a free version of CodeRush called CodeRush Xpress because DevExpress is awesome like that.)
Optional: Create a new, empty DXCore VSIX standard plugin project for reference. You won’t actually be doing any coding in here, but having a populated skeleton plugin really helps if you need to grab some code copy/paste style or check to see how something is set up. This was pretty key for me to figure out what I needed to do to add VSIX to my plugin – a skeleton plugin and a diff tool. Once you’ve created it, build it once and close it. You’re done with it unless you need to go refer to something or troubleshoot it.
Open up your plugin project. We’re going to make a few modifications to the project properties.
- Switch the target framework to .NET 4.0. You need to do this because VSIX only supports .NET 4.0. It does mean you’ll be giving up support in your plugin for versions of Visual Studio before 2010.

- Switch your build output paths to
bin\Debug\andbin\Release\for the Debug and Release build configurations, respectively. Most plugin projects have the build output set so the plugin will build right into your Community Plugins folder. This makes it easy to debug. Once you switch to VSIX, you debug in a different way, so you don’t want the plugin going into the Community Plugins folder anymore. You do need to have a build output location, though, so switch it back to the standardbin\Debug\orbin\Release\location. - Remove any post-build copy/deployment tasks. In my plugins, rather than change the build output paths, I use post-build copy tasks to copy the plugin into my Community Plugins folder. Again, you don’t want to auto-deploy like this because there’s a different mechanism for VSIX, so remove any of these steps from the project.
That’s all for now with the project properties. We’ll come back to that in a little bit once we’ve made a few more modifications.
Add some assembly references to your project if you haven’t got them already:
- System.Core
- System.ComponentModel.Composition
You’ll need these so the MEF portion of the VSIX installer will work.
Open your plugin project file in a text editor. It’s time to tweak a few things by hand.
We need to add some top-level global properties to the project. In
the top-level PropertyGroup node, which appears just below the root
Project node, you need to:
- Add a
ProjectTypeGuidsnode that has the VSIX project GUIDs in it. - Add the VSIX properties that help direct the VSIX build.
<ProjectTypeGuids>{82b43b9b-a64c-4715-b499-d71e9ca2bd60};{FAE04EC0-301F-11D3-BF4B-00C04F79EFBC}</ProjectTypeGuids>
<GeneratePkgDefFile>false</GeneratePkgDefFile>
<IncludeAssemblyInVSIXContainer>true</IncludeAssemblyInVSIXContainer>
<IncludeDebugSymbolsInVSIXContainer>true</IncludeDebugSymbolsInVSIXContainer>
<IncludeDebugSymbolsInLocalVSIXDeployment>false</IncludeDebugSymbolsInLocalVSIXDeployment>
<CopyBuildOutputToOutputDirectory>true</CopyBuildOutputToOutputDirectory>
<CopyOutputSymbolsToOutputDirectory>true</CopyOutputSymbolsToOutputDirectory>
My top-level PropertyGroup node in CR_Documentor now looks like this. I’ve made the additions bold.
<Project DefaultTargets="Build" xmlns="http://schemas.microsoft.com/developer/msbuild/2003" ToolsVersion="4.0">
  <PropertyGroup>
    <Configuration Condition=" '$(Configuration)' == '' ">Debug</Configuration>
    <Platform Condition=" '$(Platform)' == '' ">AnyCPU</Platform>
    <ProductVersion>10.0.20506</ProductVersion>
    <SchemaVersion>2.0</SchemaVersion>
    <ProjectTypeGuids>{82b43b9b-a64c-4715-b499-d71e9ca2bd60};{FAE04EC0-301F-11D3-BF4B-00C04F79EFBC}</ProjectTypeGuids>
    <ProjectGuid>{9229512A-C004-46FD-8CEE-D096C883E827}</ProjectGuid>
    <OutputType>Library</OutputType>
    <AppDesignerFolder>Properties</AppDesignerFolder>
    <RootNamespace>CR_Documentor</RootNamespace>
    <RunPostBuildEvent>OnOutputUpdated</RunPostBuildEvent>
    <TargetFrameworkVersion>v4.0</TargetFrameworkVersion>
    <FileAlignment>512</FileAlignment>
    <GeneratePkgDefFile>false</GeneratePkgDefFile>
    <IncludeAssemblyInVSIXContainer>true</IncludeAssemblyInVSIXContainer>
    <IncludeDebugSymbolsInVSIXContainer>true</IncludeDebugSymbolsInVSIXContainer>
    <IncludeDebugSymbolsInLocalVSIXDeployment>false</IncludeDebugSymbolsInLocalVSIXDeployment>
    <CopyBuildOutputToOutputDirectory>true</CopyBuildOutputToOutputDirectory>
    <CopyOutputSymbolsToOutputDirectory>true</CopyOutputSymbolsToOutputDirectory>
  </PropertyGroup>
</Project>
These properties are really important to getting the project to build successfully. For example, early on I forgot to add the GeneratePkgDefFile property over and set it to false. For quite some time I got an odd error that I couldn’t figure out and stopped the build from finishing:
CreatePkgDef : error : No Visual Studio registration attribute found in this assembly.
Adding the property fixed the build. I was able to find my error by comparing my .csproj to the empty/skeleton VSIX plugin .csproj I had created. That’s why I mentioned that as an optional step at the top – it’s good to have something working to compare against.
Now add the build targets that allow VSIX to compile. At the bottom of your project file, locate the following line:
<Import Project="$(MSBuildBinPath)\Microsoft.CSharp.targets" />
Just below that, add this line to reference the VS SDK targets:
<Import Project="$(MSBuildExtensionsPath)\Microsoft\VisualStudio\v10.0\VSSDK\Microsoft.VsSDK.targets" />
If there’s any additional project cleanup you want to do, now’s a decent time. For me, CR_Documentor has been around for a while so there was a lot of stuff referring to old versions of .NET and/or old versions of Visual Studio, all of which has persisted over the course of several project upgrades. I can’t give you any guidance on this and you do it all at your own risk. You aren’t required to do any additional cleanup to get the VSIX stuff to work; I just mention it since you’re already neck-deep in .csproj hacking.
Save your changes and close the text editor. You’re done manually tweaking the project. If you didn’t previously close the project in Visual Studio, you’ll now be prompted to load the changed project. Go ahead and do that.
Add a VSIX Plugin Extension class to your plugin. This is the little “shim” that signals DXCore to load your plugin from VSIX. Super easy and not even really any code.
- Add a new class to your project. I called mine “VsixPluginExtension”because I’m all about naming. :)
- Set the class to implement DevExpress.CodeRush.Common.IVsixPluginExtension. This is a marker interface; no code to write or implement for it.
- Add a System.ComponentModel.Composition.ExportAttribute to the class so it exports IVsixPluginExtension.
That’s it. Here’s a copy/paste version you can grab and just change the namespace, even:
using System.ComponentModel.Composition;
using DevExpress.CodeRush.Common;

namespace YourNamespaceHere
{
  [Export(typeof(IVsixPluginExtension))]
  public class VsixPluginExtension : IVsixPluginExtension
  {
  }
}
Finally, add a VSIX manifest to the project. The VSIX manifest is a little XML file that describes what’s in the VSIX package. Unfortunately, there’s no template for this file type so you either need to copy one in from a different project (another reason having that empty/skeleton VSIX plugin project is handy) or you need to manually create the file yourself.
- Add an XML file to the project called
source.extension.vsixmanifestand set the “Build Action” on it to “None.” If you copy it in from the skeleton project, you’re done. - Add some empty/placeholder manifest data. You can edit the data later in a nice designer in Visual Studio, but to get you going you have to have something in it. Here’s the content from a skeleton VSIX plugin if you want to copy/paste.
<?xml version="1.0" encoding="utf-8"?>
<Vsix xmlns:xsi="http://www.w3.org/2001/XMLSchema-instance" xmlns:xsd="http://www.w3.org/2001/XMLSchema" Version="1.0.0" xmlns="http://schemas.microsoft.com/developer/vsx-schema/2010">
  <Identifier Id="MyDemoVsixPlugin">
    <Name>MyDemoVsixPlugin</Name>
    <Author>MyCompany</Author>
    <Version>1.0</Version>
    <Description xml:space="preserve">Empty DXCore VSIX plugin project.</Description>
    <Locale>1033</Locale>
    <SupportedProducts>
      <VisualStudio Version="10.0">
        <Edition>Pro</Edition>
      </VisualStudio>
    </SupportedProducts>
    <SupportedFrameworkRuntimeEdition MinVersion="4.0" MaxVersion="4.0" />
  </Identifier>
  <References />
  <Content>
    <MefComponent>|%CurrentProject%|</MefComponent>
  </Content>
</Vsix>
Obviously those values won’t be right for your project. Your project isn’t called “MyDemoVsixPlugin” or whatever. We’ll fix that soon.
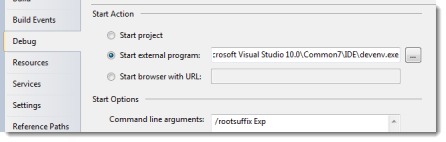
Open the project properties again. It’s time to set up the debugging environment.
The way VSIX debugging works for DXCore plugins is that, rather than deploy your plugin to the Community Plugins folder, Visual Studio can automatically deploy your built VSIX package (which includes your plugin) into an “experimental” version of Visual Studio. This “experimental” version is sort of like running under a “test user profile” so it won’t have all of the fancy stuff you’ve installed into your VS – it’ll be pretty bare bones. In fact, the first time you run it, you’ll be prompted to set up some default things like your window layout settings and whatnot, just like the first time you ran Visual Studio. Don’t be fooled by the “experimental” thing – it’s real, full VS. It’s just the user profile that’s considered “experimental.”
An interesting side note is that you can actually see where VS is deploying your plugin for debugging if you look in
%USERPROFILE%\AppData\Local\Microsoft\VisualStudio\10.0Exp\Extensionswhich is something like
C:\Users\yourusername\AppData\Local\Microsoft\VisualStudio\10.0Exp\ExtensionsIf you run into issues where you have to manually remove your extension from the experimental instance, you can delete it from that folder.
On the Debug tab, set the “Start external program” value to start Visual Studio (devenv.exe). Under “Command line arguments,” put /rootsuffix Exp to instruct Visual Studio to use the “experimental” instance of Visual Studio.
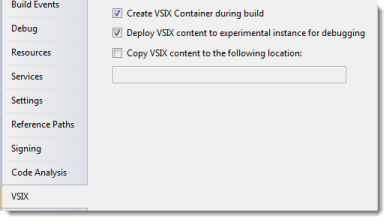
On the VSIX tab (which will now appear because your project type was set via the ProjectTypeGuids node you added earlier), for all build configurations, select the “Create VSIX Container during build” and “Deploy VSIX content to experimental instance for debugging” options.
Close the project properties. You’re done with that.
Finally, do some minimum update to the manifest to tailor the package for your plugin.
- Double-click the
source.extension.vsixmanifestfile you added earlier. This will open it up in a nice designer. - At a minimum, change the following properties:
- ID: This is the “unique ID” for your package. Usually it’s the name of your plugin, but you may or may not want that. Just as long as you don’t change it later, you’ll be fine.
- Product Name: This is the name of your plugin. You’ll see it appear in the Extension Manager in Visual Studio.
- Version: This is the version of your plugin. You probably want this to match the version of your plugin assembly.
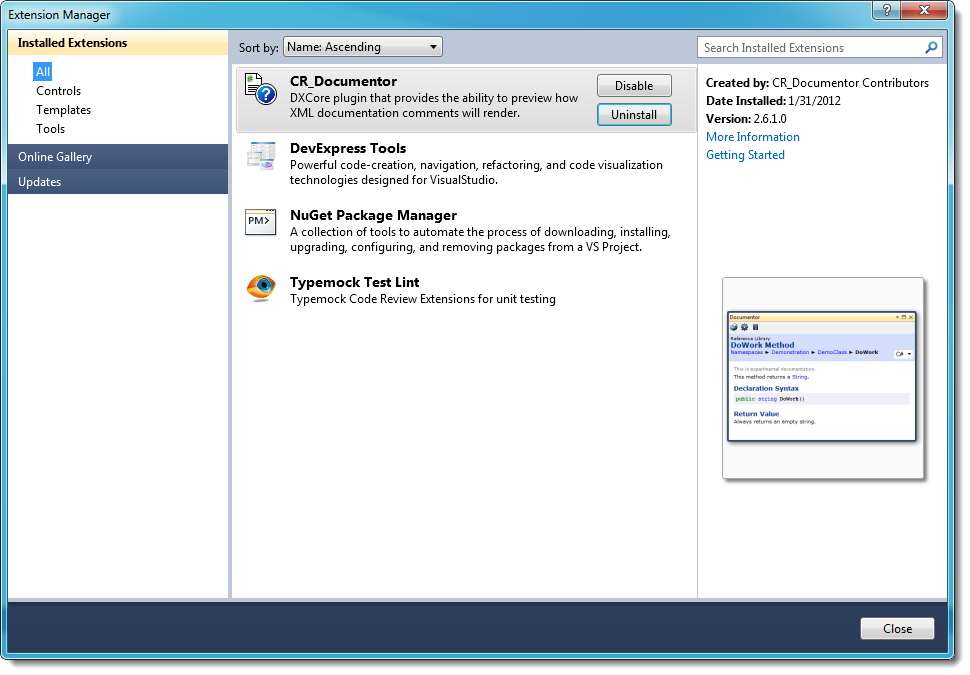
Save your changes and hit F5 to build and start a debugging session. Once the experimental version of Visual Studio starts up, check to see that your plugin is available. You can even go into the Visual Studio Extension Manager (Tools –> Extension Manager…) to see your plugin listed as an extension.
Troubleshoot your build. If you are getting warnings or errors, now’s the time to fix them. I had several warnings about different things in CR_Documentor because I updated the .NET target framework from 2.0 to 4.0 and a lot has changed. Unfortunately, I can’t give you much guidance on this part. If you’ve followed the instructions up to now, you should have all of the pieces in place to get this building and debugging properly. If you’re getting odd VSIX errors…
- Go back and make sure you got ALL of the properties in place in your project.
- Verify you have the right version of the Visual Studio SDK installed for the version of Visual Studio you have installed. If you have VS 2010 SP1, the regular VS 2010 SDK won’t work – you need VS 2010 SP1 SDK.
- Compare your plugin project to an empty/skeleton VSIX DXCore plugin project. Pop the files open in a diff tool and see what the differences are. This was key in my troubleshooting efforts.
Once you’ve verified the deployment is working, it’s time to do a little fine-tuning on the manifest.
The manifest file is what determines how your plugin appears in the Visual Studio Gallery and in the Extension Manager. You can put as much or as little effort into this as you want – the minimum values you need are the ones I mentioned earlier. If you want your plugin to look professional, though, and be discoverable to everyone, a little more work is required.
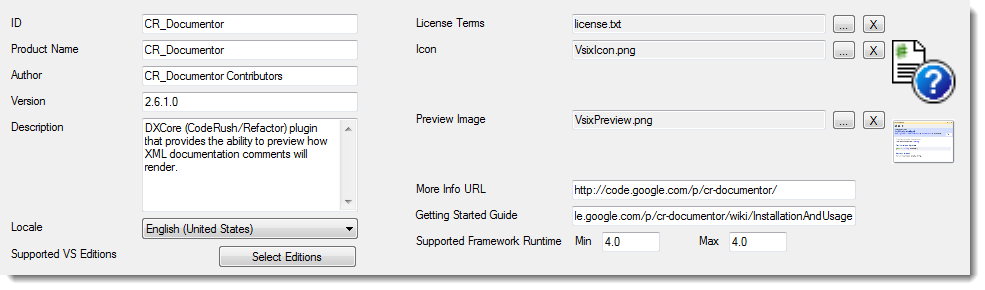
Open the manifest in the Visual Studio designer. A [somewhat terse] explanation of the main values you see at the top of the designer is on MSDN. I’ll tell you how I set up CR_Documentor and you can make the appropriate changes for your project.
- Author: The name of the person/group responsible for the plugin. Since mine’s open source, I put “CR_Documentor Contributors” as the author.
- Description: A short text description explaining what the plugin does. This can be used to search for plugins, so having keywords in the description can help people locate your plugin.
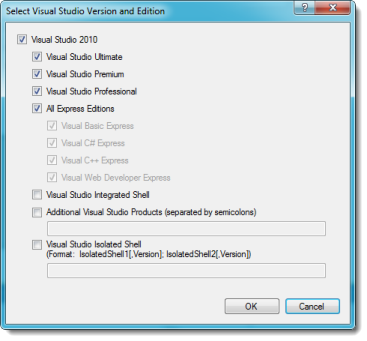
-
Supported VS Editions: Open this and select all of the standard VS 2010 editions as well as all Express editions. Since DXCore can run on any of these, you want your plugin for DXCore to also be discoverable by people with any of these versions.
Note that you may start getting a build warning once you select the Express Editions of Visual Studio:
source.extension.vsixmanifest : warning : VSIX targets Express Versions of Visual Studio but VSIX contains non-template content.From what I can tell, this warning is erroneous and can be ignored.
On the other hand,if you choose the Express Editions and see this warning, you won’t be able to upload your VSIX to the Visual Studio Extension Gallery. The Gallery auto-checks the uploaded VSIX and rejects any VSIX with non-template content targeted to VS Express SKUs.
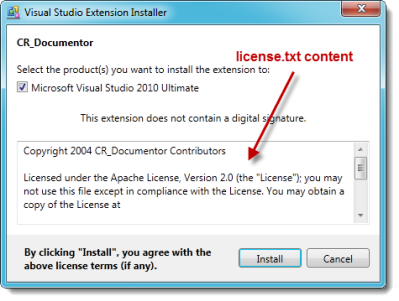
-
License Terms: This is a small text file that will contain license information for your plugin. You’ll see this information when you install the plugin. I called mine “license.txt” because it’s easy
- Icon: A 32x32 image (png/bmp/jpg/ico) that will appear in the Extension Manager and the Gallery next to your plugin’s name and description.
- Preview Image: A 200x200 image (png/bmp/jpg/ico) that will appear in the Extension Manager and the Gallery showing a screen shot of your plugin.
- More Info URL: A URL people can click from within the Extension Manager to read more about your plugin. I pointed mine to the CR_Documentor home page.
- Getting Started Guide: A URL people can click from within the Extension Manager to learn how to get working with your plugin. I pointed mine to the CR_Documentor installation and usage wiki page.
Here’s what my manifest looks like, fully populated (click to enlarge):
[
Any files you put in the VSIX package (the license, the icon, the preview image) need to be put in the same folder as the .csproj and the source.extension.vsixmanifest. I tried to put them at a different level in the project (solution level) and it caused all sorts of headache. Don’t buck the system, just stick them at the project level and life will be great.
Save your changes, rebuild, and debug your plugin. Now when you look in the Extension Manager, you’ll see your plugin along with the other VS extensions and it’ll look totally professional. (Click to enlarge)
[
I’ll be releasing CR_Documentor via VSIX soon. I have a few more things to tidy up since I’ve updated to .NET 4.0. In the meantime, if you want to see the working source, you can see it in Subversion in the Google Code repository.