Autofac 5.0 Released
Today the Autofac team and I are pleased to announce the release of Autofac 5.0!
This is the first major-version release we’ve had in about three years (Autofac 4.0 was released in August 2016). There are some breaking changes and new features you should know about as you decide your upgrade strategy. Hopefully this will help you navigate those waters.
Breaking Changes
Framework Version Targeting Changes
Starting with Autofac 5.0 there is no longer support for .NET 4.5.x. .NET 4.5.2, the last release in that line, follows the same support lifecycle as Windows Server 2012 R2 which ended mainstream support in September 2018.
Autofac 5.0 now targets:
netstandard2.0netstandard2.1net461
Containers are Immutable
The container registry can no longer be updated after it has been built.
The ContainerBuilder.Update method was marked obsolete in November 2016 and there has been a robust discussion to answer questions about how to get the container contents to adjust as needed at runtime.
ContainerBuilder.Update has now been removed entirely.
If you need to change registration behavior at runtime, there are several options available to you including the use of lambdas or child lifetime scopes. See this discussion issue for examples and ideas. We will work to add some documentation based on this issue.
Lifetime Scope Disposal Hierarchy Enforced
Resolving a service from a lifetime scope will now check all parent scopes to make sure none of them have been disposed.
If you dispose a lifetime scope, all children of that lifetime scope will stop resolving objects. In cases like this you’ll start getting ObjectDisposedException instead.
If you have a custom application integration that involves creating/destroying lifetime scopes (e.g., custom per-request support) this may cause issues where proper disposal ordering is not occurring.
[Fixes #1020; PR #1061 - thanks @alistairjevans!]
Prevent Auto-Injecting onto Static Properties
Autofac will no longer do property injection on static properties when auto-wiring of properties is enabled.
If your application behavior depends on static property injection you will need to do some additional work like adding a build callback to populate the property.
[Fixes #1013; PR #1021 - thanks @alistairjevans!]
Features and Fixes
Asynchronous Disposal Support
Autofac lifetime scopes now implement the IAsyncDisposable interface so they can be disposed asynchyronously.
await using (var scope = container.BeginLifetimeScope())
{
   var service = scope.Resolve<ServiceThatImplementsIAsyncDisposable>();
   // When the scope disposes, any services that implement IAsyncDisposable will be
   // Disposed of using DisposeAsync rather than Dispose.
}
[PR #1037 - thanks @alistairjevans!]
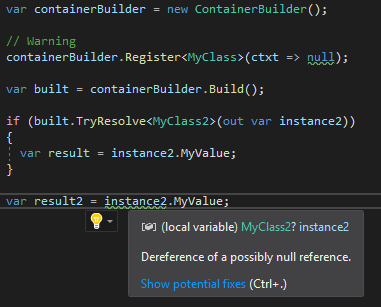
Nullable Reference Type Annotations
Autofac is now build using nullable reference type annotations. This allows developers to get sensible compiler warnings if they opt-in, thus avoiding NullReferenceException instances where possible.
[PR #1037 - thanks @alistairjevans!]
Build Callbacks in Lifetime Scopes
One method of running code at container build time is by registering a build callback. Previously this only worked at the container level, but we’ve added the ability to register callbacks that run at lifetime scope creation as well.
var scope = container.BeginLifetimeScope(cfg =>
{
    cfg.RegisterBuildCallback(scope => { /* do something */ });
});
The callback will be invoked just prior to BeginLifetimeScope exiting, after any startable components are instantiated.
[Fixes #985; PR #1054 - thanks @alistairjevans!]
Other Fixes
-
#1030:
ParameterFilterAttributenow checks to see if it can resolve a parameter before doing it. (PR #1053 - thanks @RaymondHuy!) -
#1040:
IsRegisteredno longer throws anIndexOutOfRangeExceptionwhen called on an open generic type. (PR #1045 - thanks @RaymondHuy!) -
#1041:
PropertiesAutowirednow works with the new decorator syntax. (PR #1043 - thanks @RaymondHuy!) - #1057: NuGet package icon is now embedded in the package. (PR #1054 - thanks @alistairjevans!)
- Performance improvements:
- Improved locking during component registration (PR #948 - thanks @weelink!)
-
IsGenericTypeDefinedBycaching for generic type info (PR #1038 - thanks @alistairjevans!)
Still TODO
Now that Autofac 5.0 is out, there is still a lot to do. We’ll be working on these things as fast as we can:
- Updating integration packages we support so they ensure compatibility with Autofac 5.
- Updating the documentation to reflect the above changes.
Some of this is sitting in branches ready to go, other things need to be done now that we have this core package out there.
If your favorite integration isn’t ready yet, we’re doing our best. Rather than filing “When will this be ready?” issues, consider pull requests with the required updates.
Thank You
On a more personal note, I’d like to thank all the folks that threw code at Autofac in the past few months. We appreciate the effort and the contributions. NuGet tells me we’re at 41,587,203 total downloads as I write this, #27 on the list of top package downloads in the last six weeks. We have 25 integration packages we maintain along with documentation, examples, and support.
Without your contributions this wouldn’t be possible. Thank you so much!
- @afabre
- @alexandrnikitin
- @alistairjevans
- @avtc
- @babrekel
- @chris-peterson
- @claudiobernasconi
- @dammejed
- @dyronald
- @edwardmeng
- @eugbaranov
- @MarcoNicolodi
- @nblumhardt
- @nevadawilliford
- @RaymondHuy
- @RogerKratz
- @sandersaares
- @starkcolin
- @timhermann
- @weelink
Hopefully git shortlog and the GitHub contributors page didn’t fail me - I don’t want to miss anyone!