media, music comments edit

My iTunes library is currently around 160GB, much of which is stored in Apple Lossless format. I also have podcasts, TV shows, and movies in the library. I have a 160GB iPod Classic. I want all of it on the iPod.

Luckily, iTunes has this nifty option “Convert higher bit rate songs to 128 kbps AAC” which will, on the fly, convert the Apple Lossless stuff to smaller (and lower quality) files so it all fits. This is fine for my iPod since my major use case there is middle-of-the-road earphones at work and podcasts anyway.

The problem is, syncing that much and doing the conversion literally takes days. And if iTunes crashes in the middle… you basically get to start over.

What I’d find is about a day and a half in, I’d get a little dialog that would pop up and say “iTunes has stopped working.” From there, if I tried to start things running again, I’d get “Verifying iPod…” and nothing would happen. (I figured out how to get past the “Verifying iPod” message, but it still restarted the sync from the beginning.)

After a long process involving syncing small blocks of the library one at a time onto the iPod and which I’m now referring to as The Great iPod Sync of ‘10, I found the culprit: One. Single. Bad. Track.

Windows Explorer showing ONE TRACK not
working.

See that track where Windows can’t pick up the metadata information? Of the over 14,500 tracks in the library, iTunes encountered this one bad track and died. Blammo.

(I didn’t discover it earlier because I wasn’t compressing and apparently iTunes will just blindly copy the bad track over without checking.)

Once I removed this track from the library, everything synchronized fine.

So… if you’re finding iTunes crashing in the middle of your sync over and over… go look to see if you have a bad track.
process comments edit

I’m a contributor to the Autofac project and recently they switched their repository from Subversion to Mercurial which means I have to learn Mercurial. I’ve been working with it a little and the workflow process is… not quite as intuitive to me as Subversion, but then, it’s a pretty big mental shift and I’m still working on it.

These sites have helped me get up to speed and start understanding a bit better. Maybe they’ll help you, too:

Got other good ones? Leave ‘em in the comments!

media, music, windows comments edit

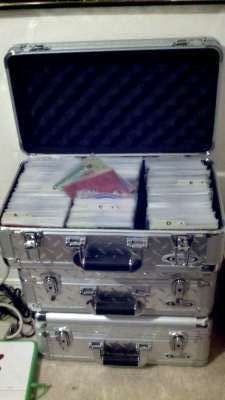
DJ cases full of
CDs.I admit I’m not the “standard” use case. I have a 160GB iPod Classic and it’s not big enough. My iTunes music library is up in the 150GB range and much of my music is stored in Apple Lossless format. It’s enough now that if I sync the iPod and include the list of podcasts I listen to, it’s more than 160GB.
At this point, I basically have three options:

  1. Resample everything so it’s not lossless. Not on your life. I have it in lossless so I can back up the original quality and, if need be, create lower bit rate versions as needed. Plus, hello, too much work.
  2. Don’t include everything in the sync. This is actually plan B, but I do like having everything on there. I find I get in weird moods and always seem to want to listen to the stuff I don’t have.
  3. Check that “Convert higher bit rate songs to 128 kbps AAC” box and sync the whole library. This is what I’m trying to do. I wish they had a 256 kbps option, but my primary iPod use case is listening with reasonably cheap headphones, so 128 isn’t killing me.

When you check that “convert” box, iTunes recompresses anything higher than 128 kbps on the fly. The source stays intact, the iPod gets the converted version. Saves space, and I get to keep my library.

Problem is, iTunes also doesn’t really handle a ton of data well, nor does it handle it well if your music is stored on a network drive. All of these factors mean the sync takes literally days to finish.

I have been lucky enough to have the sync fail on me pretty constantly. I go to work, leave it running, come home and see “iTunes has stopped working.” Then when I restart iTunes and plug the iPod in, I get the message “Verifying iPod…” and it just verifies… infinitely. Previously the only way I could figure out how to fix it was to do a full restore on the iPod and start over. Yeah, I’ve been doing this for a week or so now.

But I did find something that seems to get me up and running, past the “Verifying iPod,” without having to fully wipe the iPod.

  1. Plug in the iPod and wait until the “Verifying iPod” message shows up.
  2. Eject the iPod. It’ll warn you that the sync’s not done, and that’s fine. Eject and disconnect the iPod.

    Steps 1 and 2 are important. If you skip them and go straight for the reset sync history bit, things don’t get fixed.

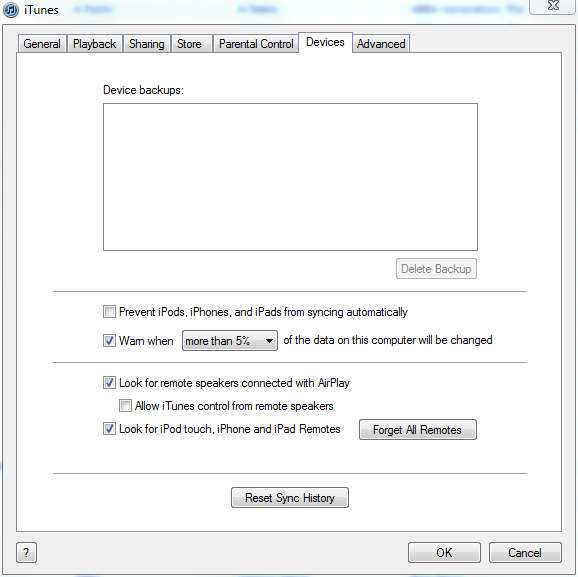
  3. Go into Edit -> Preferences and look at the “Devices” tab. Devices tab in iTunes
 preferences.

  4. Click the “Reset Sync History” button. You’ll get a little warning.

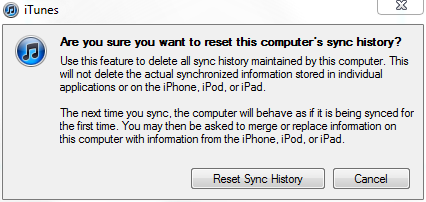
    Reset sync history
 warning.

  5. Click the “Reset Sync History” button on the warning.
  6. Plug the iPod back in. It will start syncing again.

Now, something I’ve noticed - if it fails in the middle of a sync, after doing this it won’t remember any of the stuff it already completed. For me, that means I’m breaking up my library into 1000 - 3000 song chunks and syncing bit by bit.

YMMV; This has worked for me a few times now so hopefully it’ll work for you.

android comments edit

After you update Android on your phone (or whatever) you should recalibrate the compass so it, literally, knows which end is up. This involves flipping the phone around along all axes so it can figure things out. After a while, the little on-screen compass thing turns green and lets you know it’s calibrated.

Except when it turns red and never turns green, which is what happened to me.

I looked around in forums and it turns out this is reasonably common. I fixed it in the same way other people have fixed it, which was:

  1. Uninstall any compass-related applications. This includes fancy on-screen compasses as well as apps like GPS Test Plus, which is a great app for helping you test out your GPS reception/settings but also has an on-screen compass component.
  2. Power cycle the phone. Turn it all the way off and back on again.
  3. Sit in the middle of the room. Well, you don’t have to sit smack in the middle of the room, just make sure you’re not sitting next to speakers, or an MRI machine, or something that’s going to create magnetic interference.
  4. Start the calibration. Settings -> Location and Security -> Calibrate Compass.
  5. Rotate the phone slowly. Don’t fling it around really fast. Take about two seconds to complete a full rotation of the phone in any direction. Flip it around all different ways. It should take around a minute to turn green.
  6. If it doesn’t turn green, or if it turns red, go look and make double sure you don’t have any compass apps installed. I didn’t even think about GPS Test Plus until I remembered there was one screen in there that did, in fact, deal with the compass. It may be a game, it may be a utility… whatever. The compass app thing was, I think, the real key for me, though it does sound like some folks are moving the phone around too fast as well.
  7. Reinstall your app(s) after calibration. Done and done.

This was really annoying for a few hours while I couldn’t for the life of me figure out why the compass calibrator kept turning red and never completing. I followed the above steps (which is an amalgamation of things that worked for different people) and had no issues. Hopefully it’ll help you, too.

android comments edit

My wife has a BlackBerry and I used to as well until I switched to a Droid X. One of the things we used to do to help each other remember stuff or get things onto the other person’s calendar (when using BlackBerry) was to send an appointment via MMS to the other person. You could add an appointment to your BlackBerry calendar, select it, and send it to someone else. Really easy.

Problem is, that’s not how Google Calendar works, which means when I switched to Android, all hell broke loose. You can’t export an event as an iCal (.ics) or vCal (.vcs) file, which is basically what the BlackBerry was doing. However, there is a way to do this, it’s just not… intuitive. At least not to me since I’m so used to shipping .ics files around.

Getting an Appointment from BlackBerry to Android/Google Calendar

  1. Open the appointment on the BlackBerry.
  2. Send the appointment to the Google user’s Gmail address (the account the calendar is hooked up to).
  3. When the Gmail user opens the appointment the BlackBerry user sent, Gmail displays it as a meeting invite and asks you if you’ll be attending. Click the “Yes” link  in the email and it gets added to your calendar.

There’s an alternate way to do this, too, but it involves saving the .ics file that’s attached to that incoming Gmail and going to Google Calendar and running an import… but that’s painful and not necessary. Just click “yes” and call it good.

UPDATE 12/22/2010: Opening an appointment in Gmail appears to only work if you do it from a desktop computer, and from the full view - not just the basic HTML view. You can’t open the appointment and accept it right on the Android phone because the Gmail client on Android will simply show the appointment as an attachment and not an invitation.

Getting an Appointment from Android/Google Calendar to BlackBerry

For this one, you need to have the email address attached to the BlackBerry. Some people set up their Gmail or Hotmail or whatever so the BlackBerry automatically picks it up, and if so, that’ll work; other people (like my wife) have a special email provided by the service provider like phonenumber@vzw.blackberry.net that goes to the BlackBerry. You’ll need that address so you can get the email to the BlackBerry’s native email client, not, say, the Google Mail app installed on the BlackBerry.

  1. Open the appointment in Google Calendar.
  2. Add a guest to the appointment and use the BlackBerry’s email address (as discussed above) as the guest email.
  3. When Google Calendar asks you if you want to send a notification to the guest, say yes. This automatically sends the .ics file to the BlackBerry user on their phone.
  4. The BlackBerry user can open that email and add the appointment to their calendar using the attached .ics. Done.