I’m a huge CodeRush and Refactor
user and
DevExpress fan, but my day job is
developing web sites so I thought I’d give the DevExpress MVC
Extensions a run to see how they work.
The DevExpress MVC Extensions are sort of like web controls - like
HtmlHelper methods combined with some client-side script - that allow
you to easily provide rich client-side widgetry in your MVC
applications. I’m always interested in easy ways to provide a nice
experience, so this sounds pretty good to me.
The first thing I noticed, even before I got a chance to use the
extensions, was the seamless install process. I had already
installed CodeRush/Refactor using the separate DevExpress IDE Tools
installer, but when I ran the full DX Universal installer it totally
picked up that I had some components installed and went to a “Modify”
operation rather than not seeing the previously installed tools and
telling me to re-install. I had actually built up in my head that I was
going to have trouble with this, but it was totally cool. It’s the
little things, right?
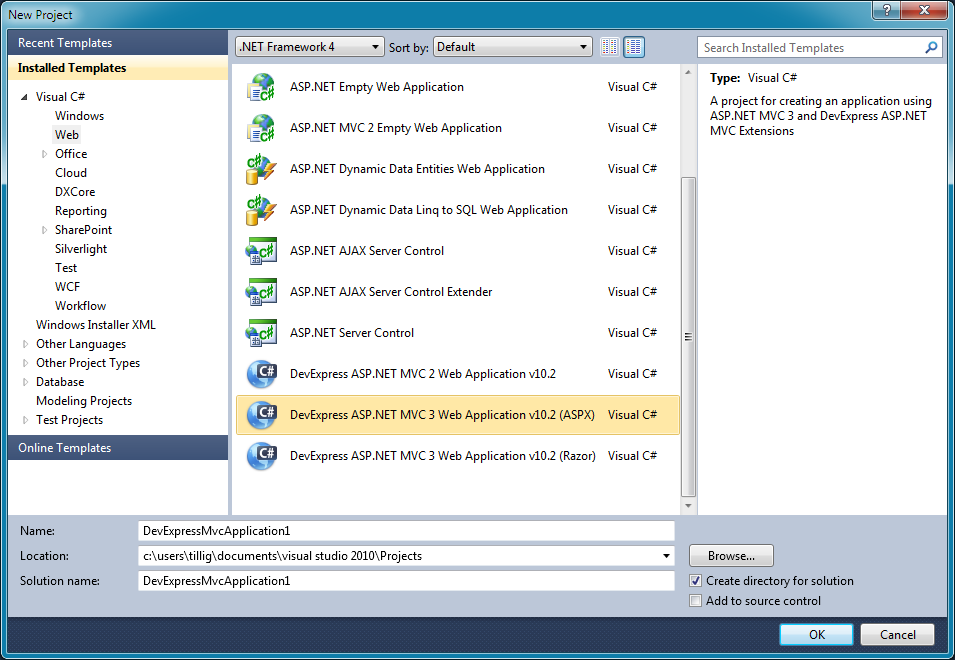
After installing, I decided to start up a new project to test things out
in. There is an article on DevExpress that explains how to integrate
with your existing
site, but I
really wanted to start a clean project to mess around in. The article
explaining how to integrate with an existing project is, admittedly, a
little intimidating. Much is just one-time setup, adding assembly
references and so forth, but it’s not a short list of steps. Luckily,
for new projects, DevExpress adds some project templates that allow
you to start up with everything pre-wired.
[
The project template generates something very similar to the standard
MVC3 project, with a few placeholder items like the HomeController and
Index views.
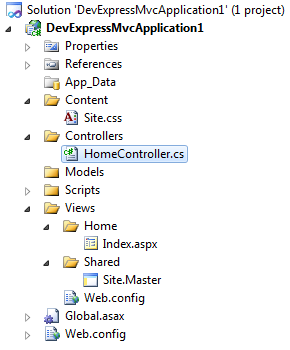
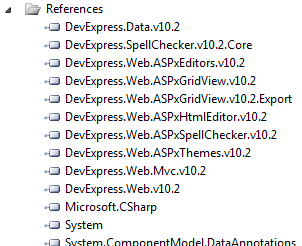
You’ll also see several references to the DevExpress assemblies.
If you look at the Home/Index view, there’s really nothing interesting
there. What’s interesting is in the Site.Master, where you’ll see the
stylesheet and script references that were added for the MVC extensions.
[
When you fire up the site, the initial view (Home/Index) really doesn’t
have anything on it - it’s a blank slate.
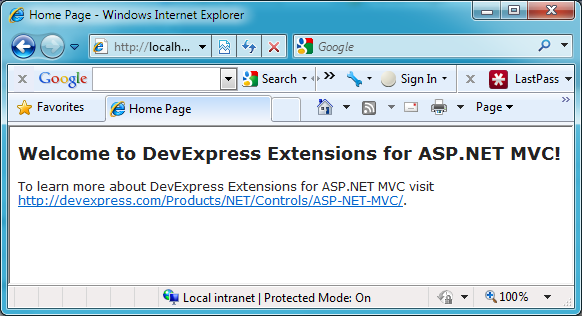
This, though, is where the fun begins.
First, let’s look at how the references in the Site.Master translate to
rendered code:
[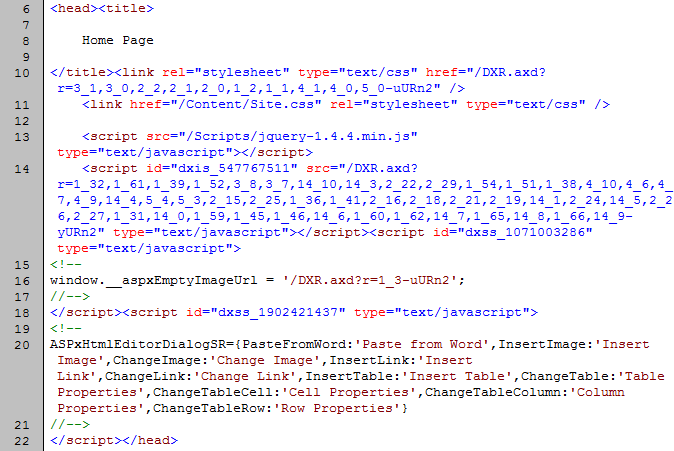
As you can see, there’s some script and CSS combining going on, so you
only have one file transfer for script and one for CSS when you add the
extensions. The default set of script/CSS provided a ~350KB script
(a gzipped version of 1.5MB script) and a ~27KB CSS file (a gzipped
version of a 278KB CSS file). Note that the script/CSS is only zipped,
not minified, so I think there’s an opportunity for DevExpress to reduce
the overhead further.
Now that we have a basic project skeleton in order, I figured I would do
something slightly more robust than a standard “Hello World” to test
these out. A simple contact list sounds like a reasonably simple, yet
more than “Hello World,” solution, so that’s what I went for.
I’m going to yada yada
over some of the details of putting the scaffolding in place because
that part’s not interesting. Basically I added a one-table database with
a Person object that has first and last name (strings), birthdate
(DateTime), and a biography (HTML). (Here’s the metadata buddy class.)
using System;
using System.ComponentModel;
using System.ComponentModel.DataAnnotations;
using System.Web.Mvc;

namespace DevExpressMvcApplication1.Models
{
  [MetadataType(typeof(PersonMetadata))]
  public partial class Person
  {
    public class PersonMetadata
    {
      [Required]
      [StringLength(50)]
      [DisplayName("First Name")]
      public object FirstName { get; set; }

      [Required]
      [StringLength(50)]
      [DisplayName("Last Name")]
      public object LastName { get; set; }

      [Required]
      [DataType(DataType.Date)]
      public object Birthdate { get; set; }

      [DataType(DataType.Html)]
      public object Biography { get; set; }
    }
  }
}
…as well as the controller actions and views for simple
list/create/details/edit/delete operations.
First, the list view. For that, I exercised the GridView
extension.
The GridView extension is an AJAX grid that appears to be an
MVC-friendly wrapper around the extraordinarily robust ASPxGridView
control.
Adding a GridView via the extension has basically four steps:
- Add a partial view that contains the grid proper.
- In the main view, render the partial view with your grid.
- Add a controller action that returns just the grid partial view.
- In the grid definition, indicate which action renders your grid
partial view so sort operations, etc., can do the appropriate
callback.
I threw a couple of test people into my database and ran it. Here’s what
I came out with:
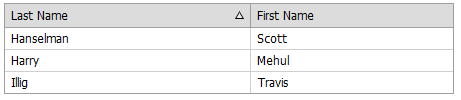
That’s not too shabby for like two minutes’ worth of work. Clicking
the little arrow or a different header changes the sort order/column as
expected. Each click calls the controller action that returns the
partial view, so it’s working a little like an UpdatePanel control in
ASP.NET - rather than getting the data as JSON and client-side binding,
the whole view is returned and replaces the grid.
That default grid is with a pretty minimal configuration:
<%
Html.DevExpress().GridView(
  settings =>
  {
    settings.Name = "indexList";
    settings.CallbackRouteValues = new { Controller = "Person", Action = "IndexListView" };
    settings.Width = 450;
    settings.Columns.Add("LastName").SortOrder = DevExpress.Data.ColumnSortOrder.Ascending;
    settings.Columns.Add("FirstName");
  })
  .Bind(Model)
  .Render();
%>
That Html.DevExpress() bit is common for the MVC Extensions - that’s
how you access the DevExpress functionality. After that, you can see a
pretty simple settings structure that shows the client ID of the tablet
that will be generated, the callback info for the partial view rendering
action, and info on which columns are displayed.
Something I thought interesting was that the sort order is managed
entirely by the grid. When the partial view action gets called, you
just hand the view the raw data and the grid deals with sorting it. I’m
not sure how I feel about that. On the one hand, it’s nice to not have
to worry about it and fiddle with it in my controller action; on the
other hand, it’s sort of abstracted away, so if I want to do something
different if a specific column is sorted or whatever, I’m into a more
web forms style programming model where I’m handling events like
DataBound.
Another thing I noticed was in looking at the column headers. The ALT
text on the sort direction arrows was inserted for me, which is nice,
but I couldn’t figure out how I’d localize that text.
<td style="width:100%;">Last Name</td><td style="padding-left:5px;"><img class="dxGridView_gvHeaderSortUp" src="/DXR.axd?r=1_3-uURn2" alt="(Ascending)" style="border-width:0px;" /></td>
I admittedly didn’t put a load of time into researching it, and with a
settings object that has ~60 properties, I’m sure it’s possible… but
I could spend all day on this thing and there is more stuff to look at,
so I didn’t dwell on it. It did occur to me that with so many settings,
there’s probably a heck of a learning curve figuring out what all of
them do and when you’d use each one. Not a bad thing, just something to
be aware of.
OK, so we have a grid. Let’s put some links to get to the “delete” and
“details” views on people. I’ll make the last name column clickable so
you can get to the details view from there. Doing this is simple if you
know how, but it took me a while to figure it out. Again, we get a small
taste of web forms style programming by setting column template contents
using DataBinder.Eval and so forth. Not bad, just slightly different
than that bare-metal-HTML feel you might be used to in MVC view
creation. Same thing with adding a little delete link column -
reasonably simple. Here’s the code we end up with…
<%@ Control Language="C#" Inherits="System.Web.Mvc.ViewUserControl<IEnumerable<Person>>" %>
<%
  Html.DevExpress().GridView(
    settings =>
    {
      settings.Name = "indexList";
      settings.CallbackRouteValues = new { Controller = "Person", Action = "IndexListView" };
      var deleteColumn = settings.Columns.Add("", "");
      deleteColumn.HeaderStyle.HorizontalAlign = HorizontalAlign.Center;
      deleteColumn.CellStyle.HorizontalAlign = HorizontalAlign.Center;
      deleteColumn.SetDataItemTemplateContent(c =>
        {%>
        <a href="<%: Url.Action("Delete", new { Id = DataBinder.Eval(c.DataItem, "Id") }) %>">
          <img src="<%: Url.Content("~/Content/Delete.png") %>" alt="Delete" style="border: none;" />
        </a>
        <%});
      var lastNameColumn = settings.Columns.Add("LastName");
      lastNameColumn.SortOrder = DevExpress.Data.ColumnSortOrder.Ascending;
      lastNameColumn.SetDataItemTemplateContent(c =>
        {%>
        <%= Html.ActionLink(
            DataBinder.Eval(c.DataItem, "LastName").ToString(),
            "Details",
            new { Id = DataBinder.Eval(c.DataItem, "Id") })
        %>
        <%});
      settings.Columns.Add("FirstName");
    })
    .Bind(Model)
    .Render();
%>
…and here’s the resulting grid:

Nice. Now, you probably have two questions about this:
- Could I have accomplished this just using an HTML table and some
foreach looping? Sure, but what I get by using the extension is the
sorting, AJAX loading, and additional flexibility that the logic
inside the GridView brings. It comes with a bit of a price in that
you do dip your toe back in the web forms waters, so whether it’s
appropriate for you will be a balance between your desire to remain
pure and your desire for packaged super-functionality.
- Could I have added inline editing and deleting? Yes, I could have
done everything right in the grid, adding editing templates and
delete confirmations and all that right there. That might even have
been a nicer user experience. On the other hand, it would have
effectively sidestepped my experimentation with the rest of the
controls, which is sort of the point here, so I’m doing things the
long way.
Anyway, GridView is pretty slick and far beyond what I’d normally term
“robust.” A little web-forms-ish, but if you’re trying to package up
this kind of logic in some sort of reusable format, I’m not sure how
else you’d do it. It also has a non-trivial learning curve, but wow,
does it have features layered on features. Enough so it’s really
difficult to even give it a fair evaluation because you’d spend weeks
delving into it. Check out some of the demos on the DevExpress
site to see the features
I didn’t get into. What’s more robust than robust? Now you have the
answer: the DevExpress MVC extensions GridView.
Now that we have the delete and edit links in place, let’s wire things
up. There’s not a lot of interesting anything going on with the delete
view, so I’m not going to go there. The good stuff is in the details and
edit views, so let’s dig into those.
I’m a big fan of the DataAnnotations support in MVC and the whole
Html.DisplayFor() method of displaying and editing models, so I
figured I’d create a display and edit template for our Person model.
Easy enough to add a quick partial view in the DisplayTemplates folder
for handling my Person model, but even with the option to scaffold some
default details HTML in there to display the various fields, we can
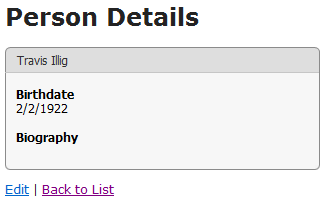
clean it up a bit. Let’s try the Rounded Panel
extension to add just a
little flair for fun. A quick bit of code in
DisplayTemplates/Person.ascx…
<%
  Html.DevExpress().RoundPanel(
    settings =>
    {
      settings.Name = "personDetails";
      settings.HeaderText = String.Format("{0} {1}", this.Model.FirstName, this.Model.LastName);
      settings.ShowHeader = true;
      settings.View = DevExpress.Web.ASPxRoundPanel.View.Standard;
      settings.Width = 315;
      settings.SetContent(() =>
      {%>
        <div class="display-label">Birthdate</div>
        <div class="display-field"><%: String.Format("{0:d}", Model.Birthdate) %></div>
        <div class="display-label">Biography</div>
        <div class="display-field"><%= Model.Biography %></div>
      <%});
    })
    .Render();
%>
…and we have a nice little view:
It was at this point I decided I wanted to do some styling. For example,
I wanted to make the person’s name in the header be bold and maybe a
little larger. Simply throwing a CSS class on the header didn’t seem to
fix it, though, since the HTML that the rounded panel generates is… a
bit more complex than you might think.
Styling the MVC extensions is somewhat unintuitive and is a more
involved process than you realize. The way you’re supposed to do what
I want to do is to use the theme deployer
tool to
manually deploy the CSS used to style these controls (which is normally
stored as embedded resources in an assembly) and then manually tweak the
deployed files. I put out a call for help on this in the
forums
which confirmed this. It feels like overkill when I just want to style a
single element. It also implies that these controls will probably not
work easily with other styling tools like jQuery
ThemeRoller (though, admittedly, I
didn’t try). Note that in the forum
response,
they did mention they’re working on an easier way to do this.
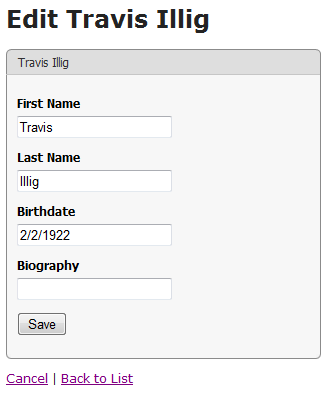
OK, so, moving on. We have our details view, it’s in a nice RoundPanel,
let’s create an editor view. I threw a link on the details page so we
can get to the edit view, then added a simple editor template and view.
It all starts out looking like this:
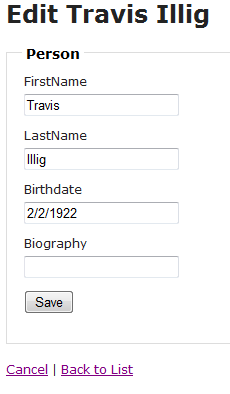
Well, that’s not very pretty, so let’s add a little model metadata to
clean up the display information and throw a RoundPanel around it to
make it at least a bit consistent with the details view.
Better, but not done. To make date editing nicer, I figured I’d try out
the Date Edit MVC
Extension. This is a nice
date picker control that has a very good user experience. You can type
the date in, pick it from a calendar, allow for character masking…
it’s really pretty sweet. Definitely check out the demo on the
DevExpress site on this one
because there’s no way I can exercise it all right here.
Anyway, easiest way to get dates all editing the same way is to add an
editor template for dates to my project, so that’s what I’ll do. I
created a Shared/EditorTemplates folder and a DateTime.ascx control that
has the following code in it:
<%@ Control Language="C#" Inherits="System.Web.Mvc.ViewUserControl<System.DateTime?>" %>
<%
  Html.DevExpress().DateEdit(
    settings =>
    {
      settings.Name = this.ViewData.ModelMetadata.PropertyName;
      settings.Properties.NullText = "MM/dd/yyyy";
      settings.Properties.EditFormat = EditFormat.Date;
      if (this.Model.HasValue)
      {
        settings.Date = this.Model.Value;
      }
    }
  )
  .Render();
%>
That ends up rendering the date picker like this, so you can click the
dropdown arrow and get the calendar:
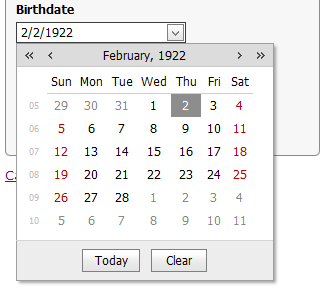
Niiiiice.
Adding date editing with the Date Edit extension was super simple.
Really, the only challenging bit about it was setting the “Name”
property since you have to do that manually rather than letting the
framework infer it for you. This is an easy way of getting a nice,
robust date picking/editing user experience into your site.
Good, so we have date editing covered for the birthdate field, let’s
deal with editing the biography field. For this one, I want to have a
nice, rich HTML editor so the biography can be formatted and not just
text. (Yes, in real life this would open us up to XSS attacks, but we’re
demoing here, so we’re not really focusing on security.)
The MVC extensions come witha super-rich HTML
editor, so I figured
I’d use that. Same drill as with the date editor - a new EditorTemplate
for HTML data.
Except… looking at the HTML editor, it’s not quite as drop-in-and-go
as all that. It’s closer to the GridView in setup, with a need for
various callback actions and so forth. The key here is to start with
the
documentation
rather than the demo code since the documentation provides a much
simpler starting point that allows you to skip the extra bells and
whistles and add them on later.
First thing I did was to add an Html.ascx in my
Shared/EditorTemplates folder that will serve as the template for
editing HTML fields. Inside that editor template, I added the call to
Html.RenderPartial as outlined in the documentation.
Note: In setting this up, I encountered early on that due to the
need to render a partial view from a partial view, when the HTML
editor posts to the server to get an updated view you lose your model
metadata. That means you have to propagate things like the model
property name manually, and it’s sort of painful. You’ll see where I
add in some ViewData settings and such to accommodate this.
So, the HTML editor template looks like this:
<%@ Control Language="C#" Inherits="System.Web.Mvc.ViewUserControl<System.String>" %>
<%
  this.ViewData["PropertyName"] = this.ViewData.ModelMetadata.PropertyName;
  Html.RenderPartial("HtmlEditorPartial");
%>
That’s not a very exciting view, but what it does is gets our editor
template in place. Then I added a new partial view in the Shared
folder called HtmlEditorPartial.ascx. That partial view is where I
render the actual HTML editor.
<%@ Control Language="C#" Inherits="System.Web.Mvc.ViewUserControl<System.String>" %>
<%
  var propertyName = this.ViewData["PropertyName"].ToString();
  Html.DevExpress().HtmlEditor(
    settings =>
    {
      settings.Name = propertyName;
      settings.CallbackRouteValues = new { Controller = "HtmlEditor", Action = "HtmlEditorPart", PropertyName = propertyName };
      if (this.Model != null)
      {
        settings.Html = this.Model;
      }
    })
    .Render();
%>
<input type="hidden" name="<%= this.ViewData["PropertyName"].ToString() %>" />
Again, note how I’m getting the model metadata property name from a
ViewData value I set manually. You have to do this due to the indirect
partial-rendering-partial callback that goes on, and you have to keep
that available.
I’ll explain that extra hidden field later. It has to do with a
challenge I found around model binding. Anyway…
The last thing I did was add a controller that will handle the callbacks
from the HTML editor. I called it HtmlEditorController and there’s
only one action on it - HtmlEditorPart, which renders the editor’s
partial view.
using System;
using System.Web.Mvc;

namespace DevExpressMvcApplication1.Controllers
{
  public class HtmlEditorController : Controller
  {
    public ActionResult HtmlEditorPart(string propertyName)
    {
      this.ViewData["PropertyName"] = propertyName;
      return PartialView("HtmlEditorPartial");
    }
  }
}
It was at this point I got stuck.
Even though I was setting the Name property on the HTML editor correctly
(to, in this case, “Biography”), when I’d get the postback I’d have a
ton of fields that all start with “Biography” (like
“Biography_CurDialog,” “Biography_TD_T0CI,”
“Biography$TD$T1$ITCNT0$ctl00,” and so on) but no actual field
called “Biography” would come back in the POST. If you’re trying to
get this to work with model binding, that’s sort of a showstopper. I
posted a question to the
forums
and got pointed to an
example that
shows how to get the HTML back out of the editor - you need to use a
special HtmlEditorExtension.GetHtml() method. That sort of throws a
wrench in the works as far as model binding is concerned because it
means I would have to manually extract the value in some sort of a
controller action. Given the way EditorTemplates work, partial views and
whatnot, that’s not so easy. (A later response pointed me to a class
called
DevExpressEditorsBinder
that is used for binding data coming from other editor controls, but
apparently it’s not yet updated to work with the HTML editor.)
I tried adding a custom model binder for HTML data types, but the
problem you run into is that the HTML editor still doesn’t post a value
with the right name so when model binding runs, it doesn’t see a field
matching the name of the property (“Biography”) and doesn’t even run the
binder. The way I ended up working around this is to add a hidden
input field with an empty value to the HTML editor partial view and give
that input field the name of the HTML editor. (That’s why you see it
in the partial view earlier.) Since the HTML editor doesn’t generate any
input field with that name, there’s no overlap, and it makes it so
something with the appropriate property name gets posted back and model
binding will run. Then I added a custom model binder that verifies the
data type of the field being parsed and if it’s HTML, it uses that
GetHtml method I mentioned earlier.
using System;
using System.Web.Mvc;
using DevExpress.Web.Mvc;

namespace DevExpressMvcApplication1
{
  public class HtmlModelBinder : IModelBinder
  {
    public object BindModel(ControllerContext controllerContext, ModelBindingContext bindingContext)
    {
      if (bindingContext.ModelMetadata.DataTypeName == "Html")
      {
        return HtmlEditorExtension.GetHtml(bindingContext.ModelName);
      }
      else
      {
        return ModelBinders.Binders.DefaultBinder.BindModel(controllerContext, bindingContext);
      }
    }
  }
}
You have to register that model binder at application startup for the
System.String datatype so it’ll fire.
ModelBinders.Binders.Add(typeof(string), new HtmlModelBinder());
Now any string property marked with [DataType(DataType.Html)] will go
through the appropriate model binder and have the HTML properly pulled
out of the HTML editor control.
That was a little painful and not straightforward. I think the HTML
editor is pretty cool, but I feel like I jumped through a few hoops on
that one. Maybe this isn’t the primary use case for it or something.
The last thing I wanted to try was adding model validation in. This
article’s running a bit on the long side already so I’ll cut right to
it:
- I wasn’t able to get the jQuery validation working. I fought
with it for about an hour, but simply setting the web.config
parameters and/or setting Html.EnableClientValidation() didn’t do
it. The form always seemed to post, regardless of the validity of
the fields, though the server would properly see model validation
was incorrect. I ended up adding the original
MicrosoftMvcValidation.js style validation back in and disabling the
jQuery validation and that worked.
- Thedemo showing validation using the MVC
extensionssays
it’s using standard DataAnnotations model validation but when you
look at the demo code, it’s doing some really crazy custom stuff.
(It appears the demos for the custom DevExpress
validation and
the DataAnnotations validation are the same.) I did not want to
spend a ton of time on this but I have a feeling there was something
I wasn’t wiring up properly, or that maybe there’s some flag or
setting I wasn’t wiring up right.
- Validation with the date picker was effortless. It validates
just like a text box, no problems. I didn’t have to wire anything
special up.
- I didn’t try validation with the HTML editor. After working
through the model binding issue, I didn’t want to get into the
validation thing. It may have been easy, but somehow I’m thinking
I’d have gotten into writing custom client-side adapters or trying
to mix the DevExpress
validation in
with the DataAnnotations validation, which doesn’t sound like a five
minute task.
So, given all that, the results of my spike with the DevExpress MVC
Extensions:
- They look really nice. Out of the box, the styles are really
nice so it makes it simple to add some quick hotness to your site.
- Custom styling isn’t fall-down easy. The controls can get a
little complex so you do need to look at using the DevExpress themes
that ship with the extensions, possibly with customizations. You
probably won’t be able to get by just throwing a couple of quick
overrides in a separate CSS file, and it may be a challenge to
figure out what to change to achieve the results you want.
- Simple use cases are a breeze. It was easy to sub the date
picker in as my date editor and just as easy to get validation
working in it.
- Damn, I love that date picker. I just wanted to throw that in
there again. I’d almost buy the package just for that really nice
date picker.
- The complex controls are very full-featured but can be complex to
work with. The GridView and HTML editor have a ton of fantastic
features, but they’re not really fall-down simple to work with.
While there are a lot of demos, figuring out what each line in the
demo does and whether or not it’s something you’re interested in
doing in your own code is a challenge. The documentation is
reasonable from an API standpoint but there could probably stand to
be a bit more “how to” style docs. Not just demos, but more
explanation of the various features, what they do, and how you use
them. Model binding, as you saw, was also a challenge in the more
complex controls (HTML editor), though hopefully that will get
easier as new versions are released.
- There’s still a touch of web forms in places. For example, the
GridView exposing data binding events, working with DataBinder.Eval,
and so forth, felt pretty web forms to me. I’m not sure what I’d
like to see instead, but you’ve probably read in places that “data
binding in MVC is a foreach loop” - it might be nice to see
something closer to that level of simplicity.
- Callback partial views can throw a wrench in the works. The
GridView and HTML editor, being AJAX-y controls, need partial views
that they can call back to and update their content. You saw how
this made using the HTML editor a bit of a challenge in an
EditorTemplate. I can see that it may get a little less than
straightforward in other areas, too.
- DevExpress support is awesome. I’ve had a great experience
working with the DevExpress folks - community, tech support, devs -
throughout my relationship with them using CodeRush and Refactor,
and using the MVC Extensions is no different. You get quick answers
in the forums, they’re receptive to input (they even filed an
enhancement request based on my forum
post!)… honestly, there
are a small handful of companies that are a joy to work with like
this. That counts for a lot.
Anyway, that was a bit longer than I thought it was going to turn out…
but hopefully that helps you on your way to cooler web sites.