
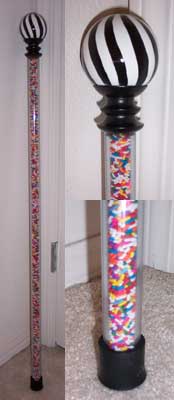
HOWTO: Willy Wonka Walking Stick
I finished up my Wonka walking stick for my Halloween costume so I thought I’d put out some instructions on how I did it. I’m pretty pleased with how it turned out.
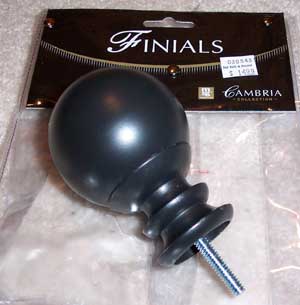
Parts (along with where I got them and my original cost): Cambria Gun Metal Paragon Finials (Bed Bath & Beyond)
- Set of 2, $15 White spray paint and spray primer (Fred Meyer) - $7 Harvel Clear PVC 3/4” Schedule 80 Pipe (ClearPVCPipe.com)
- $22.99 + $11.79 shipping Invacare 1” Cane Tips, Product #INV408504 (HealthFancy.com)
- $1.54 + $7.95 shipping Rainbow sprinkles, about half a pound (Winco Foods) - $0.75 Silica gel packets (Found 2 sitting around the house; look in shoe boxes, purses, bags, medicine bottles…) - Free Shoe Goo (Fred Meyer) - $3.95
First take the finials out of the package. You get two, you’ll only need one.
You’ll need to paint white swirling stripes on one of the finials. This is the hardest part of the whole project. I made a swirl template and measured out an even number of swirls, masked it off, primered it, painted it, and lacquered it. It took me several evenings to get it done, so don’t expect you’ll have it in an afternoon.
Note that the finial ball unscrews from the finial connector. You’ll need to disconnect the finial you’re painting from its connector.
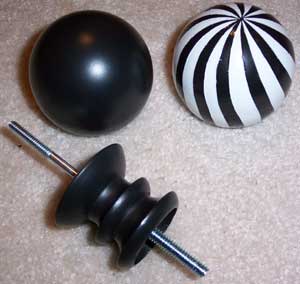
The screw that normally connects the finial to the curtain rod comes off the finial connector. Remove it, but leave the screw that connects the finial ball to the connector.
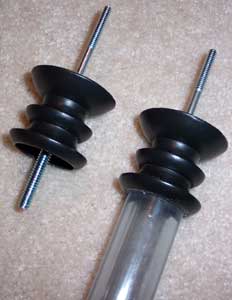
Now it’s time to cut the PVC pipe. To measure how long it needs to be, stand up and let your hands rest at your sides with a slight bend at your elbows, then have a friend measure from your wrist to the floor. That’s how long the total length of the walking stick should be. Subtract 3.5” from that for the height of the finial and that’s how long the PVC needs to be.
The PVC pipe fits inside the finial connector where the curtain rod would usually go, though there’s a tiny bit of room to spare around the edge. That’s okay. Use Shoe Goo to connect the clear PVC pipe to the finial connector. Don’t use too much or it gets all over, plus a lot will go up inside the tube and it won’t dry. That’s actually very problematic because if it doesn’t dry, you’ll never be able to turn the walking stick upright. I ruined a whole section of pipe by not realizing the Shoe Goo was too thick (and, thus, not realizing it wasn’t dry) and turning it over. A few hours later I came in to see a stream of Shoe Goo running down the inside of the tube and had to start over.
Let that dry with the finial connector at the floor and the pipe pointed upwards (the walking stick being inverted) for as long as you can. I left mine for three days. A day in or so, I took the screw that connects the finial ball to the connector and pushed it slowly into the tube through the connector just a short distance to stir around in any still-wet Shoe Goo in there (and there was some). I poked the screw through the dry layer of Shoe Goo to get air to the wet portion, then returned the screw to its original position. The point is, make absolutely sure the Shoe Goo is dry.
You may find it troublesome to have the screw poking out of the finial attachment and resting on the ground. Take a Dixie cup and poke a small hole in the center of the bottom, then put the screw through that. It makes it so the Dixie cup is sitting on the ground and the screw isn’t oddly positioned.
Once that’s dry, you can trim any excess Shoe Goo from around the finial connector with a knife and then connect your finished, painted finial ball to the walking stick.

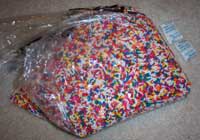
Now for the really easy part. Get the rainbow sprinkles and your silica gel packets out.
You see I have like two pounds of rainbow sprinkles there. You don’t need that much. I didn’t bother doing the math or anything, but about half a pound should do you.
Using a funnel, fill the cane up with rainbow sprinkles. Fill it all the way to the very end, leaving only about a millimeter or two of space. It should look like you don’t have enough room for the silica gel packets. Push them in the end of the cane, compressing the rainbow sprinkles. This tight fit will make it so the cane doesn’t rattle when you move it - you don’t want any extra space at all for the rainbow sprinkles to jiggle around in.
Now, pull one of the cane tips out of the box…
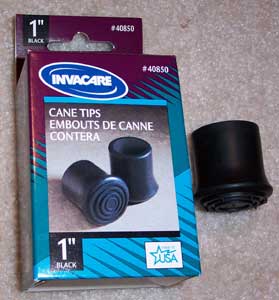
…and push it onto the end of the cane. It will be a pretty snug fit (the cane tips fit 1” canes and the outside diameter of the pipe is 1.05”), but it will go on nicely and won’t come off.
That’s it! You’re done!
I’ve seen a couple of links out there to more authentic looking walking sticks. Unfortunately, I had already invested the money in materials before I saw these, and I’m not sure how much they cost. Pending on your resources, you could probably make this version pretty cheaply.
You’ll note that both Schedule 40 and Schedule 80 clear PVC pipe exists. The difference is the wall thickness. The Schedule 40 pipe walls aren’t as thick as Schedule 80. While the 40 is cheaper, the 80 offers more stability, which I felt was key for use in a walking stick. The above stick is done with Schedule 80 pipe. If you choose to try and save money using Schedule 40 pipe, this should all still work, you’ll just need some more rainbow sprinkles because the inside of the pipe will have a larger volume.
UPDATE 10/02/05: The whole Wonka costume I made came out well. Here are the details.