windows, azure, security comments edit

I’ve been experimenting with Azure Active Directory Domain Services (currently in preview) and it’s pretty neat. If you have a lot of VMs you’re working with, it helps quite a bit in credential management.

However, it hasn’t all been “fall-down easy.” There are a couple of gotchas I’ve hit that folks may be interested in.

Active Directory Becomes DNS Control for the Domain

When you join an Azure VM to your domain, you have to set the network for that VM to use the Azure Active Directory as the DNS server. This results in any DNS entries for the domain - for machines on that network - only being resolved by Active Directory.

This is clearer with an example: Let’s say you own the domain mycoolapp.com and you enable Azure AD Domain Services for mycoolapp.com. You also have…

  • A VM named webserver.
  • A cloud service responding to mycoolapp.cloudapp.net that’s associated with the VM.

You join webserver to the domain. The full domain name for that machine is now webserver.mycoolapp.com. You want to expose that machine to the outside (outside the domain, outside of Azure) to serve up your new web application. It needs to respond to www.mycoolapp.com.

You can add a public DNS entry mapping www.mycoolapp.com to the mycoolapp.cloudapp.net public IP address. You can now get to www.mycoolapp.com correctly from outside your Azure domain. However, you can’t get to it from inside the domain. Why not?

You can’t because Active Directory is serving DNS inside the domain and there’s no VM named www. It doesn’t proxy external DNS records for the domain, so you’re stuck.

There is not currently a way to manage the DNS for your domain within Azure Active Directory.

Workaround: Rename the VM to match the desired external DNS entry. Which is to say, call the VM www instead of webserver. That way you can reach the same machine using the same DNS name both inside and outside the domain.

Unable to Set User Primary Email Address

When you enable Azure AD Domain Services you get the ability to start authenticating against joined VMs using your domain credentials. However, if you try managing users with the standard Active Directory MMC snap-ins, you’ll find some things don’t work.

A key challenge is that you can’t set the primary email address field for a user. It’s totally disabled in the snap-in.

This is really painful if you are trying to manage a cloud-only domain. Domain Services sort of assumes that you’re synchronizing an on-premise AD with the cloud AD and that the workaround would be to change the user’s email address in the on-premise AD. However, if you’re trying to go cloud-only, you’re stuck. There’s no workaround for this.

Domain Services Only Connects to a Single ASM Virtual Network

When you set up Domain Services, you have to associate it with a single virtual network (the vnet your VMs are on), and it must be an Azure Service Manager style network. If you created a vnet with Azure Resource Manager, you’re kinda stuck. If you have ARM VMs you want to join (which must be on ARM vnets), you’re kinda stuck. If you have more than one virtual network on which you want Domain Services, you’re kinda stuck.

Workaround: Join the “primary vnet” (the one associated with Domain Services) to other vnets using VPN gateways.

There is not a clear “step-by-step” guide for how to do this. You need to sort of piece together the information in these articles:

Active Directory Network Ports Need to be Opened

Just attaching the Active Directory Domain Services to your vnet and setting it as the DNS server may not be enough. Especially when you get to connecting things through VPN, you need to make sure the right ports are open through the network security group or you won’t be able to join the domain (or you may be able to join but you won’t be able to authenticate).

Here’s the list of ports required by all of Domain Services. Which is not to say you need all of them open, just that you’ll want that for reference.

I found that enabling these ports outbound for the network seemed to cover joining and authenticating against the domain. YMMV. There is no specific guidance (that I’ve found) to explain exactly what’s required.

  • LDAP: Any/389
  • LDAP SSL: TCP/636
  • DNS: Any/53

personal, gaming, toys, xbox comments edit

This year for Christmas, Jenn and I decided to get a larger “joint gift” for each other since neither of us really needed anything. That gift ended up being an Xbox One (the Halo 5 bundle), the LEGO Dimensions starter pack, and a few expansion packs.

LEGO Dimensions Starter Pack

Never having played one of these collectible toy games before, I wasn’t entirely sure what to expect beyond similar gameplay to other LEGO video games. We like the other LEGO games so it seemed like an easy win.

LEGO Dimensions is super fun. If you like the other LEGO games, you’ll like this one.

The story is, basically, that a master bad guy is gathering up all the other bad guys from the other LEGO worlds (which come from the licensed LEGO properties like Portal, DC Comics, Lord of the Rings, and so on). Your job is to stop him from taking over these “dimensions” (each licensed property is a “dimension”) by visiting the various dimensions and saving people or gathering special artifacts.

With the starter pack you get Batman, Gandalf, and Wildstyle characters with which you can play the game. These characters will allow you to beat the main story.

So why get expansion packs?

  • There are additional dimensions you can visit that you can’t get to without characters from that dimension. For example, while the main game lets you play through a Doctor Who level, you can’t visit the other Doctor Who levels unless you buy the associated expansion pack.
  • As with the other LEGO games, you can’t unlock certain hidden areas or collectibles unless you have special skills. For example, only certain characters have the ability to destroy metal LEGO bricks. With previous LEGO games you could unlock these characters by beating levels; with LEGO Dimensions you unlock characters by buying the expansion packs.

Picking the right packs to get the best bang for your buck is hard. IGN has a good page outlining the various character abilities, which pack contains each, and some recommendations on which ones will get you the most if you’re starting fresh.

The packs Jenn and I have (after getting some for Christmas and grabbing a couple of extras) are:

Portal level pack Portal level pack

Back to the Future level pack Back to the Future level pack

Emmet fun pack Emmet fun pack

Zane fun pack Zane fun pack

Gollum fun pack Gollum fun pack

Eris fun pack Eris fun pack

Wizard of Oz Wicked Witch fun pack Wizard of Oz Wicked Witch fun pack

Doctor Who level pack Doctor Who level pack

Unikitty fun pack Unikitty fun pack

Admittedly, this is a heck of an investment in a game. We’re suckers. We know.

This particular combination of packs unlocks just about everything. There are still things we can’t get to - levels we can’t enter, a few hidden things we can’t reach - but this is a good 90%. Most of the stuff we can’t get to is because there are characters where only that one character has such-and-such ability. For example, Aquaman (for whatever reason) seems to have one or two abilities unique to him for which we’ve run across the need. Unikitty is also a character with unique abilities (which we ended up getting). I’d encourage you as you purchase packs to keep consulting the character ability matrix to determine which packs will best help you.

I have to say… There’s a huge satisfaction in flying the TARDIS around or getting the Twelfth Doctor driving around in the DeLorean. It may make that $15 or whatever worth it.

If you’re a LEGO fan anyway, the packs actually include minifigs and models that are detachable - you can play with them with other standard LEGO sets once you get tired of the video game. It’s a nice dual-purpose that other collectible games don’t provide.

Finally, it’s something fun Jenn and I can play together to do something more interactive than just watch TV. I don’t mind investing in that.

In any case, if you’re looking at one of the collectible toy games, I’d recommend LEGO Dimensions. We’re having a blast with it.

personal comments edit

It’s been a busy year, and in particular a pretty crazy last-three-months, so I’m rounding out my 2015 by finally using up my paid time off at work and effectively taking December off.

What that means is I probably won’t be seen on StackOverflow or handling Autofac issues or working on the Autofac ASP.NET 5 conversion.

I love coding, but I also have a couple of challenges if I do that on my time off:

  • I stress out. I’m not sure how other people work, but when I see questions and issues come in I feel like there’s a need I’m not addressing or a problem I need to solve, somehow, immediately right now. Even if that just serves as a backlog of things to prioritize, it’s one more thing on the list of things I’m not checking off. I want to help people and I want to provide great stuff with Autofac and the other projects I work on, but there is a non-zero amount of stress involved with that. It can pretty quickly turn from “good, motivating stress” to “bad, overwhelming stress.” It’s something I work on from a personal perspective, but taking a break from that helps me regain some focus.
  • I lose time. There are so many things I want to do that I don’t have time for. I like sewing and making physical things - something I don’t really get a chance to do in the software world. If I sit down and start coding stuff, pretty soon the day is gone and I may have made some interesting progress on a code-related project, but I just lost a day I could have addressed some of the other things I want to do. Since I code for a living (and am lucky enough to be able to get Autofac time in as part of work), I try to avoid doing much coding on my time off unless it’s helping me contribute to my other hobbies. (For example, I just got an embroidery machine - I may code to create custom embroidery patterns.)

I don’t really take vacation time during the year so I often end up in a “use it or lose it” situation come December, which works out well because there are a ton of holidays to work around anyway. Why not de-stress, unwind, and take the whole month off?

I may even get some time to outline some of the blog entries I’ve been meaning to post. I’ve been working on some cool stuff from Azure to Roslyn code analyzers, not to mention the challenges we’ve run into with Autofac/ASP.NET 5. I’ve just been slammed enough that I haven’t been able to get those out. We’ll see. I should at least start keeping a list.

halloween, costumes comments edit

It was raining again this year and that definitely took down the number of visitors. Again this year we also didn’t put out our “Halloween projector” that puts a festive image on our garage. In general, it was pretty slow all around. I took Phoenix out this year while Jenn answered the door so I got to see what was out there firsthand. Really hardly anyone out there this year.

Trick-or-Treaters

2015: 85
trick-or-treaters.

Average Trick-or-Treaters by Time Block

The table’s also starting to get pretty wide; might have to switch it so time block goes across the top and year goes down.

Cumulative data:

  Time Block
Year 6:00p - 6:30p 6:30p - 7:00p 7:00p - 7:30p 7:30p - 8:00p 8:00p - 8:30p Total
2006 52 59 35 16 0 162
2007 5 45 39 25 21 139
2008 14 71 82 45 25 237
2009 17 51 72 82 21 243
2010 19 77 76 48 39 259
2011 31 80 53 25 0 189
2013 28 72 113 80 5 298
2014 19 54 51 42 10 176
2015 13 14 30 28 0 85

Costumes

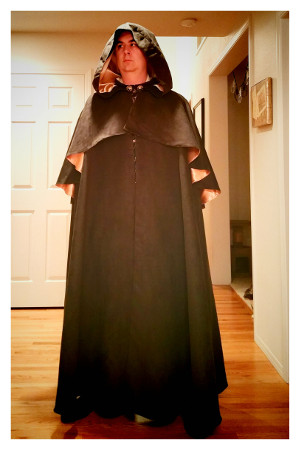
My costume this year was Robin Hood. Jenn was Merida from Brave so we were both archers. Phoenix had two costumes - for trick-or-treating at Jenn’s work she was a bride with a little white dress and veil; for going out in the neighborhood she was a ninja.

The finished Robin Hood costume

Costume with the cloak closed

I posted some in-progress pictures of my costume on social media, but as part of the statistical breakdown of Halloween this year I thought it’d be interesting to dive into more of exactly what went into the making outside of the time and effort - actual dollars put in.

On my costume, I made the shirt, the doublet, the pants, and the cape. I bought the boots, the tights, and the bow.

Accessories and Props

Let’s start with the pieces I bought:

Total: $99.10

The Shirt

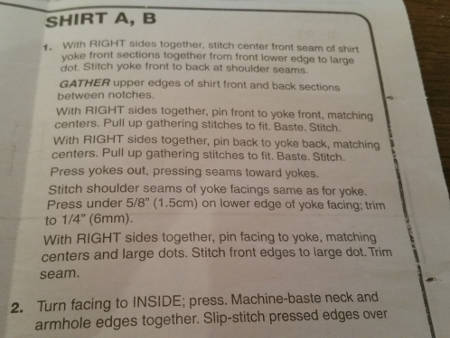
The shirt is made of a gauzy fabric that was pretty hard to work with. The pattern was also not super helpful because you’d see “a step” in the pattern consisting of several actions.

Confusing shirt pattern

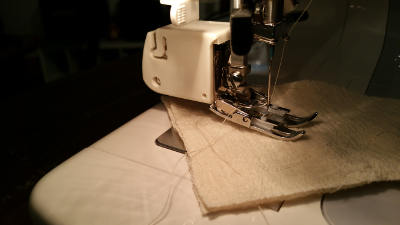
I did learn how to use an “even foot” (sometimes called a “walking foot”) on our sewing machine, which was a new thing for me.

Even foot on the sewing machine

  • Shirt, doublet, and pants pattern - $10.17
  • Gauze fabric - $6.59
  • Thread - $3.29
  • Buttons - $5.99
  • Interfacing - $0.62

Total: $26.66

The Pants

I don’t have any in-progress shots of the pants being made, but they were pretty simple pants. I will say I thought I should make the largest size due to my height… but then the waist turned out pretty big so I had to do some adjustments to make them fit. Even after adjusting they were pretty big. I should probably have done more but ran out of time.

  • Shirt, doublet, and pants pattern - (included in shirt cost)
  • Black gabardine fabric - $23.73
  • Thread - $4.00
  • Buttons - $1.90
  • Eyelets - $2.39
  • Ribbon - $1.49
  • Interfacing - (I had some already for this)

Total: $33.51

The Doublet

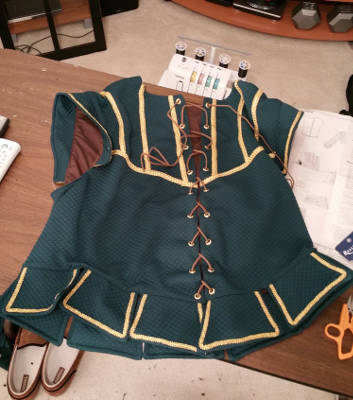
The doublet was interesting to make. It had a lot of pieces, but they came together really well and I learned a lot while doing it. Did you know those little “flaps” on the bottom are called “peplum?” I didn’t.

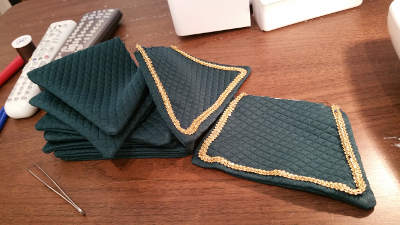
I hadn’t really done much with adding trim, so this was a learning experience. For example, this trim had a sort of “direction” or “grain” to it - if you sewed with the “grain,” it went on really smoothly. If you went against the “grain,” the trim would get all caught up on the sewing machine foot. I also found that sewing trim to the edge of a seam is really hard on thick fabric so I ended up adding a little margin between the seam and the trim.

Putting trim on the body of the doublet

These are the peplums that go around the bottom of the doublet. You can see the trim pinned to the one on the right.

Sewing peplums

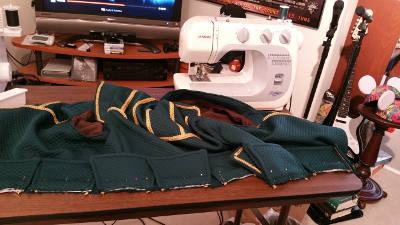
Once all the peplums were done, I pinned and machine basted them in place. Getting them evenly spaced was a challenge, but it turned out well.

Pinning peplums

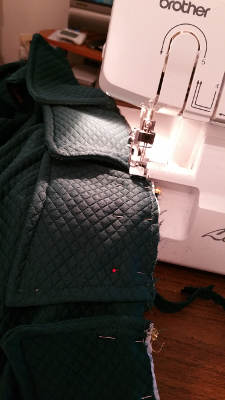
After the machine basting, I ran the whole thing through the serger which gave them a strong seam and trimmed off the excess. This was the first project I’d done with a serger and it’s definitely a time saver. It also makes finished seams look really professional.

Serging peplums

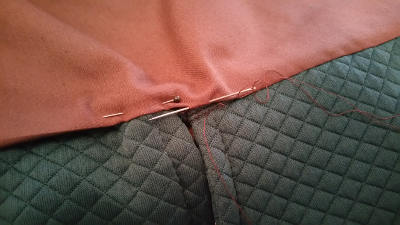
To cover the seam where the peplums are attached, the lining in the doublet gets hand sewn over the top. There was a lot of hand sewing in this project, which was the largest time sink.

Slip-stitching the doublet lining

Here’s the finished doublet.

The finished doublet

  • Shirt, doublet, and pants pattern - (included in shirt cost)
  • Quilted fabric (exterior) - $15.73
  • Brown broadcloath fabric (lining) - $5.99
  • Thread - $8.29
  • Eyelets - $8.28
  • Trim - $23.95
  • Leather lacing - $2.50
  • Interfacing - $6.11

Total: $70.85

The Cape

The cape was the least complex of the things to make but took the most time due to the size. Just laying out and cutting the pattern pieces took a couple of evenings.

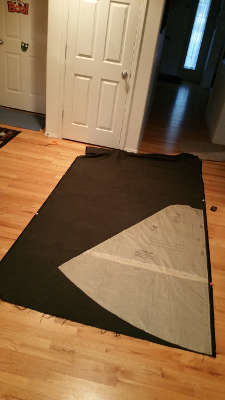
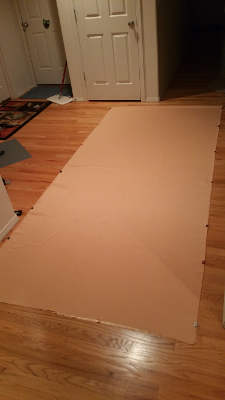
As you can see, I had to lay them out in our hallway.

Cutting the exterior cape pieces

I learned something while cutting the outside of the cape: The pattern was a little confusing in that the diagrams of how the pattern should be laid out were inconsistent with the notation they describe. This resulted in my cutting one of the pattern pieces backwards and Jenn being kind enough to go back to the fabric store all the way across town and get the last bit of fabric from the bolt. I was very lucky there was enough to re-cut the piece the correct way.

I used binder clips on the edges in an attempt to stop the two fabric layers from slipping around. It was mildly successful.

Cutting the cape lining

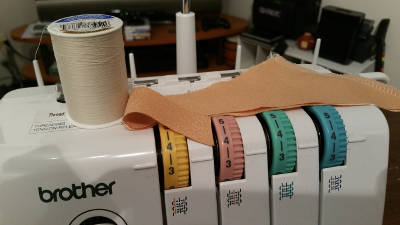
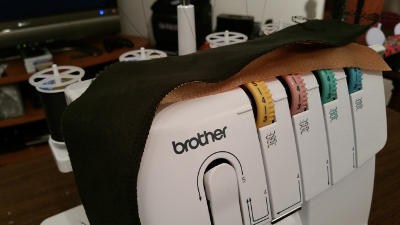
I found with the serger I had to keep close track of the tension settings to make sure the seams were sewn correctly. Depending on the thread and weight of the fabric being sewn, I had to tweak some things.

To help me remember settings, I took photos with my phone of the thread, the fabric being sewn, and the dials on the serger so I’d know exactly what was set.

Here are the settings for sewing together two layers of cape lining.

Cape lining serger settings

And the settings for attaching the lining to the cape exterior.

Serger settings for attaching lining to cape exterior

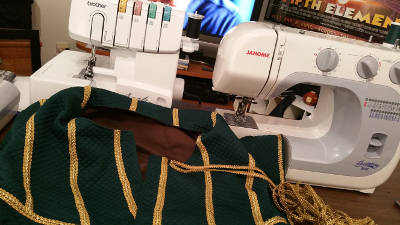
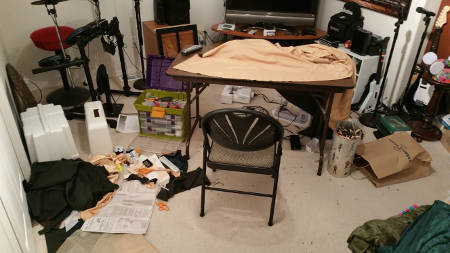
I took a shot of my whole work area while working on the cape. It gets pretty messy, especially toward the end of a project. I know where everything is, though.

You can also see I’ve got things set up so I can watch TV while I work. I got through a couple of different TV seasons on Netflix during this project.

My messy work area

One of the big learning things for me with this cape was that with a thicker fabric it’s hard to get the seams to lay flat. I ironed the junk out of that thing and all the edge seams were rounded and puffy. I had to edgestitch the seams to make sure they laid flat.

Edge stitching the cape hem

  • Green suedecloth (exterior) - $55.82
  • Gold satin (lining) - $40.46
  • Dark green taffeta (hood lining) - $5.99
  • Interfacing - (I had some already for this)
  • Thread - $11.51
  • Silver “conchos” (the metal insignias on the neck) - $13.98
  • Scotchgard (for waterproofing) - $5.99

Total: $133.75

Total

  • Accessories and props - $99.10
  • Shirt - $26.66
  • Pants - $33.51
  • Doublet - $70.85
  • Cape - $133.75

Total: $363.87

That’s probably reasonably accurate. I know I had some coupons where I saved some money on fabric (you definitely need to be watching for coupons!) so the costs on those may be lower, but I also know I had to buy some incidentals like more sewing machine needles after I broke a couple, so it probably roughly balances out.

I get a lot of folks asking why I don’t just rent a costume. Obviously from a money and time perspective it’d be a lot cheaper to do that.

The thing is… I really like making the costume. I’m a software engineer, so generally when I “make something,” it’s entirely intangible - it’s electronic bits stored somewhere that make other bits do things. I don’t come out with something I can hold in my hands and say I did this. When I make a shirt or a costume or whatever, there’s something to be said for having a physical object and being able to point to it and be proud of the craftsmanship that went into it. It’s a satisfying feeling.

home comments edit

At home, especially after a long day, I’ve noticed my phone may be low on power even though I’d like to continue using it. All of our chargers are in rooms other than the living room where we spend most of our time and I didn’t want to move one into the living room because I didn’t want cords all over the place or a bajillion different things to plug in.

I finally figured out the answer.

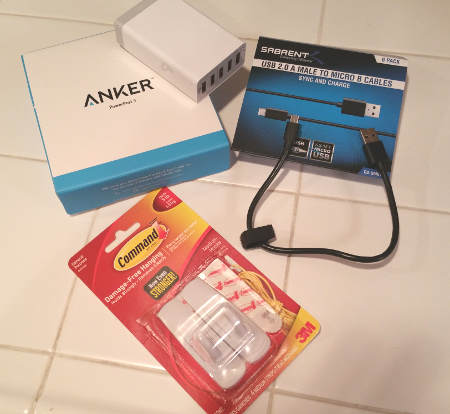
Materials

Charger, cables, and adhesive

Assembly

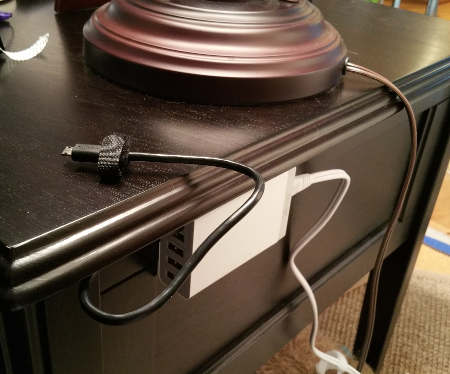
Use one of the Command strips to affix the USB charger under the lip on the back of your end table. I went with Command strips because they’re reasonably strong but generally won’t ruin the finish on your table because they can be easily removed.

Plug one or more of the one-foot cables into the charger.

If you get the Sabrent USB cables I mentioned earlier, they have a little bit of Velcro on them you can use to your benefit. Put a little Velcro under a nearby area of the table and push the Velcro tie on the USB cable to the end. You can then attach the end of the cable in easy reach from your couch using the Velcro.

Charger attached to the back of the table

Usage

The nice thing about this is it’s entirely unobtrusive. Charge your phone on the end table while you’re sitting and watching TV, but when you’re done you can drop the cable back behind the table (it’s only a foot long so it won’t drag on the ground or look messy); or if you have the Velcro you can affix the cable under the lip of the table in easy reach for the next usage.

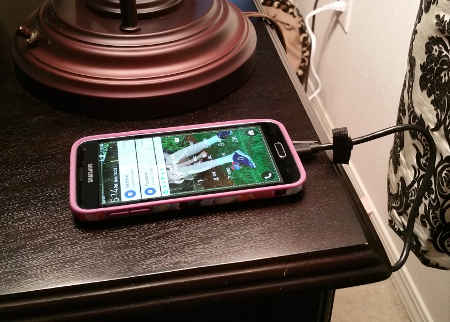
Charging a phone